The basics of reflection probes
A reflection probe captures an image of the world around it and stores it into a "cubemap" - a six-sided texture that can fill every side of a cube.
Each side of the texture is square, and of the same resolution. This means a "512" resolution probe is six 512x512 textures, compacted together. This takes up 2MB of space and 2MB of memory.
Reflection probes also store lower-resolution versions of their textures. These lower-resolution copies are blurred, and allow for the representation of rough or uneven surfaces realistically.
As objects are rendered in the scene, they will be asking Unity "what reflection probe am I in?". Unity will provide them the texture and location of the two closest probes to their anchor position, and the shader will blend between them. If only one probe is available, Unity only will send one.
In addition to reflection probe objects, each scene has an "environment reflection", which is provided when no reflection probes are nearby. This is typically generated from the skybox material, but can be overridden manually.
An example of a reflection probe texture

In this image, you can see the contents of a reflection probe. Typically, reflection probes are stored uncompressed with all their faces laid out like this, but Unity will automatically combine them when importing them or any other cubemap texture laid out the same way. You can see that the probe in this example contains a building, a sky above, and an exterior area. Even though the probe is only 512 pixels on each side, it is still pretty sharp and contains a reflection that looks accurate and sharp in realtime.
How do they work for dynamic objects, like players?
Dynamic objects use the probes closest to their anchor position on their mesh.
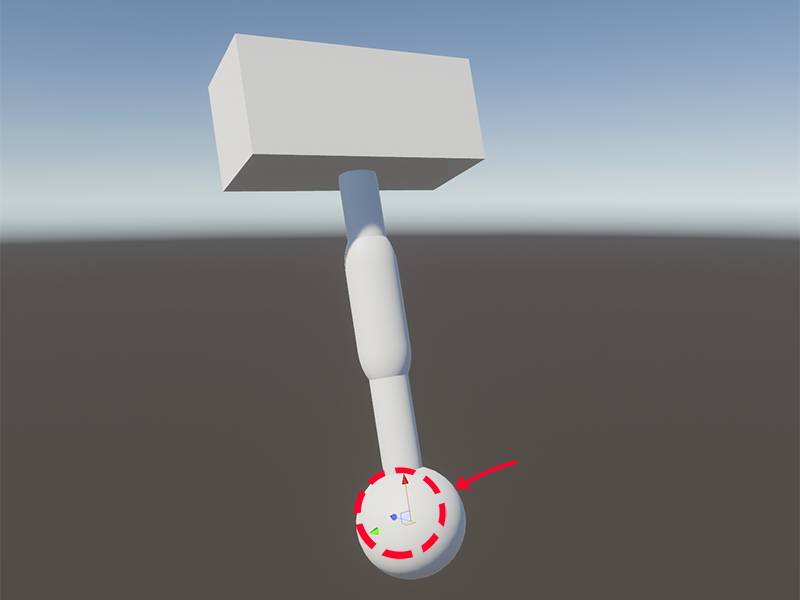
In this image, you can see the anchor point of an object. It's at the root of the object, rather than the middle as you might expect.
This object's anchor is, in fact, where the red arrow is pointing - even though the centre is elsewhere. Unity will use that position to pick the reflection probes for the model. This position is, by default, the "origin" of the mesh - the point at (0, 0, 0) that every vertex is placed around.
You can override this by setting a GameObject in the "Anchor Override" field on the Mesh Renderer.

How do they work for static objects, like the map?
They work the same as for dynamic objects. This, however, can cause some problems.
Unity has static batching, which combines multiple models into a single mesh, and renders them in a single draw call.
However, Unity will not combine objects affected by different probes.
You can partially work around this with Anchor Overrides. Objects using the same Anchor Override will sometimes be batched together. Unity will often fail to batch them together, though, so in these cases you'll be required to merge the meshes manually to regain performance.
What do shaders do with reflection probes?
For the most part, shaders will follow what the Unity Standard shader does. Unity offers some functions that let any shader use parts of Standard to provide the same reflections as Standard does, or access the data to do it themselves.
As noted before, Unity will provide them the texture and location of the two closest probes to their anchor position, and the shader will blend between them using some handy functions Unity provides which most shaders will make use of.
In Standard, the occlusion map is used to define areas that can't normally be reached by light, which will make those parts reflect less light and dampens the effect of reflections.
No Comments