Setting up post-processing in your scene
Okay, now you have it installed, let's go over the basics of using post-processing. First, we need to cover post-processing volumes and how they work.
Note: 1's VRWorld Toolkit can set up post-processing for you! I recommend using it to install it and set it up in your scenes.
There are two main components to be aware of when setting up post-processing:
-
Post Processing Layer, which goes on the camera and receives post processing. When you add this to your camera, it sets the camera as the Layer Trigger, which interacts with...
-
Post Processing Volume, which goes in the map and presents post processing. When a Layer Trigger is inside a volume, it will gain that volume's assigned post processing. You can have several volumes in your map with different colour grading settings, or even create adjustable graphical options by animating or toggling objects!
A volume with a collider/trigger component will affect anything inside it. You can set the width of the transition from not applied to applied here, too.
A volume set to Global will cover the entire map. This means you can modify post processing from triggers and animations through volumes!
The volume intensity slider can be animated. This means you can have post processing tied to triggers that animate the intensity of a volume.
And how do you set this up? First, let's cover adding a global scene profile.
-
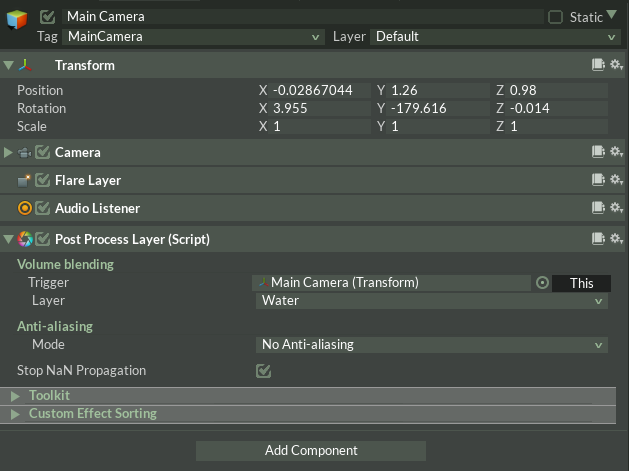
Add a Post Processing Layer to your Main Camera. The Layer is what receives the post processing. Note that the Trigger is automatically set to your camera. This means the Camera position is what controls what the post-process layer uses up.

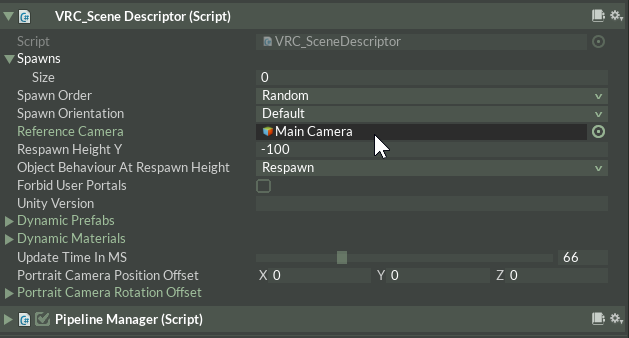
Make sure this camera is set as the Reference Camera in the VRC_Scene Descriptor.

Also, you will need to decide on a Layer - as in, a regular Unity Layer - for your Post Processing Layer to process. This is important, because without a Layer set it won't see your Post Processing Volumes. All your Volumes will need to be assigned this Layer in Unity. Because the post processing system will be scanning all objects on this layer, I recommend something that doesn't have many other objects on it - here, we'll use Water.
Note: Set Anti-aliasing to "No Anti-aliasing". Don't change it. Using anything else can cause brain-searing double vision in VR in the worst case, and glitchy flashing transparency in the best case. VRC already enables anti-aliasing.
-
Create a new GameObject in your scene, and add a Post Processing Volume component to it. Tick the box for Is Global.
Note: You can't have a volume and layer on the same object. Make sure this object isn't a child of your camera, or you'll run into issues.
-
I've made a sample profile to make things easier. You can download it here! (Right-click and Save As...) Drop it in your Assets folder, and then drag and drop it into your Post Processing Volume.
-
We're done! You should see a noticeable difference in your scene now.
Keep reading to see how to set up post-processing volumes that cover specific areas.
2 Comments
How to get Silent to contribute to the wiki:
Jokes aside, this is my MOST visited guide whenever I start on a new work. Nice work!
That package URL doesn't seem to be working for me - though I might have misconfigured something on the wiki. Hmmm!
I'll have to come back and reupload that later...