Materials
The following section on materials will cover what is needed to know for both avatars and worlds.
Specifics for avatars and worlds will be covered in their respective sections.
How colorColor or detail is applied to the mesh.mesh by using a material. It combines a shader and textures.
If a part of your model is a shadeless magenta, something is wrong with the material slot (typically a referenced shader is missing) or there is no material applied to that part of the model.
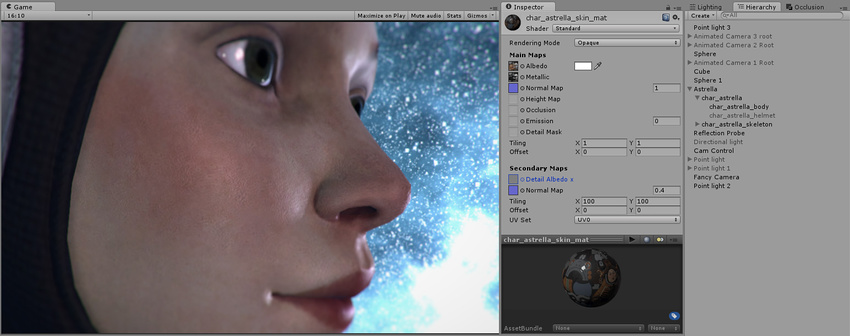
To create a material in Unity, right click in the project window>New>Material. The default shader is the Standard shader, which is a physically based, or PBR shader.
Shader
Component of a material which determines how it interacts with light. The 2 types of shaders you will work with in VRChat most often are StandardPBR shaders for photorealism, and toon shaders (for a cartoontoon or anime look).VRChat’s shaders are good if you can use them, mainly Standard Lite and Toon lit, because only VRChat’s shaders work with Oculus Quest and they are very light on performance.
Unity's standard shader lacks a lot of features and also has a weird way of dealing with a very important map
If you need a more robust and versatile toon shader than VRChat’s official one, they recommend the 3 below:
I would recommend Poiyomi because it is the most widely adopted, has the most features and has an extensive video documentation.
The Unity standard shader has 2 sliders, one metallic (should only be used if the material is a metal) and the smoothness slider, used to tell the material how much light it should diffuse or reflect. These 2 principles are part of PBR, or Physically Based Rendering.look.
Watch the video below as it will help you out withunderstand the textures section (skip to 57s).better.
TL;DR everything reflects and absorbs some light, so you should never set the slider to exactly 0 nor 1. You should try to get as close as you can to the material preview image using the metallic and smoothness sliders.
DON’T GO OVERBOARD WITH THE SMOOTHNESS! If a material isn’t shiny (like unpolished wood or brick), don’t make it overly shiny! It will just look wet or wrong!To be Oculus Quest compatible, every material must use one of the VRChat shaders provided in the SDK for the Oculus Quest version of your avatar/world.You may want to use the VRChat shaders for PC sometimes, as their performance cost is very low (because they are variants of shaders for mobile).
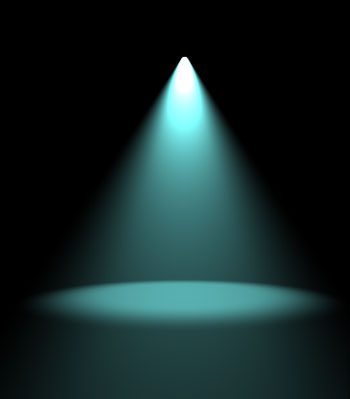
You may also want to use custom shaders for particular effects, like a water shader or a faked volumetric lighting shader to make a light source really pop.
^ Faked volumetric lighting, using a shader, a light source and a cone mesh.light.
Textures/Maps
The 2D images a material combines which are projected onto the triangles.
Projected onto those triangles are textures (AKA maps), which are 2D images. Unity utilizes several different types of textures, combined into a material, which you can then apply to a 3D model.
Texels (texture pixels)
Texture types:
Albedo (AKA basecolor) texture
AThe picturecolor of athe surface, but with all the shading information removed. This is the most clearly visible texture.
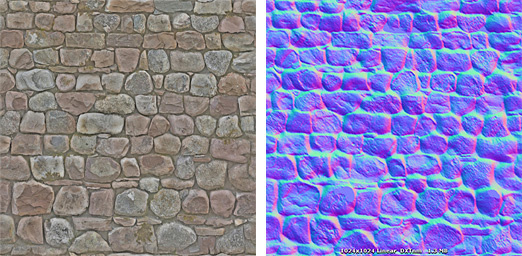
Normal map
A mostly blue-purple image, which fakes 3D by altering the angle (the normal vector) at which light reflects off of the surface (at a specific texel).
Originally posted by docs.unity3d.com:
A stone wall texture and its corresponding normal map texture
Height (AKA displacement) map
This texture insets or extrudes different parts of the material. In Unity you should typically set this pretty low or else looking at the material at an angle will ruin the effect, which is especially noticeable in VR.
Originally posted bydocs.unity3d.com:“From left to right in the above image: 1. A rocky wall material with albedo assigned, but no normalmap or heightmap. 2. The normal assigned. Lighting is modified on the surface, but rocks do not occlude each other. 3. The final effect with normalmap and heightmap assigned. The rocks appear to protrude out from the surface, and nearer rocks seem to occlude rocks behind them.”
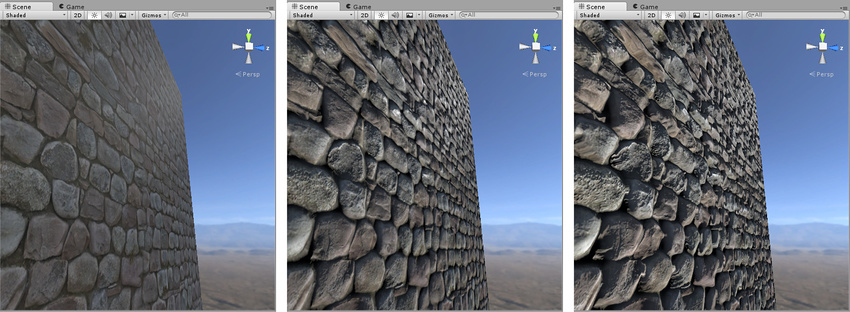
Displacement maps are calculated using parallax mapping in Unity. This is a low-performance real-time approximation but also the least accurate, and the illusion breaks at intense angles. Using shaders like Mochie's standard allow you to control how many "steps" the parallax mapping has.
Occlusion (AKA Ambient Occlusion, AO) map
Puts indirect shading information into the material, simulating parts where it would be harder for light to escape. Separating the occlusion map from the albedo map allows for more intricate shading according to the lights in the scene.
Smoothness map
Controls how clear the reflections in a material are. Unity has a really weird way of handling these, and because the industry standard is roughness maps, not smoothness maps, I would recommend using an alternative more feature packed PBR shader such as Mochie standard.
DON’T GO OVERBOARD WITH THE SMOOTHNESS! If a material isn’t shiny (like unpolished wood or brick), don’t make it overly shiny! It will just look wet or wrong!
Metallic map
ThisDefines may be in your material, and should only be used in Unity if differentwhich parts are different amounts of metallic. If it is a solid color texture, don’t use it, and just use the metallic slider to get as close as you can to the material preview.are metallic.
Specular Map
For use with the alternative specular workflow. UseI would only recommend this workflow onlyto beginners if your material comes with a specular map (typically grayscale) that isn’t just one solid color. I would not recommend using the specular workflow unless you know what you are doing.map.
Emission map
When activated, the emission property of the material is used to define the intensity and color of light it emits. The emission map is used to define how the emission is different across the material.
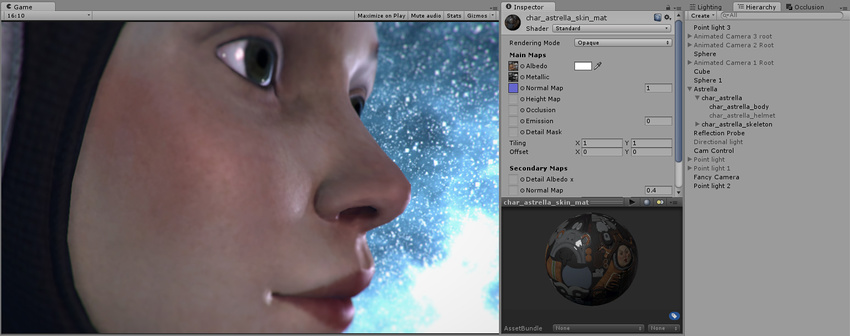
Secondary Maps (Detail Maps) & Detail MaskUsed for extra detail or imperfections, such as cracks or scratches in a surface or the tiny pores of skin. Originally posted by docs.unity3d.com:This character has a skin texture map, but no detail texture yet. We will add skin pores as a detail texture.The end result, the character now has subtle skin pore detail across her skin, at a much higher resolution than the base Albedo or Normal map layer would have allowed.Detail textures can have a subtle but striking effect on the way light hits a surface. This is the same character in a different lighting context. You can find many separate surface imperfection maps.
Thickness mapUsed for subsurface scattering, to simulate when light passes through a material. A great example of when to use it is for skin, leaves or cloth.You can generate this map by inverting the normals and baking ambient occlusion.You will need a custom shader to apply it, like Poiyomi, or both Silent's photorealistic and toon shaders.
Diffuse map
A base color map with balanced shading (no clearly directional light source). This is the texture you would get if you simply took a picture of a surface. If a model only has one texture then it would be considered a diffuse texture (you will find this a lot on toon shaded models).
This texture has fallen out of favor in the PBR workflow for the albedo and ambient occlusion texture combination, which allows for more variable shading of a material and better compression when using multiple albedo maps (like for different skins).
You can read a more in-depth guide on PBR shading written by Silent here.
UV mapping
Specifies how the 2D textures should be projected onto the faces.
Originally posted by Wikipedia:
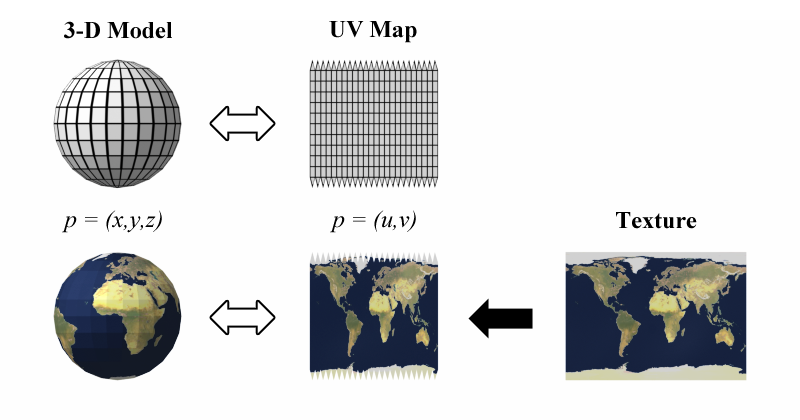
The best way to think of it is that your mesh is made of paper, and you have to decide where you want the cuts in order to lay it flat.
UV stands for the vertical and horizontal axes U & V, since W,X,Y & Z are already used.
Unity Texture settings:
Types
- Default- all the textures on a material except the normal map(s)
- Normal-
used exclusively fornormal maps must be set to this in order to function properly - Sprite- if you want to have a 2d image displayed in 3D space (ie use it for a picture hanging on a wall)
Should be disabled on grayscale textures (e.g. Heightheight, andAO, AO)metallic) or else they won’t function properly!!!
If the texture looks too blurry from a distance, try changing the filtering algorithm from Box to Kaiser.
MipMapping Explained
Filter Mode
Set to Trilinear for the best result.
Aniso Level
Makes textures not appear blurry when viewed from angles. I would recommend setting it to 16.
In Unity the setting is a slider but only works in powers of 2. If it is set to a non power of 2, it will go down to the next lowest power of 2 (e.g. 10 would go down to 8).
Texture compression settings
Max resolution
The maximum resolution the texture renders at.
For world textures I typically wouldn’t recommend setting it higher than 1K (1024x1024).
Crunch compression
A lossy compression algorithm. I would recommend setting it to around 20 for the best compromise between file size and quality.