Lighting
Types of lighting:
- Real-time- calculates lighting every frame
- Baked- pre-calculates lighting on the editor’s computer and generates light maps (textures that contain lighting and shading) which are overlaid on those objects
- Mixed- combination of baked for static objects and real-time for dynamic objects
Types of lights:
- Directional - Essentially the sun. There should be no more than 1 per scene. [Its rays are infinite, so its position does not matter but its rotation does.]
- Point - projects light outward in all directions from the center. Simulates a lightbulb.
- Spot - projects light outward from the center in a cone. Simulates a spotlight.
- Area - projects light outward from a 2D rectangle or circle. Simulates a ceiling office light.
ALL LIGHTING SHOULD BE BAKED! NO REAL-TIME NOR MIXED LIGHTS SHOULD BE USED IN A VRCHAT WORLD!
[Real-time lights in VRChat they will either look terrible, tank your framerate, usually both.]
So how do you light dynamic objects? Light probes. These probes pre-calculate how an object would be lit at that probes location. Many of these probes are placed in a group, and when dynamic objects move through this group they blend the probes and are lit accordingly.

Reflection probes
[docs.unity3d.com]
Used for reflections. They act as a camera, taking 6 pictures from where they are placed (the 6 directions) and combining that data into a cubemap (a spherical image). Overlapping reflection probes blend.
DO NOT use screen space reflections in VR.

Reflection Probe Guide[gitlab.com]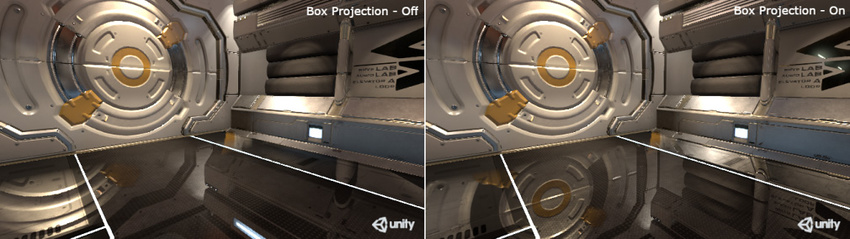
Lighting settings
Go to Window>Rendering>Lighting Settings to bring up the window.
If your scene is completely indoors with no windows, turn off the skybox lighting.
If it is an outdoor scene, turn skybox lighting on and set the directional light source in the lighting settings.
Texels per unit
Texels are like pixels placed onto an object, and used to calculate the baked lighting. For many PC worlds I find ~30 texels per unit to be a sufficient compromise between quality and size.
Have your lights set to cast soft shadows.
To actually see how the lightmap texels will be projected onto your geometry, you can click the dropdown at the top of the Scene window (the one that is usually set to "Shaded") and set it to "Baked Lightmap".
To change the lightmap UVs of your mesh, you can do so in the model settings (click on the model in the Project window and change the Generate Lightmap UVs settings at the bottom of the Model tab).
[While some objects with short shadows may be more accurately lit with hard shadows, soft shadows are more accurate across longer distances and look better at lower texel resolutions. Unity doesn’t include adaptive shadows out of the box like PCSS (Percentage Closeness Soft Shadows).
Next time you go in the sunlight, look at your shadow. Look at how the edges are sharp close to the origin (your feet) and get blurrier as you go up! That’s what techniques like PCSS emulate.]
Do not overuse texels! The more texels you have, the larger in file size your lightmap(s) will be!
https://unity3d.com/how-to/progressive-lightmapper-optimization-tips
There are some situations where you would want to have a higher texel count because of overlapping lightmapping UVs (common with probuilder objects). UV overlap[docs.unity3d.com]
In your level design, avoid putting detailed shadows on the floor or low on the walls if your lighting is baked; the non-static models walking on top of those shadows won’t have those detailed shadows projected onto them.
Lightmap resolution
Controls the maximum resolution of the lightmap(s). Set it so that you only have one lightmap for optimal performance.
Bounces
Controls how many bounces a light ray will perform. [These take a long time to bake]
Most scenes shouldn’t need more than 2. [Exceptions would be scenes lit entirely indirectly.]
Have you ever pulled on a door handle, only when you should have pushed? Level design, like door design, is best when you never even notice it.Through level design you can make people perform actions subliminally. It may sound obvious, but people won’t do what they can’t do.As a level designer it’s your job to form your levels in such a way that you get people to do what you want them to without them even realizing it.For example, don’t want people to congregate around a certain area (like the stairs)? Through design, you can make it far less likely that people will gather there (like by making it smaller and less inviting than the areas around it).Through design you can greatly influence how players act.Recommended videos:
ExpectedDeliberateConsistentShortPerformed entirely with artificial locomotion (thumbstick or jumping, ideally just one and not both simultaneously for greatest comfort)
VRChat has a layer called Walkthrough; if you set an object to this layer, physics objects will still collide with it but players will pass through. I would recommend setting much of the furniture to this layer.{If you’re super interested in level design, you can read this 123-page document on the topic by industry experts[docs.google.com].}