Guide
Why?
For live streams, you must use AVPro, but AVPro does not and will not support audio filters per this VRChat Canny. For live-music venues and worlds, who by nature typically care about audio, this is a problem because being able to apply audio effects is a great addition. Many worlds have excellent visuals, world design, detail, etc. but have very basic audio. I hope to share a little knowledge to help with this. It would be nice to be able to have a low-pass filter applied in a bathroom, or when you approach the main venue area - hearing the bass rumble and increase in volume as you walk up. But with this method, in theory, you can apply a limited number of arbitrary effects to your live streams.
Work Around
A very naïve, initial thought it to just have multiple audio streams into the world each with whatever audio data you want - but syncing those _perfectly_ would never happen. However, AVPro supports up to 8 audio channels, we can use those to carry other audio. There are many use cases and directions this can go, which I'll only touch on briefly. One use-case is carrying multi-lingual audio streams, where each channel (or pairs if you want stereo) can carry a different language. Another use case could be to use the audio stream to carry data to control lighting, or effects in the world. This book will cover applying a low-pass filter to a third audio channel, as I think that is a common "want" in many music venues. As this is a WIP, I hope to expand this to apply any arbitrary filter to any channel. Side note: I'm told if using RTSP there is a limitation of only 5 channels, so another protocol would need to be used if more is desired. MPEG-2, for example should support all 8 channels that AVPro can handle.
How
Making multi-channel audio streams is a pain unfortunately. Specifically because we want to apply an effect to only select channels, most software doesn't support this. There are two methods this will include, although I'm sure there are more.
Reaper DAW
Using a Digital Audio Workstation program like Reaper is capable of doing this. This a paid product, but has a free trial. During installation there is an optional checkbox to install ReaRoute which is required to make this work. This method required using a custom OBS fork that supports multi-channel audio found here, in conjunction with a custom audio driver ASIO4All, and lastly a plugin for OBS that can take advantage of the ASIO audio source called obs-asio.
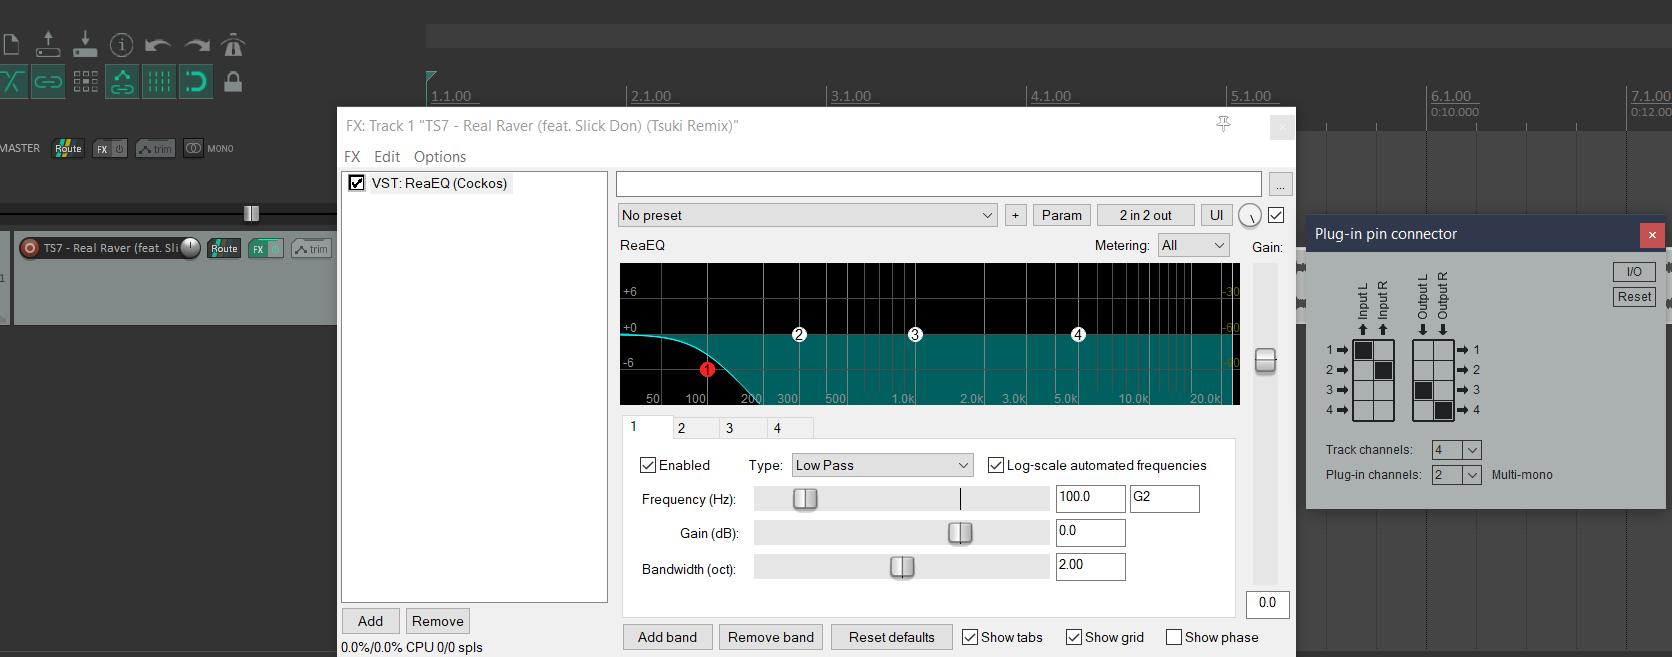
These introduction videos to Reaper multi-channel audio show you pretty much all you need to know to make this happen (pt1 and pt2). Those videos just show simple up-mixing, routing, and typical surround sound features, but to do something like applying an effect to only certain channels is only slightly different. Instead of applying a ReaSurround filter, you can do something like adding a ReaEQ FX on a track, then for example set the "Plugin pin connector" to use channel 1 & 2 as input, and channel 3 & 4 as output. This would: duplicate channel 1&2 to 3&4, and apply whatever EQ effects you have to only channels 3&4. See the image below for an example setup.
< TODO talk about using ReaRoute to route your output to the ASIO4All driver/audio source. Mapping channels to outputs. Then OBS you can read those inputs/channels and set them accordingly>
This method is a lot to setup though, but it does work. I would still like to explore using Reaper to just read from a stream and pushing this out another stream i.e. receive a Twitch stream, manipulate audio, and push back out to either Twitch or VRCDN or something else. This method is unsustainable for multi-artist music venues otherwise as it's just not feasible to ask each artist to go through this kind of setup.
Nginx RTMP
A some-what better solution is to just host your own RTMP server. Part of this WIP is trying to make this as easy to adopt as possible. Although setting up a server is a big ask, very low processing power is needed for simple EQ effects. A Raspberry Pi could handle this with ease. Setting up Nginx is as easy as a few commands as well. The huge benefit of this method is that artists can simply point their OBS towards your server, and everything will just work. I detect no noticeable latency or degradation in anyway by using this "middle man" audio processing. Artists will of course incur a latency penalty from connecting to your server first, just whatever ping time between the artist and the server.
< TODO go over setting up Nginx, using ffmpeg, and pushing back out to VRCDN or something else>
OBS --> Nginx RTMP --> ffmpeg up-mix --> VRCDN
Nginx setup is very simple, just add this into /etc/nginx/nginx.conf
rtmp {
  server {
    listen 1935;
    ping 30s;
    chunk_size 4096;
    # allow publishing from your own network
    allow publish 192.168.1.0/24;
    # allow publishing from another IP.
    allow publish 1.2.3.4;
    deny publish all;

    notify_method get;

    application ingest {
      live on;
      allow play all;
      exec /home/username/rtmp/start_stream.sh $name;
      exec_kill_signal term;
      record off;
   }
  }
}
Then the "exec" script is what does the magic. Nginx will execute this script on stream start, and kill it when the stream disconnects. This is very handy. The script it executes:
#!/bin/bash

echo "$(date +"%Y/%m/%d %H:%M:%S"): starting"
# This is ultimately the code that runs on stream stop. This kills all children of this script
on_die() {
  # kill all children
  pkill -KILL -P $$
}
# Nginx will trigger this trap on stream end
trap 'on_die' TERM

# read in raw stream, upmix stereo to 5.1
echo "Upmixing to 5.1 surround and pushing to VRCDN"
ffmpeg -i rtmp://192.168.1.31/ingest/test \
        -err_detect ignore_err \
        -filter_complex "[0:a]pan=5.1(side)|FL=FL|FR=FR|LFE<FL+FR|SL=FL|SR=FR[a]" \
        -map 0 -map -0:a -map "[a]" -ac 6 \
        -c:a aac -c:v copy \
        -f flv rtmp://ingest.vrcdn.live/live/YOURVRCDNKEY &

wait
With this example setup, a streamer just points their OBS to rtmp://192.168.1.31/ingest with a stream key of test. You can of course expose this publicly with port forwarding, although I still have yet to look into better security or stream keys. A trustworthy host could set it up so a streamer to use their VRCDN key for your server, and you in turn just push the stream out to that streamers own VRCDN account. Again, this would require trust, or maybe just use revocable guest keys.
Once a streamer hits "start stream" - Nginx will fire off that script, which will read in the streamers stream from the RTMP server, then up mix it to 5.1 surround sound, set the audio channels to 6, and pushes it right back out to VRCDN. Ffmpeg default up-mixing behavior sets the LFE channel to have a low-pass, so there is no need for any extra work. On my home network, I did not notice any additional latency or any negative effects from this additional processing, which is expected as *-pass filters do not transform any audio data, it only removes a frequency range so extremely low processing overhead.
Still very much WIP! For my use case, there is only need for 3 channels, so we're wasting some audio bandwidth with the extra ones. Still need to figure out FFMPEG magic to individually apply filters to channels, so that any filter can be applied. Then how to make this easy/accessible as possible.
Feel free to reach out on discord if you have any questions or input! lightbulb#0004
Additional References:
https://obsproject.com/wiki/Surround-Sound-Streaming-and-Recording