Worlds
- Basic Upload and Modelling - Worlds
- Physics
- Prefabs
- World Tutorial series
- Lighting
- Level Design
- Particles
- Post Processing
- Audio
- Udon
- Final Things (Version control, optimizations)
- World Work in Blender (Advanced Users)
- Materials for Worlds
Basic Upload and Modelling - Worlds
The easiest and most comprehensive way to learn world creation is by watching the tutorial series linked at the top of this guide: https://youtube.com/playlist?list=PLPdWkxUSZ65Fp6ICr\
I recommend using VRWorldToolkit: a Unity Editor extension for making VRChat worlds[github.com]. It will help you optimize your world.
EasyQuestSwitch[github.com] helps to switch a world (or avatar) from PC to Oculus Quest: allows to switch properties of all specified assets (like the shader of a material) to a specified PC or Quest version with one button.
Probuilder
Great for making/prototyping levels and level geometry. Effectively a simple 3D modeler inside Unity.
Tips:
Create empty Gameobjects (GameObject>Create Empty OR Ctrl+Shift+N OR right click Hierarchy>Create Empty) and use them as folders to organize objects! BEFORE MAKING ANYTHING AS A CHILD OF THE GAMEOBJECT, RESET THE TRANSFORM!!! DO NOT MOVE THE EMPTY GAMEOBJECTS THEMSELVES, MOVE ALL OF THE THINGS INSIDE OF THEM!!! (If you don’t this will screw up progrids!!!)
Z-Fighting, also called stitching, occurs when multiple 2D planes are in the exact same location (e.g. a picture on a wall). Avoid this by moving the object that is supposed to be overlapping the other a miniscule amount forward.
Polybrush
For simple sculpting inside Unity. Great for making natural landscapes.
UNOFFICIAL VRChat Creator Glossary[docs.google.com]
Asset hunting
Tip: only download free assets you think you’ll actually use; you can always come back to get them later. You can find plenty of free and paid assets on the Unity Asset store. I’ll list some additional free asset sites below:
Textures
Check the dimension metrics for the materials that you download, if they are available. This will inform you how much you need to change the tiling setting on them to get them to scale properly. They will often be in deviations of a meter (e.g. 1m x 1m).
When hunting for textures, prefer lossless .PNGs rather than lossy .JPGs. Unity compresses the textures as mentioned above; using lossless images will lead to higher quality textures and smaller texture sizes in Unity.
[(Completely optional) If you want to losslessly compress the .PNGs on your computer you can use a program like PNGGauntlet. Unity does not store textures as common image formats like PNG or JPEG because of their relatively slow decompression time.]
Texture Search Engine[textures.one]
Free PBR texture sites:
- https://ambientcg.com/
- https://texturehaven.com/
- https://freepbr.com/
- https://3dtextures.me/
- https://www.poliigon.com/search?type=all&refine_by=assets-free
- http://textures.com/
- http://gametextures.com/freebies
If a non-color texture appears colored in Unity (like a slight green), bring it into a photo editing program like GIMP and export it as a grayscale image (8bpc GRAY in GIMP, GRAYA if it has an alpha/transparency channel).
Substance Player is a free program where you can easily create custom, high-quality textures using .sabar files. You can get these files for free at AmbientCG.com.
Models
Hunting for models is far more difficult than for textures. Ensure that:
The file format is .obj or .fbx, preferably the latter
The poly count is low (or you’ll have to decimate it yourself)
I would recommend checking the Unity asset store first. If you can’t find it there then Google “*object name* 3D model”.
Free 3D Model Sites & Resources[devga.me]
Decimation (lowering the polygon count of a mesh) can be done manually by removing/merging vertices/faces or automatically.
To do it automatically in Blender, you can select quick decimation in CATS or use the decimate modifier on a mesh.
[The decimate modifier is also great for creating LODs if you want to go the extra mile.]
There are also programs meant specifically for decimation and retopology, like the free Instant Meshes.
DO NOT import .blend files directly into Unity! Export them as .fbx, then import!
You will also need a skybox. You can get some from the Unity Asset Store, or I also like TowelCloud’s skyboxes[gitlab.com].
Physics
Pickupabble objects require 3 components:
- Rigid body: allows object to interact with physics [called a rigid body because there is no deformation]
- Collider: allows the collider to collide with other colliders (so the object will not simply pass through everything)
- VRCPickup: allows the object to be grabbed in VRChat
To make a VRChat object pickupabble, add the VRCPickup component to the GameObject.
This will automatically add a rigidbody (if there isn’t one already).
The collider types [in order of lowest to highest performance cost]:
- Sphere [1 vector]
- Capsule [2 vectors and the distance between them]
- Box [a volume]
A mesh collider will form it’s collider to the mesh. If applying to an object with a rigidbody, the mesh collider should be set to convex so it can collide with other objects with rigidbodies that have convex mesh colliders.
A convex collider will also limit the collision mesh to 256 triangles.
In addition, the naming convex relates to conavity; the collider is not concave; for example, any openings, like on a bowl or a cup would be covered with a convex collider.
When creating colliders for objects with a rigidbody, it is best to use a primitive or a combination of them for a result that is both performance and believable.
The orthographic view mode (where everything is of equal distance to the camera) is extremely helpful for editing colliders. To enable it, click on the box in the top right corner of the scene view.
For example, on a beer bottle, I would use a capsule collider around the part that can roll, and a box collider inside the capsule that goes to the top and bottom of the bottle so it can stand up.
For optimizing pickups, make sure that all of them are under a single gameobject at the root of your hierarchy. Every object with a rigidbody not only needs to update its transform every frame, but also the transform of all of its parent gameobjects. Ensuring that all the pickups are under a single parent keeps your hierarchy organized while also not wasting performance.
For even more believability, you can apply physics materials to colliders; for example, if you have a carpet floor, you can apply a high friction physics material to it, and a low friction physics material to an ice sheet. Several physics materials come with the Unity Standard Assets[assetstore.unity.com].
DO NOT USE MESH COLLIDERS FOR COMPLEX MESHES! (This is extremely taxing!)
It’s best to add one or multiple primitives (box, sphere, or capsule) collider(s) to the object and make the colliders conform to the mesh that way.
In a 3D modeling program like Blender, you can create a set of simpler meshes in the same model, turn off their mesh renderer, and give the simpler meshes a mesh collider. This will save performance and most players won’t notice the difference.
Unity also uses different types of joints. These can be useful for creating things like physical doors.
Prefabs
Prefabs allow for an object and all its components to be saved into a single asset.
These are especially useful for things like light fixtures or pickupables! Combine a light source and a 3D model into a prefab! Combine a pickupable, its vrc_pickup script and its collider(s) into a prefab!
Check out the Udon prefabs section[docs.google.com] of VRCPrefabs. I also recommend Vowgan’s Collision Sounds[vowgan.booth.pm], they are incredibly satisfying.
World Tutorial series
Have you ever wanted to make your own world, but never new where to start? I am currently making a step-by-step tutorial series about how to make your own room in VRChat for the absolute beginner!
Lighting
Types of lighting:
- Real-time- calculates lighting every frame
- Baked- pre-calculates lighting on the editor’s computer and generates light maps (textures that contain lighting and shading) which are overlaid on those objects
- Mixed- combination of baked for static objects and real-time for dynamic objects
Types of lights:
- Directional - Essentially the sun. There should be no more than 1 per scene. [Its rays are infinite, so its position does not matter but its rotation does.]
- Point - projects light outward in all directions from the center. Simulates a lightbulb.
- Spot - projects light outward from the center in a cone. Simulates a spotlight.
- Area - projects light outward from a 2D rectangle or circle. Simulates a ceiling office light.
ideally all lights should be baked and no real-time lights should be used!!
Real-time lights in VRChat will either look terrible, tank your framerate, or usually both.
So how do you light dynamic objects? Light probes. These probes pre-calculate how an object would be lit at that probes location. Many of these probes are placed in a group, and when dynamic objects move through this group they blend the probes and are lit accordingly.
Reflection probes
Used for reflections. They act as a camera, taking 6 pictures from where they are placed (the 6 directions) and combining that data into a cubemap (a spherical image). Overlapping reflection probes blend.
DO NOT use screen space reflections in VR.
Reflection Probe Guide[gitlab.com]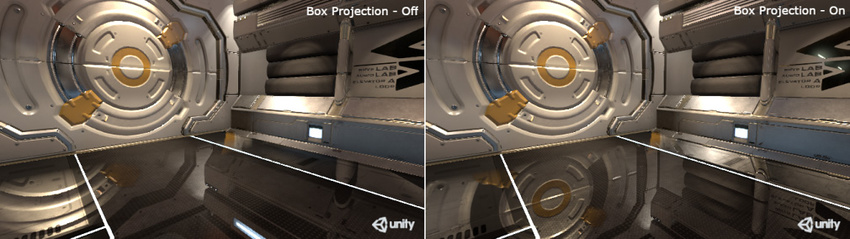
Lighting settings
Go to Window>Rendering>Lighting Settings to bring up the window.
If your scene is completely indoors with no windows, turn off the skybox lighting.
If it is an outdoor scene, turn skybox lighting on and set the directional light source in the lighting settings.
Texels per unit
Texels are like pixels placed onto an object, and used to calculate the baked lighting. For many PC worlds I find ~30 texels per unit to be a sufficient compromise between quality and size.
Have your lights set to cast soft shadows.
To actually see how the lightmap texels will be projected onto your geometry, you can click the dropdown at the top of the Scene window (the one that is usually set to "Shaded") and set it to "Baked Lightmap".
To change the lightmap UVs of your mesh, you can do so in the model settings (click on the model in the Project window and change the Generate Lightmap UVs settings at the bottom of the Model tab).
While some objects with short shadows may be more accurately lit with hard shadows, soft shadows are more accurate across longer distances and look better at lower texel resolutions. Unity doesn’t include adaptive shadows out of the box like PCSS (Percentage Closeness Soft Shadows).
Next time you go in the sunlight, look at your shadow. Look at how the edges are sharp close to the origin (your feet) and get blurrier as you go up! That’s what techniques like PCSS emulate.
Do not overuse texels! The more texels you have, the larger in file size your lightmap(s) will be!
https://unity3d.com/how-to/progressive-lightmapper-optimization-tips
There are some situations where you would want to have a higher texel count because of overlapping lightmapping UVs (common with probuilder objects). UV overlap[docs.unity3d.com]
In your level design, avoid putting detailed shadows on the floor or low on the walls if your lighting is baked; the non-static models walking on top of those shadows won’t have those detailed shadows projected onto them.
Lightmap resolution
Controls the maximum resolution of the lightmap(s). Set it so that you only have one lightmap for optimal performance.
Bounces
Controls how many bounces a light ray will perform. [These take a long time to bake]
Most scenes shouldn’t need more than 2. [Exceptions would be scenes lit entirely indirectly.]
Occlusion Culling[docs.unity3d.com]
Set your static GameObjects to static [this will set the sub-parameters, occlusion and occludee static to true]. Then go to Windows>Rendering>Occlusion Culling, and hit bake before uploading your world.
Unity won’t render avatars the player can’t see; since rendering avatars is what tanks performance the most, good VRChat level design should subconsciously guide the player to look only at the other players they are interacting with, without rendering a bunch of poorly performing avatars in the background that they don’t care about.
Level Design
Have you ever pulled on a door handle, only when you should have pushed? Level design, like door design, is best when you never even notice it.
Through level design you can make people perform actions subliminally. It may sound obvious, but people won’t do what they can’t do.
As a level designer it’s your job to form your levels in such a way that you get people to do what you want them to without them even realizing it.
For example, don’t want people to congregate around a certain area (like the stairs)? Through design, you can make it far less likely that people will gather there (like by making it smaller and less inviting than the areas around it).
Through design you can greatly influence how players act.
Recommended videos:
One extremely important and often overlooked aspect of VR level design is changes in elevation. When walking around your playspace, the elevation should not constantly change. Even strafing in your playspace but moving up or down an incline in-game can be extremely disorienting.
In VR, changes in elevation should be
- Expected
- Deliberate
- Consistent
- Short
- Performed entirely with artificial locomotion (thumbstick or jumping, ideally just one and not both simultaneously for greatest comfort)
VRChat has a layer called Walkthrough; if you set an object to this layer, physics objects will still collide with it but players will pass through. I would recommend setting much of the furniture to this layer.
{If you’re super interested in level design, you can read this 123-page document on the topic by industry experts[docs.google.com].}
Particles
Particles[docs.unity3d.com]
An important note about particles, you may have seen that if you roll your headset in-game that particles will rotate with your head motions. Untick “Allow Roll” under the renderer tab if the option is present. This will fix the issue.
Post Processing
You can easily apply post processing to your scene by using the quick function in VRWorldToolkit.
Read Silent’s post for more info.
Motion Blur, Depth of Field, and any Screen Space effects (reflections, ambient occlusion, etc.) should not be used in VR. If you want to use screen space reflections on your materials you can use Moochie's shaders, but SSR often breaks, especially in VR, and it has a huge performance cost, so if you do use it (which you almost always shouldn't) use it sparingly!!!!!!!!!
Screen distortion/warping effects should never be used in VR. They are extremely nauseating.
Just like a real camera or your eyes, this can automatically adapt the exposure of the virtual camera(s) based on how much light it is looking at. Go into your post processing volume and under auto exposure the most important settings are minimum and maximum EV. If you hover over these settings, it will give you a brief explanation and if you need more information you can click on the circle with the question mark that is on all Unity components.
I (based on experience and no empirical evidence or research, so don't quote me on this) recommend setting the minimum EV to around -0.7 (at least for interiors), the maximum EV to 0.7 and the exposure compensation to 0.7. If you notice the exposure flickering too much or too fast you can set the minimum and maximum to the same value.
Audio
Create a new empty GameObject and add the component VRC Spatial Audio Source. This will automatically add an Audio Source component.
If it is world music, uncheck enable specialization.
To compress the audio, set the compression format to Vorbis, and adjust the slider lower for more compression.
If the audio is spacialized, check "Force to Mono".
Audio-basics-crash-course[ask.vrchat.com]
Udon
Udon is how to make code in VRChat worlds. It is a visual scripting language, which means it uses blocks and nodes rather than traditional lines of code.
If you already know C# and would rather use it to write your Udon scripts using lines of code, you can use UdonSharp[github.com] to do so.
Getting Started with Udon[ask.vrchat.com]
VRChat Udon Tutorials
Many people view coding as a daunting black box. As a programmer myself, I can assure you that a basic understanding of it’s principles is not as complex as some portray it. The best advice I can offer you is:
- Take it slow, don’t try to learn everything at once
- Don’t dabble or attempt to modify a piece of code until you know what it does
- Go in with a logical mindset
The last one is paramount. Think about the exact logical steps a computer would have to accomplish to achieve a desired result. Then putting it together will mostly be a process of translating that logic into computer code.
Oh, and the 2 most important tips:
READ THE CONSOLE!!! and
WRITE COMMENTS!!!!!!!!!!!!!!!!!!!!!!!!!!
Unity runs on C#, so if you would like to start learning a programming language, C# would be a great place to start. As of writing Brackeys is creating a tutorial series on programming for Unity. HOW TO PROGRAM in C# YT playlist
Basics
Data types:
- Boolean - true or false
- Int - an integer
- Float - a decimal
- String - a collection of characters
Note that ints in C# are 32-bit, which means they have a limit of ~2.1 billion, positive or negative. Exceeding this limit will result in overflow, which will cause errors.
Alternatively you can use the community-developed UdonSharp. It will translate C# script into Udon Behavior. It is more reliable, and if you have basic coding experience I would recommend using it over Udon’s visual script.
Final Things (Version control, optimizations)
Version Control
If you are putting a lot of time and effort into a world, version control is a must (lest you end up like me and lose your work). Version control tracks the changes you make to your project and allows you to revert your project to previous states (indispensable if something goes wrong).
Working on a world, you are most likely going to be one person on a single computer, so I would simply recommend using Sourcetree[www.sourcetreeapp.com].
Optimization (Review)
World Creation, Optimization, and Community Labs Tips[docs.vrchat.com]
Quest Content Optimization[docs.vrchat.com]
- Set everything that is static to static [will allow for lighting and occlusion culling to be baked]
- Set all lights to baked
- bake the lighting
- Bake occlusion culling
Remember, occlusion culling only affects the visual rendering of objects! Objects out of view will still be processed and affect performance!
Make sure to include toggles on performance heavy gameobjects, for example:
- toggles for physics objects
- toggles to turn off shadows for realtime lights (if you have a realtime light with shadows enabled in your scene)
- MIRRORS!!! This should be obvious but they should have toggles and be off by default!
Use the Unity profiler! It will help you find things in your world that are causing performance to drop the most! This is especially useful for figuring out how to optimize scripts!
World Work in Blender (Advanced Users)
Level Design in Blender
You can greybox your basic level design and shapes in Unity using Probuilder, and using Probuilder’s export feature or the FBX exporter (download in package manager) you can export your assets for further modification and detailing, with the scale intact.
See Maebbie's guide for a round-trip workflow
You could also make interiors completely in Blender using ArchViz add-ons, like Archimesh!
Custom bevel profiles will be extremely useful for detailing (from chairs to stairs, baseboards and columns, etc.).
You can move around the viewport in fly/walk mode in Blender using SHIFT+`, similar to the scene navigation in Unity.
If you want to create a scene in Blender to match a photo (REFERENCE PHOTOS ARE SUPER IMPORTANT!!), using the free fSpy is fantastic to do the first thing, which is lining up the 3D camera!
Blender now has support for VR scene viewing, with support for Oculus and Windows MR. You can view it with a Vive or Index by opting into the SteamVR beta. (Blender uses OpenXR, a standard SteamVR only just started supporting in its beta.)
Editing Assets in Blender
Topology is important; if you have bad topology on your mesh, it will be unnecessarily difficult to work with.
Plenty of meshes you find online will have horrible, unworkable topology.
There are programs/addons to remesh, including (surprisingly good) free ones:
Modeling your own assets in Blender
Unlike avatars, the assets you will model for a world use a different workflow, known as hard-surface modelling.
(SUPER IMPORTANT) learn the difference between destructive and non-destructive modelling:
- just watch this one, you don't have to follow along. It uses paid add-ons called HardOps and BoxCutter but they are not necessary to understand the concepts and techniques taught in the video.
Hard Surface Modeling in Blender - YT playlist, requires familiarity with Blender
Bake normal maps for high-poly meshes in Blender, then lower the poly count (advanced)
Materials for Worlds
For an ideal introduction I would recommend watching my video on the topic of materials in my Create Your First VRChat World series or reading its respective script.
Using one of the 4 PBR shaders listed on the original page will increase visual quality, and also offer many additional features including baked specular lighting! This will allow specular highlights to appear with baked lights, which is not possible when using the standard shader.
Height (AKA displacement) map
This texture insets or extrudes different parts of the material.
In Unity you should typically set this pretty low or else looking at the material at an angle will ruin the effect, which is especially noticeable in VR.
These maps are more computationally expensive than all the others (Oculus' documentation advises not to use them at all because of this). They can look great in certain circumstances but if not necessary then they should be avoided.
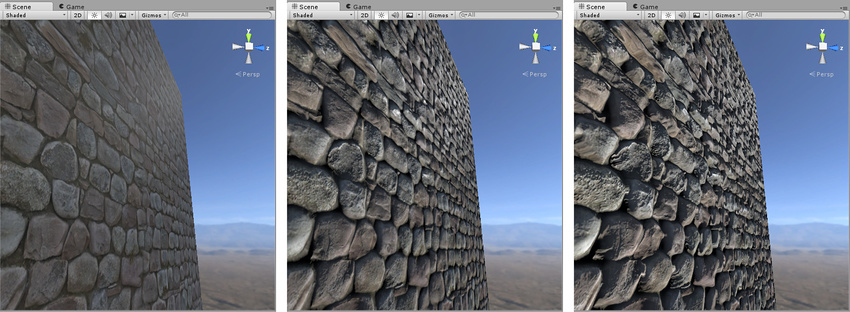
Originally posted by docs.unity3d.com:
“From left to right in the above image: 1. A rocky wall material with albedo assigned, but no normalmap or heightmap. 2. The normal assigned. Lighting is modified on the surface, but rocks do not occlude each other. 3. The final effect with normalmap and heightmap assigned. The rocks appear to protrude out from the surface, and nearer rocks seem to occlude rocks behind them.”
Displacement maps are calculated using parallax mapping in Unity. This is a comparatively low-performance real-time approximation but also the not incredibly accurate, and the illusion breaks at intense angles. Using shaders like Mochie's standard allow you to control how many "steps" the parallax mapping has.
Secondary Maps (Detail Maps) & Detail Mask
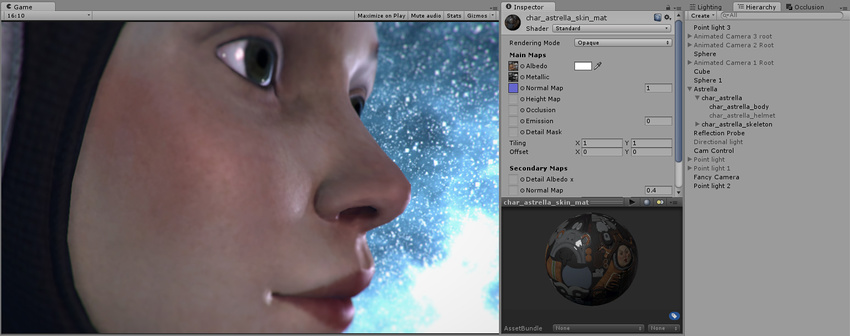
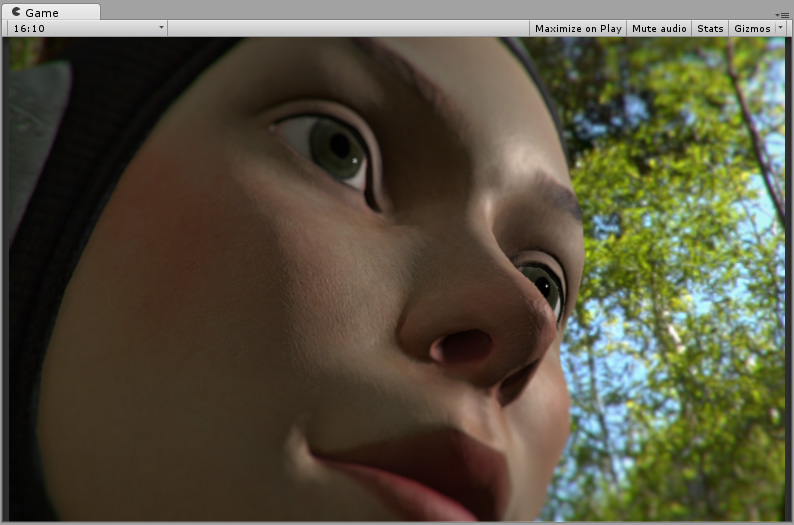
Used for extra detail or imperfections, such as cracks or scratches in a surface or the tiny pores of skin. Originally posted by docs.unity3d.com:
This character has a skin texture map, but no detail texture yet. We will add skin pores as a detail texture.
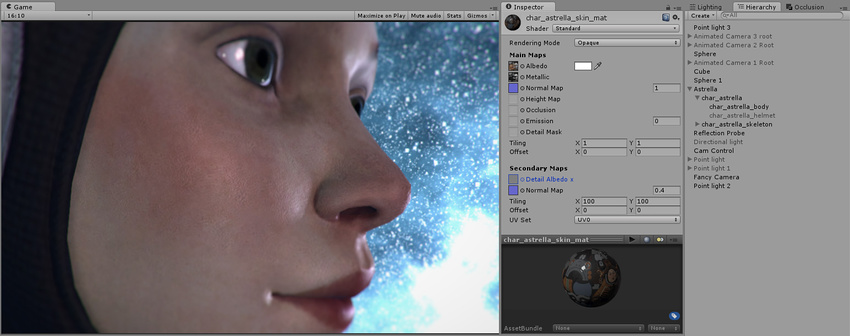
The end result, the character now has subtle skin pore detail across her skin, at a much higher resolution than the base Albedo or Normal map layer would have allowed.
Detail textures can have a subtle but striking effect on the way light hits a surface. This is the same character in a different lighting context. You can find many separate surface imperfection maps.
Thickness map
Used for subsurface scattering (SSS), to simulate when light passes through a material. A great example of when to use it is for skin, leaves or cloth.
You can generate this map by inverting the normals and baking ambient occlusion in Blender.
You will need a custom shader to apply it, like Silent's photorealistic SSS shader.
You may also want to use custom shaders for particular effects, like a water shader or a faked volumetric lighting shader to make a light source really pop.