Essential Knowledge
Prerequisites to learn for both avatars and worlds
Meshes
The geometry of the models are called a mesh, and are made of polygons, or 2D shapes: triangles (3 sides), quads (4) and n-gons (5+, typically undesirable).
These polygons are made of vertices (the points), edges, and faces.
Originally posted by ck12.org:

Topology
The makeup of those polygons on a mesh is called the topology. Good topology is essential to working on models effectively.
Normals
Every polygon has a normal vector, perpendicular to its coplanar 2D plane. This helps determine what parts of the mesh are "inside" and "outside".
By default Unity does not render the back faces of polygons, called backface culling.
If you can only see the back faces of your avatar (or a part of it), chances are the normals are inverted. This will be especially noticible; it happens to a lot of avatars when custom shaders are disabled.
Materials
The following section on materials will cover what is needed to know for both avatars and worlds.
Specifics for avatars and worlds will be covered in their respective sections.
Color or detail is applied to the mesh by using a material. It combines a shader and textures.
If a part of your model is a shadeless magenta, something is wrong with the material slot (typically a referenced shader is missing) or there is no material applied to that part of the model.
To create a material in Unity, right click in the project window>New>Material. The default shader is the Standard shader, which is a physically based, or PBR shader.
Shader
Component of a material which determines how it interacts with light. The 2 types of shaders you will work with in VRChat most often are PBR shaders for photorealism, and toon shaders for a toon or anime look.
Watch the video below as it will help you understand the textures section better.
TL;DR everything reflects and absorbs some light.
Textures/Maps
The 2D images a material combines which are projected onto the triangles.
Projected onto those triangles are textures (AKA maps), which are 2D images. Unity utilizes several different types of textures, combined into a material, which you can then apply to a 3D model.
Texels (texture pixels)
Texture types:
Albedo (AKA basecolor) texture
The color of the surface, but with all the shading information removed.
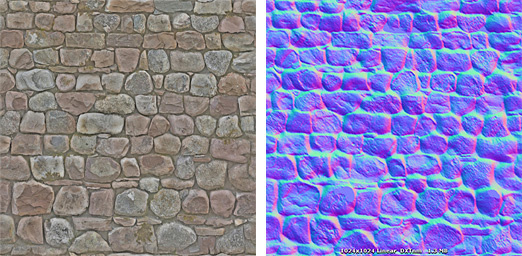
Normal map
A mostly blue-purple image, which fakes 3D by altering the angle (the normal vector) at which light reflects off of the surface (at a specific texel).
Originally posted by docs.unity3d.com:
A stone wall texture and its corresponding normal map texture
Occlusion (AKA Ambient Occlusion, AO) map
Puts indirect shading information into the material, simulating parts where it would be harder for light to escape. Separating the occlusion map from the albedo map allows for more intricate shading according to the lights in the scene.
Smoothness map
Controls how clear the reflections in a material are.
Unity has an idiosyncratic way of handling these, and because the industry standard is roughness maps, not smoothness maps, I would recommend using an alternative more feature packed PBR shader such as:
These shaders offer many more options than Unity's standard shader and will increase the visual fidelity of your avatar or (especially) world. Further notes on each in their respective sections.
DON’T GO OVERBOARD WITH THE SMOOTHNESS! If a material isn’t shiny (like unpolished wood or brick), don’t make it overly shiny! It will just look wet or wrong!
Metallic map
Defines which parts of the material are metallic.
Specular Map
For use with the alternative specular workflow. I would only recommend this workflow to beginners if your material comes with a specular map.
Emission map
When activated, the emission property of the material is used to define the intensity and color of light it emits. The emission map is used to define how the emission is different across the material.
Diffuse map
A base color map with balanced shading (no clearly directional light source). This is the texture you would get if you simply took a picture of a surface. If a model only has one texture then it would be considered a diffuse texture (you will find this a lot on toon shaded models).
This texture has fallen out of favor in the PBR workflow for the albedo and ambient occlusion texture combination, which allows for more variable shading of a material and better compression when using multiple albedo maps (like for different skins).
You can read a more in-depth guide on PBR shading written by Silent here.
UV mapping
Specifies how the 2D textures should be projected onto the faces.
Originally posted by Wikipedia:
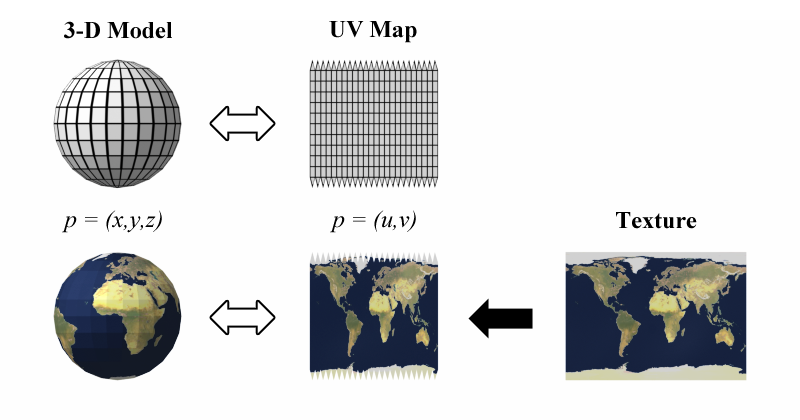
The best way to think of it is that your mesh is made of paper, and you have to decide where you want the cuts in order to lay it flat.
UV stands for the vertical and horizontal axes U & V, since W,X,Y & Z are already used.
Unity Texture settings:
Types
- Default- all the textures on a material except the normal map(s)
- Normal- normal maps must be set to this in order to function properly
- Sprite- if you want to have a 2d image displayed in 3D space (ie use it for a picture hanging on a wall)
Should be disabled on grayscale textures (e.g. height, AO, metallic) or else they won’t function properly!!!
If the texture looks too blurry from a distance, try changing the filtering algorithm from Box to Kaiser.
MipMapping Explained
Filter Mode
Set to Trilinear for the best result.
Aniso Level
Makes textures not appear blurry when viewed from angles. I would recommend setting it to 16.
In Unity the setting is a slider but only works in powers of 2. If it is set to a non power of 2, it will go down to the next lowest power of 2 (e.g. 10 would go down to 8).
Texture compression settings
Max resolution
The maximum resolution the texture renders at.
For world textures I typically wouldn’t recommend setting it higher than 1K (1024x1024).
Crunch compression
A lossy compression algorithm. I would recommend setting it to around 20 for the best compromise between file size and quality.
Optimization
Optimization is incredibly important for VRChat. Being in VR, it should run at a high frame rate so the users can play the game comfortably. I’ve experienced many times when my friends or I had to quit because we were feeling too nauseous.
Material Slots
Each material slot incurs a draw call on the CPU. Ideally on an avatar or 3D model you will have 1 material slot per each mesh that requires a different shader.
Lowering the number of draw calls is one of the most effective ways to increase performance.
Merging multiple material slots into 1 is done through texture atlasing. This can be automated in the CATS Blender Plugin.
Polygon/Triangle count
Keeping this number low without terribly sacrificing quality is the balancing act you will have to perform in developing content for this game. Reducing the number of polygons is done through decimation; in Blender this is mostly done through the decimate modifier.
Setting Up For Quest Creation[docs.vrchat.com]
Important Notes
Organize your files! It sounds boring but it will save you a ton of headache in the long run!
I would recommend creating a dedicated folder for VRChat project assets, and splitting the assets up by first:
- Avatars
- Worlds
And then:
- Textures
- Models (if a texture goes with a specific model group the two in the same folder)
- Prefabs
- Shaders
I would recommend organizing your textures by type, similar to how they are categorized in texture websites like https://ambientcg.com/.
What’s important is that the organization works for you; you can adjust it however you like.
Name your files descriptively! You should be able to know what a file contains without having to open it!
Hitting the Tab key in a text box jumps to the next text box!
Reset GameObject transform
On the transform component of a GameObject, click the (gear on the top right) and click reset.
This will return the object to XYZ position & rotation to 0,0,0, and the XYZ scale to 1,1,1.
Alternatively you can just reset the position, rotation, or scale individually via the same dropdown.
Copy & Paste Components
- Click the gear on any component
- click copy
- click the gear of another component
- click “Paste as New”
If working in Blender, there are many addons (free & paid) that can speed up your workflow!
3rd most important tip: if you are creating something custom, use reference photos! You will not be able to create something in 3D from memory as quickly or as good as you would from a reference photo! There are many subtleties and details you forget!
2nd most important tip: if there’s something specific you’re trying to do, don’t try to figure it out yourself, look it up! Speaking from experience, you will likely become frustrated and do it in a suboptimal way. There are many tutorials and answered questions that will help you immensely. If you can’t find the answer you’re looking for, post a question! It’s almost certain other people have it too and that someone has the answer. Even experts ask questions.
And the #1 most important tip: if something goes wrong in Unity, READ THE CONSOLE!!!
Unity Tips
Blender
For those interested. Learning Blender is not always necessary. There are plenty of 3D assets, including free ones, that you can find on the Unity Asset Store or Booth.
As for making world geometry, using the free Unity add-on Probuilder is often easier and quicker, especially for prototyping, as you will see if you choose to read the modeling section for worlds in this compendium.
^^ WATCH THESE 2 FIRST ^^
Blender Basic Tutorials playlist <--- LEARN FIRST!
Round trip world workflow: https://vrclibrary.com/wiki/books/maebbies-precise-solutions/page/blender-3-28x-mapping-config-for-mapping
What is a .blend1 file and why do you (not) need them?