Standard Shader and You
This book covers how to use Standard/PBR shading and make stuff look nice, in simple terms,
- Introduction
- Types of Textures
- Albedo/Diffuse
- Normal Maps
- Specular and Metallic Maps
- Occlusion, Height, and Emission Maps
- Detail Mask and Details Maps
- Visual Example
- Creating Specular/Metallic Maps for Standard
- Creating maps from a pre-existing texture with Materialize
- Conclusion and Tips
Introduction
The Standard shader is one of the many misunderstood parts of Unity in VRchat. It provides a fairly realistic look thanks to it's physically based approach, but with some huge pitfalls that anyone who can't tell their "smoothness" and "metalness" apart will fall in to.
The important thing to know about the Standard shader is that it follows the convention of PBR, or Physically Based Rendering. PBR is a set of shading rules made to react in a graceful and believable way across different light conditions. It also means that materials are energy conserving - they don't reflect any more light than they take in. Instead, they spread that light across their surface according to carefully tuned algorithms that have been tested to match the real world for similar conditions.
I won't go into the details of PBR here, though I'll link to them at the end. But there are some very important things you have to know about using the Standard shader.
Types of Textures
There's a popular saying among programmers; "garbage goes in, garbage comes out"! If you don't know what you're putting into the shader, you're only going to get garbage out of it. So, what are the different types of textures that Standard supports, and what do they do? Let's find out!
Albedo/Diffuse
First, we have the albedo map. The albedo map is uninteresting, but very important. It's where the colours of your material come from! What you'd put here is the same kind of texture that other engines would call a colour or diffuse map. To go into extra detail: "Albedo (al-bee-doh) is a measure of how much light that hits a surface is reflected without being absorbed." Note the "without being absorbed" part. That'll be important later.
After that, we have the Color. Wait, this isn't a texture! But here's something important and often overlooked - when you export a model from Blender, Blender typically changes the material colour to grey. When Unity loads the model, it sets the Color in the material to grey too, making the material duller! So, whenever you load in a new model to Unity, you should make sure the material colour is white and fully opaque.
Normal Maps
Next, we have the normal map. The normal map defines details on the surface of the material seperate to those of the mesh.
If you're reading this guide, you might not know what a normal is. Let me explain it for you! You see, meshes are made up of vertices, points in space, which make up polygons. And a polygon in a mesh is more than just three points in space. Stored throughout it is information regarding which direction the polygon is facing - the normal. This is what decides the lighting of meshes. Bad normals mean weird seams and warping that don't match our expectations. Good normals mean things look soft and round in all the right places, and hard and sharp elsewhere!
Think about meshes themselves. You can put a texture on a flat simple plane and cover it in colours, but it'll still be a simple plane underneath. So, someone had the great idea to use a texture to shift the normals around, covering it in details. A texture can be more abstractly detailed than a mesh, right? And that's what a normal map is.
In Unity, these are stored in a special format once imported, which is why you need to mark new normal map textures imported *as* normal map textures. Unity will normally show a warning if a texture is assigned as a normal map without being imported as a normal map.
If you have a normal map from another game engine, it might be oriented differently. You can tell because the ridges on one axis will look like bumps, and vice versa. In particular, normal maps made for Unreal Engine will always be inverted. In the current version of Unity, you can fix this once the texture is set to a normal map by checking the "Flip G channel" option.
If you're looking at assets without normal maps, there's no need to panic, because a normal map isn't necessary if you don't have one. It only adds lighting detail. You can generate them yourself if you want, see below.
Specular and Metallic Maps
Specular maps are a tricky subject. Many write ups explaining specular maps focus on how a specific game or engine handles them, and the specific compromises and simplifications inherent to them. One thing is clear, though, specular maps focus on shiny stuff.
In Unity, that shininess is defined by two components, following the principles of PBR. There is the part that determines which sections are light absorbing, like metal, instead of light reflecting, like paper. That's stored in the red channels of the metallic map. And then there's the part that determines which sections have a smooth and reflective surface, like polished wood, instead of a rough surface like rusty metal. That's stored in the transparency of the metallic map. These attributes are called Metallic and Smoothness.
In proper terminology, non metallic surfaces like cloth are called dielectrics. The light that hits their surface bounces around inside and produces an even colour; albedo light. Metal, on the other hand, conducts electricity, and so reflects the photons that hit it and absorbs what doesn't reflect; producing specular light.
So that covers metallic maps. But wait, what about specular maps? Well, it turns out that it's a lot easier to have one map that has both the albedo and specular colours, and a second simpler map to define which parts are metal and which are not, instead of having two full colour maps that can take up more memory. However, a metallic map can't represent materials like cloth or skin well, which are neither metallic nor hard. So just consider a specular map as a way of defining a specific kind of shine, while a metalness map only defines that something is or isn't metal. This is the difference between Standard and Standard (Specular).
In a specular system, the metallic portions of the material are defined in the RGB channels of the specular map. The Alpha is still reserved for the smoothness. This takes more memory, but it's useful when a simple mask doesn't cover what you need. A good real world example are surfaces with shiny, thin metal lines. At angles, or far away, they'll lose their shine with a metallic map due to texture filtering. But with a specular map, they'll remain properly shiny.
However, if you add a metallic/specular map to an object, you'll notice the areas with specular become darker. This is because of energy conservation. One material can not be both fully dielectric and specular at the same time - only one, or the other, or something in between. So if dealing with specular maps made for another engine, they may need editing to fit.
To review:
- Metallic maps store an on/off value specifying whether part of the material is metallic or not, in the map's red channel. The material's albedo is used to specify how strong the specular reflectance is.
- Specular maps store a colour value representing the specular reflectance directly, in the colour (RGB) channels of the map.
- Smoothness, or glossiness, or the inverse of the surface's roughness is stored in the alpha channel, in both metallic and specular mode.
References:
- https://google.github.io/filament/Filament.md.html Google's guide to using PBR with their Filament engine. Written by their engineers, it covers the topic in a deeper way.
- https://academy.allegorithmic.com/courses/b6377358ad36c444f45e2deaa0626e65
- https://marmoset.co/posts/pbr-texture-conversion/
- https://www.sharetextures.com/textures/blog/physically-based_rendering/
- https://google.github.io/filament/Material Properties.pdf Google's reference chart to PBR materials. When making your textures, this is a useful thing to have on hand.
Later on, I'll explain how you can actually use these features.
Occlusion, Height, and Emission Maps
Occlusion Maps
Next up are occlusion maps. These maps contain ambient shadows - the cracks and crevices that are normally too small for light to reach unless it's shone directly into them.
For single models like props and characters, you can bake these using Blender, but the results depend on your model's scale and UV mapping. For repeating textures like brick walls, or floor tiles, or even just some mud, you can generate these from a normal or height map.
In Standard, the green channel is used for occlusion maps.
Height Maps
Height maps are used in Unity to provide a "parallax occlusion" effect. They shift the texture according to the height map texture and your perspective. Unity uses a fairly cheap implementation of this effect that can fall apart from the wrong angles, so be careful and don't turn it up too high.
In Standard, the red channel is used for height maps.
Emission Maps
Emission maps are for areas of a model that emit light, or glow. If you were making a material for a lamp, the light would be emissive. But an emission map has to be specially made - in particular, the unlit parts must be black! Setting up emission wrong can result in your models looking really weird. Emission maps are multiplied by the emission colour of the material. Tip: For a glow-in-the-dark effect, use an emission strength of 1.0. For a bright glow, use an emission strength of 5.0 or so.
Detail Mask and Details Maps
Detail Mask
Next up is the detail mask, which controls how the detail map in the next section is applied. Where the detail mask is black, the detail map won't be applied. This lets you have a detail map that affects some parts of your mesh, but not others.
In Standard, the blue channel is used for the detail mask.
Detail Maps
Detail map is a texture Unity combines with the base albedo. This is handy, because you can specify a different tiling factor for it, letting you overlay a pattern over a less detailed texture to make it look more detailed. This seems like a good idea in practise, but actually using it well is pretty hard.
By default, detail maps in Standard are applied by multiplying the albedo by the detail map and doubling the result. In simpler terms, a middle-grey detail map will have no effect, a white one will brighten the albedo, and a black one will darken it.
Detail normal maps work like detail maps, but for the normals. One example is to apply a pattern over a wall to make it look rougher at a different scale from the rest of the material to give it more variance. Or to add depth to a feature added through the detail map!
An important option to note for detail maps is the ability to set their UV channel. Just as meshes have UVs to tell them where the textures go, Standard supports using a second UV map specifically to put details on the mesh. This allows you to, for example, have a piece of clothing with a main texture consisting of just cloth, and then a detail texture with just a logo. Using the logo as a detail texture, and with the secondary UV channel mapped to the logo texture, you can combine the two textures and have a crisp logo over your model's material.
For more detail on detail maps, check the Unity documentation.
Visual Example
How do these textures look? Well, I've included a sample right here.
Here is a section of cloth from a material with albedo, normal, specular, smoothness, and occlusion maps, using Materialise to render it shaded on the left.
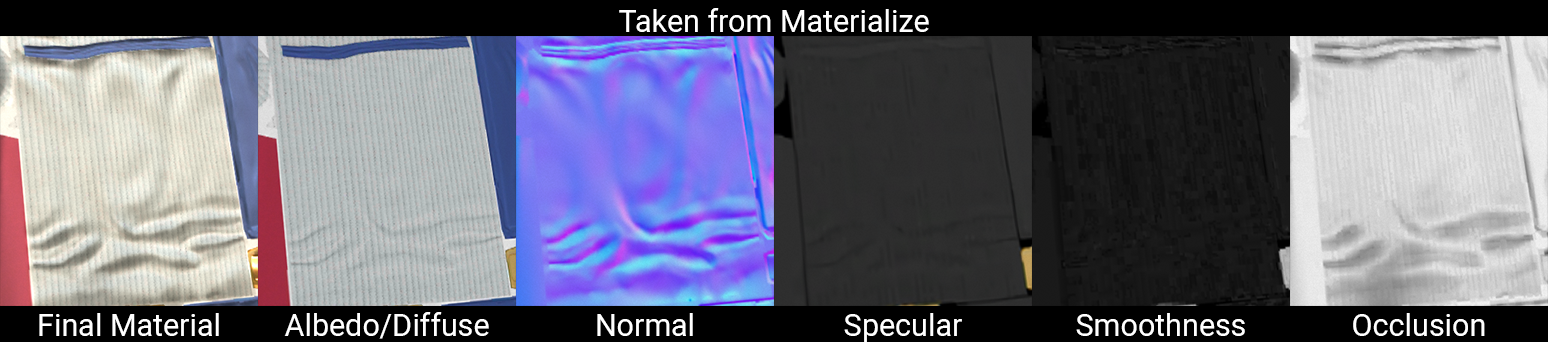
You can see that the cloth is rough, slightly shiny, and the creases in it have shadows.
Now, compare that to an area of the same texture for a metal object.


You can see the specular and albedo are both bright, and it's really reflective and shiny. Notice how the colour of the reflection is tinted with the colour of the metal.
The final result looks like this.
Creating Specular/Metallic Maps for Standard
When using the Standard shader, it expects the metallic and smoothness map to be elements of the same texture. You can also combine the occlusion map and detail mask into the same texture. Having all these elements be part of the same texture saves memory, so it's a good optimisation.
For reference, Standard expects Metallic in Red, Occlusion in Green, Detail Mask in Blue, and Smoothness in Alpha.
When using Standard (Specular), it also expects the specular and smoothness to be part of the same texture, but there's no room for anything else. Keep your occlusion and detail map separate for Specular materials!
Depending on what tools you use, this can be annoying to manage. For example, Photoshop saves semitransparent images with transparent pixels replaced with pure white - destroying the specular map! And due to an ancient bug in Windows, many tools that manipulate images can do the same to imported images.
Using SmartTexture to create combined maps
Using SmartTexture, you can create texture files in Unity that automatically combine several different textures into one. Simply store your material attributes as seperate textures, and then create a SmartTexture asset which links them all together.
To install SmartTexture, follow the instructions here: https://github.com/s-ilent/SmartTexture
Once installed, you can create new SmartTextures within Unity by creating a new SmartTexture asset and dragging in the individual seperated textures from your project.
Using chaiNNer to combine textures
ChaiNNer is a handy tool for texture manipulation. You can even use it for upscaling textures with neural networks! But here, it's main use is combining textures together.
You can get chaiNNer from here: https://chainner.app/
You can drag textures onto the board and use the Seperate RGBA nodes to split them into their components, then use Combine RGBA to reassemble them. ChaiNNer also supports various types of filters and can process images in batch.
Using ImageMagick to combine specular and smoothness
ImageMagick is a simple, efficient way of getting your maps combined outside Unity in a few easy steps - as long as you can work with the command line.
Firstly, download ImageMagick. (The HDRI compatible version is recommended.) https://imagemagick.org/script/download.php#windows
ImageMagick is a long standing open source set of command line tools for editing images. People have done amazing things using IM and batch scripts. Our script is less amazing, but useful all the same.
Here's the script:
magick convert %1 %2 -alpha off -compose CopyOpacity -composite PNG32:%1_result.pngAlternatively, here it is pre-made into a batch file.
To use it, simply select two images of the same size, and then drag the main image into the batch file. In this case, you'd select your specular map and smoothness map, and then drag the specular into the batch come. The result is a combination of the two, with the second image added to the alpha channel - creating a specular and smoothness map ready for Unity! You can then take the resulting file and use it in Unity. Make sure you pick the right one!
Creating maps from a pre-existing texture with Materialize
For world creators, Materialise is great. What is it? It's a tool that, given a simple tiling texture, can create all these maps with some clicking and tweaking!
All this came from one image. Isn't that amazing? You can download Materialize from the Bounding Box Software website. There are even helpful tutorials on there to help you get started! And because you've read this guide, you're well equipped to make maps with it. Probably!
Materialise is best used on tiling textures for worlds. You can still use it for avatars, but be careful with trying to squeeze too much depth out of character textures - it can look unnatural.
Conclusion and Tips
The Standard shader is really misunderstood in VRchat. I've heard many people curse and blame Standard for all kinds of visual issues, but it's just a complicated tool that's easy to use wrong. You can get great results from it. It's efficient and easy to tune. For avatars, it's a better option than most people think, and definitely better for anything striving towards CG-ish realism than flat shading.
Filamented
With that said, it's worth noting that Standard was introduced to Unity in 2015, many years ago. Meanwhile, shading technology and GPUs have changed and moved on since then. But that doesn't mean we have to be left in the dust! That's why I created Filamented, which replaces the shading calculations in Standard with state-of-the-art ones from Google's Filament renderer. It also adds some useful convenience features for VRC world creation.
You can get Filamented from here: https://gitlab.com/s-ilent/filamented
Crosstone Cel Shading
I also created a shader for avatars, Crosstone. It's designed to follow the same conventions as Standard, while also supporting high-quality anime-style shading. This lets you get high quality results resembling the pseudo-PBR look of modern anime games like Xenoblade Chronicles 3.
You can get Crosstone from here: https://gitlab.com/s-ilent/SCSS
Conclusion
Some smart people argue that Physically Based Rendering should be called "Physically Inspired Rendering" because it doesn't really match how the real world works. Even though a lot of the material goes on about "how things work in the real world", there's still even more layers to how reality really works. So, don't forget that there's always more complicated things than can be modelled with just the Standard shader! And if you ever need to ask, feel free to ask me for answers. Until next time, see you!