UV Tile Discarding
This page could do with some revisions to better explain things. However still serves well as a guide.
UV Tile Discarding, AKA "the best thing that'll ever happen to you" is a method of optimization and a valuable tool for avatar creation at the same time.
It effectively allows you to use a secondary UV to align islands across a grid and discard those parts of the mesh as you please. Still doesn't sound exciting yet? This basically allows you to have extremely customizable avatars with fewer skinned meshes and materials.
The avatar shown in the video below only uses a total of 3 skinned meshes and 3 materials, it has 5 different pieces of clothing that can be mixed and matched at any time. Do I have your attention yet?
The best part about this method is that this isn't some trick that just tricks performance stats into thinking it's optimized, like using transparency masks instead, which really is not an ideal method for doing this. UV Tile Discarding allows the parts of the mesh that aren't seen to be not rendered, period; This is because the discarding happens before the shader fragmentation stage, which I will spare you the technical details of, just know that this is a good thing and that people much smarter than me can likely explain it better. In short, it means you get to use less skinned meshes and materials, which means less draw calls, less being rendered.
The Meat of This Page
"How do I do it?" you may be asking, don't worry I'm finally at the point of explaining it.
There are some general things you should keep in mind when using UV Discarding:
- This is best used on parts of the mesh that share the same material settings since this only works most effectively when used on a mesh with very few materials.
- This means those textures should be atlased.
- You can't exactly use special transition effects for it, or at least you'll need to be creative with how you do it. So that means basically no dissolve transitions.
- Again unless you can figure out a way to go about doing it regardless, which if so I implore you to let me know so I can add it to this page, I haven't done much research on it myself.
- You need to use a shader that has UV Discarding on it to be able to utilize it.
- For this example, we'll be using Poiyomi 8.1+, which also has a page dedicated to UV Discarding as well that I recommend checking out, it provides better visual examples.
- It'll probably look weird to people who have shaders disabled.
- Still better than other "outfit malfunctions."
- This can also be used on the body mesh of your model to toggle off and on parts of the body.
- This is most helpful to disable the body underneath clothes to prevent clipping issues without having to use more expensive methods such as shape keys.
- I, unfortunately, neglected to utilize this in the model used in this page because I didn't think about it at the time I was making it, which I'll be rectifying later.
- This is most helpful to disable the body underneath clothes to prevent clipping issues without having to use more expensive methods such as shape keys.
Blender Setup
Below you can see the outfits of the model, it's all merged into a single mesh and all onto a single texture.
(I could have included the coat on this atlas, but I wanted to preserve my sanity of having to redo the atlas and baking for everything)
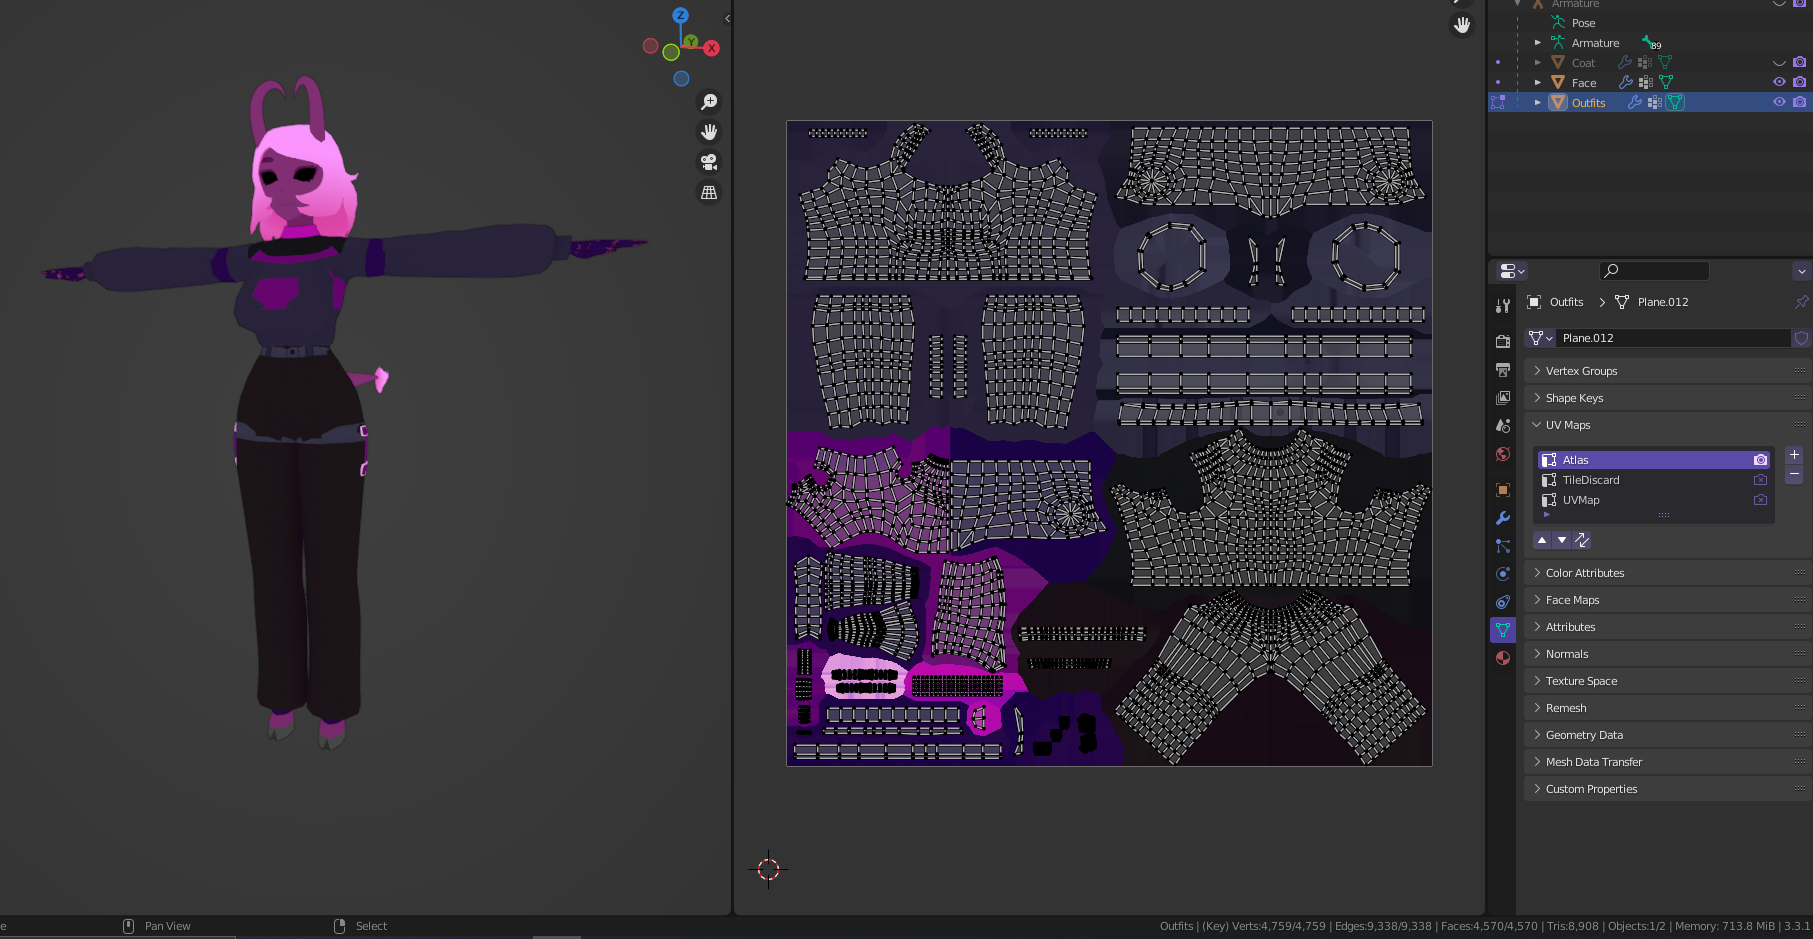
I then use a second UV map as seen on the right in the Properties window to lay out the UVs I want to individually enable/disable. You can change the tile settings in the Overlay dropdown to make this easier to visualize. Keep your UVs within the bounds of each tile or it won't work. You can see how I have mine laid out as well as the overlay settings in the screenshot below.

In-Unity
Now in Unity, we'll be using Poiyomi 8.1+ for our UV Discarding, be aware that this works on any shader that implements UV Discarding.
In Poiyomi, this feature is located under Special FX, you need to enable it. Change the Discard UV to the tile UV you just made in the previous section. This would typically be UV1 (since in Poi, UV numbering starts at zero) for best results, leave Discard Mode at Vertex, there is basically no reason to use "Pixel" discarding and doing so virtually defeats the best purpose of using this method.
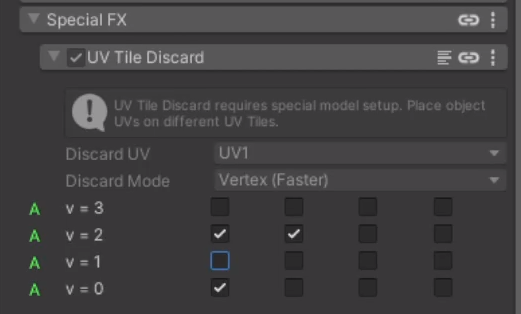
In Poiyomi, right-click the values of the tiles you're using and enable them to be animated. This allows you to use them for toggles.
Checked = Off (Discarded)
Unchecked = On (Not Discarded)
You then would make animation toggles exactly as you would for any other toggle animation, just now you toggle on and off your UV tile discards. You're basically done now!