Unity Tips
Various small and big tips for doing stuff in Unity
- UV Tile Discarding
- 3.0 Avatar Menu Text Formatting
- Recovering an Accidentally Deleted File
- How to Easily Test Your Dynamic Bones / Physbones
- Physbones: How to Grab Them in The Editor
- Physbone: Angle Limit Substitution for Colliders
- Contacts... How Do They Work?
- Cross-Avatar Interactions with Avatar Dynamics
- Always Reconfigure Your Rig
- Reduce Your Max Particles!!!
- Nesting Parameters
- Don't Waste Parameter Space
- Open Multiple Scenes at Once
- Notes On Stations On Avatars
- How I Test Weight Painting on Avatars
UV Tile Discarding
This page could do with some revisions to better explain things. However still serves well as a guide.
UV Tile Discarding, AKA "the best thing that'll ever happen to you" is a method of optimization and a valuable tool for avatar creation at the same time.
It effectively allows you to use a secondary UV to align islands across a grid and discard those parts of the mesh as you please. Still doesn't sound exciting yet? This basically allows you to have extremely customizable avatars with fewer skinned meshes and materials.
The avatar shown in the video below only uses a total of 3 skinned meshes and 3 materials, it has 5 different pieces of clothing that can be mixed and matched at any time. Do I have your attention yet?
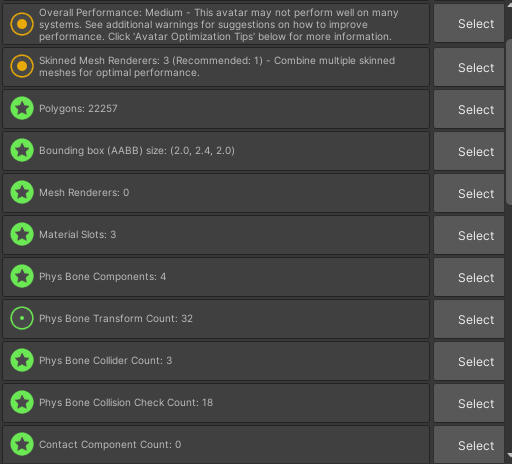
The best part about this method is that this isn't some trick that just tricks performance stats into thinking it's optimized, like using transparency masks instead, which really is not an ideal method for doing this. UV Tile Discarding allows the parts of the mesh that aren't seen to be not rendered, period; This is because the discarding happens before the shader fragmentation stage, which I will spare you the technical details of, just know that this is a good thing and that people much smarter than me can likely explain it better. In short, it means you get to use less skinned meshes and materials, which means less draw calls, less being rendered.
The Meat of This Page
"How do I do it?" you may be asking, don't worry I'm finally at the point of explaining it.
There are some general things you should keep in mind when using UV Discarding:
- This is best used on parts of the mesh that share the same material settings since this only works most effectively when used on a mesh with very few materials.
- This means those textures should be atlased.
- You can't exactly use special transition effects for it, or at least you'll need to be creative with how you do it. So that means basically no dissolve transitions.
- Again unless you can figure out a way to go about doing it regardless, which if so I implore you to let me know so I can add it to this page, I haven't done much research on it myself.
- You need to use a shader that has UV Discarding on it to be able to utilize it.
- For this example, we'll be using Poiyomi 8.1+, which also has a page dedicated to UV Discarding as well that I recommend checking out, it provides better visual examples.
- It'll probably look weird to people who have shaders disabled.
- Still better than other "outfit malfunctions."
- This can also be used on the body mesh of your model to toggle off and on parts of the body.
- This is most helpful to disable the body underneath clothes to prevent clipping issues without having to use more expensive methods such as shape keys.
- I, unfortunately, neglected to utilize this in the model used in this page because I didn't think about it at the time I was making it, which I'll be rectifying later.
- This is most helpful to disable the body underneath clothes to prevent clipping issues without having to use more expensive methods such as shape keys.
Blender Setup
Below you can see the outfits of the model, it's all merged into a single mesh and all onto a single texture.
(I could have included the coat on this atlas, but I wanted to preserve my sanity of having to redo the atlas and baking for everything)
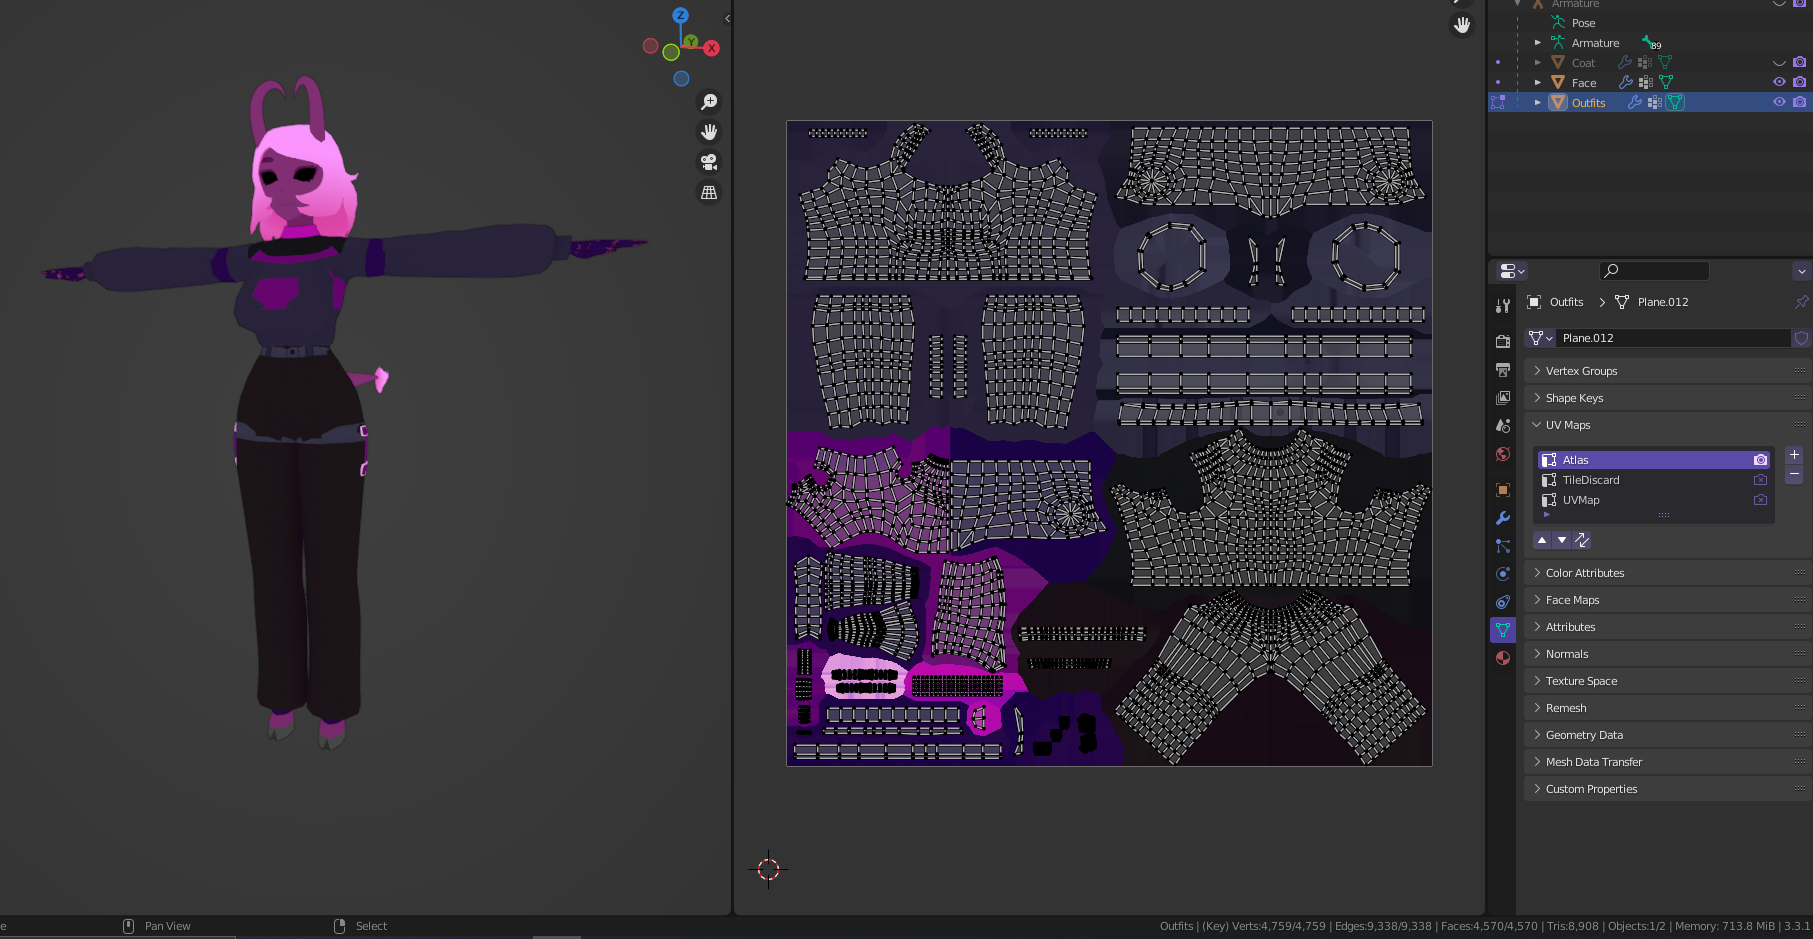
I then use a second UV map as seen on the right in the Properties window to lay out the UVs I want to individually enable/disable. You can change the tile settings in the Overlay dropdown to make this easier to visualize. Keep your UVs within the bounds of each tile or it won't work. You can see how I have mine laid out as well as the overlay settings in the screenshot below.

In-Unity
Now in Unity, we'll be using Poiyomi 8.1+ for our UV Discarding, be aware that this works on any shader that implements UV Discarding.
In Poiyomi, this feature is located under Special FX, you need to enable it. Change the Discard UV to the tile UV you just made in the previous section. This would typically be UV1 (since in Poi, UV numbering starts at zero) for best results, leave Discard Mode at Vertex, there is basically no reason to use "Pixel" discarding and doing so virtually defeats the best purpose of using this method.
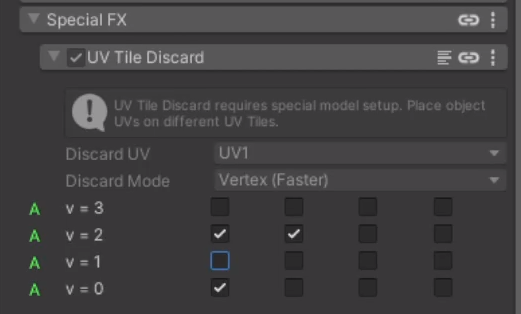
In Poiyomi, right-click the values of the tiles you're using and enable them to be animated. This allows you to use them for toggles.
Checked = Off (Discarded)
Unchecked = On (Not Discarded)
You then would make animation toggles exactly as you would for any other toggle animation, just now you toggle on and off your UV tile discards. You're basically done now!
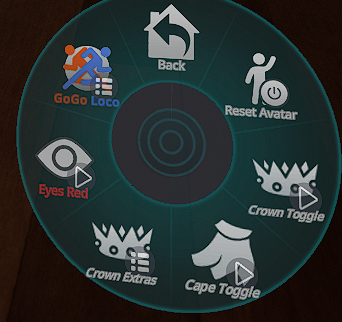
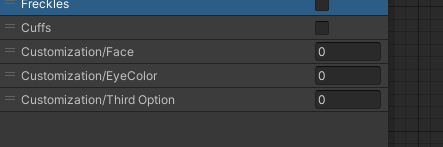
3.0 Avatar Menu Text Formatting
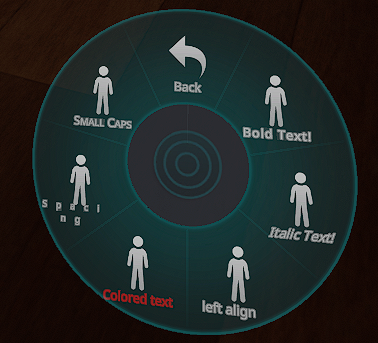
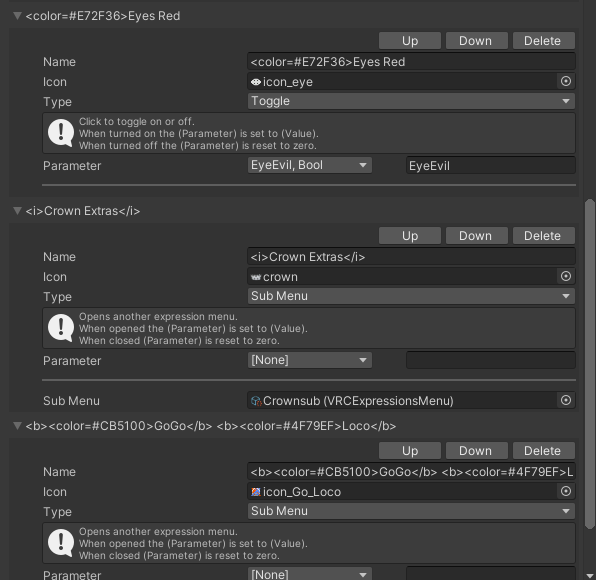
You simply use the formatting in your menus as seen above.
Recovering an Accidentally Deleted File
Have you ever accidentally deleted the entire folder for one of your avatars once? I have! And luckily, despite what Unity tells you, if you accidentally delete a file in the editor. It's still possible to recover it, the catch is that you can (probably) only recover files that you've just deleted. Sorry if you were hoping to get that file back you accidentally deleted a week ago. This probably may only work on windows too. It does definitely work in my case, I've had to do this an embarrassingly large amount of times.
What?? How do I do this?
Whenever you accidentally delete a file, you can right click in the project window where you deleted it and right click in the empty space and click "Undo Delete" and woah! It's back! Crazy right? If that doesn't work, check the trash bin on your computer.
How to Easily Test Your Dynamic Bones / Physbones
This process works the same way for Physbones!
Tired of going back and forth tweaking your settings, then hitting play to see you still can't get those dynamic bones looking nice and having to repeat? Boy do I have a solution for you!
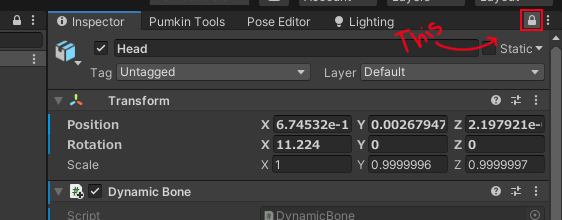
Step 1. Lock it Up
Step 2. Tweak to Your Heart's Content
Locking the Inspector lets you test your dynamic bones much more easily by preventing it from changing whenever you switch to a different GameObject.
"But wait!" you exclaim, "If I do it this way my settings won't be saved when I leave play mode!" I have a solution for that as well.
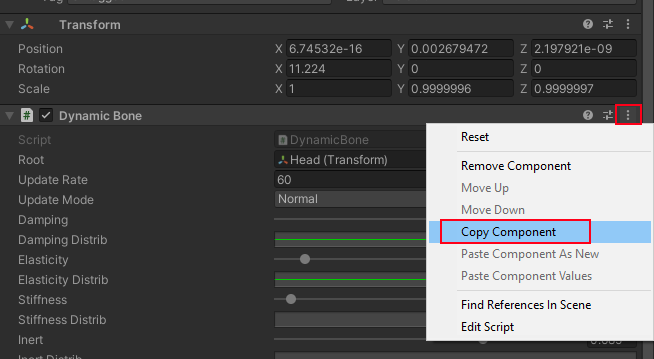
Step 3. Copy/Paste Component
When you're done adjusting your settings in play mode, select the three dots on your Dynamic Bones component and click "Copy Component" then exit play mode.
Then click the three dots again in your Dynamic Bone component and click "Paste Component Values"
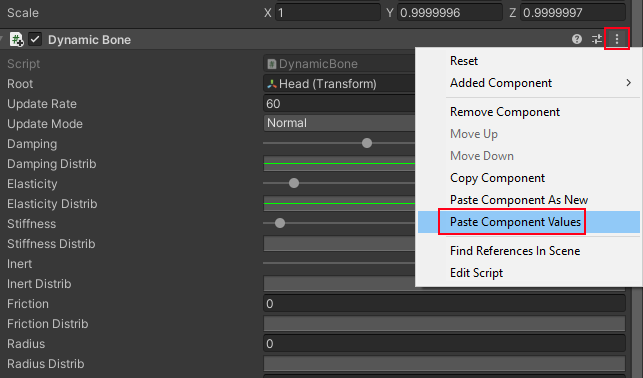
And you're done!
It is important to note that you'll only be able to do one at a time via this method since you can only have one component copied at once. You can work around this though by creating an Empty GameObject in play mode and then copying your Dynamic Bones from your avatar to that Empty and then copy the Empty GameObject, exiting play mode, and then pasting the Gameobject, then you can copy the saved values from that onto your actual avatar.
Remember to unlock your Inspector window when you're done!
Physbones: How to Grab Them in The Editor
You can grab and test physbones in play mode, how one may ask? It's pretty simple!
Step 1. Add a camera to the scene

Position the camera however works best for what you're doing, the shortcut Ctrl+Shift+F will align the camera with your current scene view.
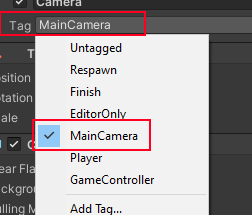
Step 2. Change the Camera's Tag to "MainCamera"
Step 3. Go into PlayMode and Test!
Physbone: Angle Limit Substitution for Colliders
Learned this from this tweet by Tupper which has a video demonstrating it.
You can use less physbone colliders by clever use of physbone angle limits alongside the pitch, roll, and yaw fields.
This can generally be used to prevent things such as hair, skirts, capes, etc, from clipping into your avatar's body. It helps keep your performance ranking high by allowing you to eliminate some unnecessary physbone colliders on your avatar.
In Blender, you would enable "Axes" under your armature's viewport settings. This allows you to see the XYZ of each bone at it's head.
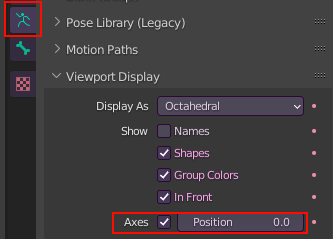
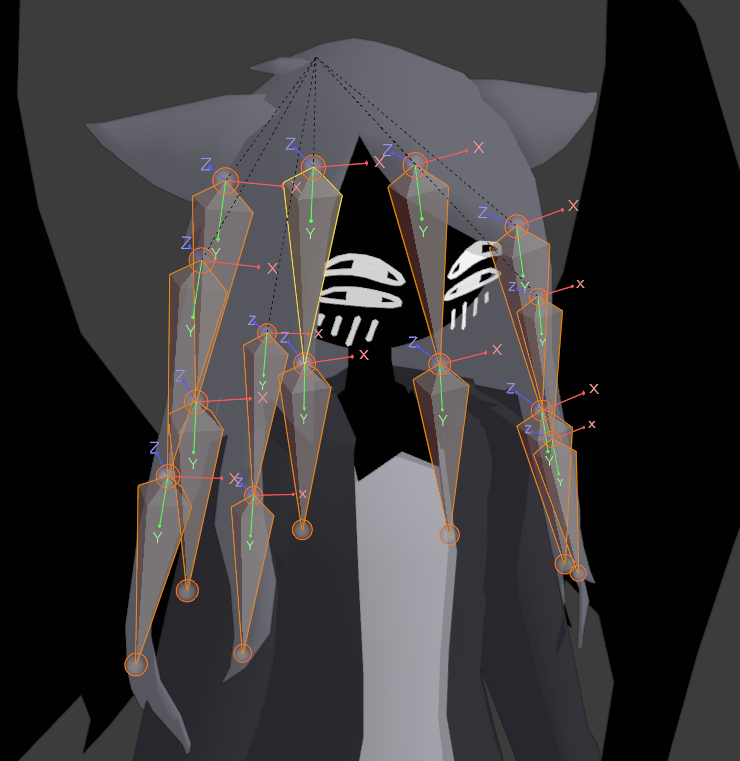
When done, XYZ axes should appear at the head of your bones, the one we want to pay attention to is the Z axis. (Note: I have every bone except for the hair bones hidden in this image so that it's easier to see)
 We want to use CTRL+R in Blender to rotate the Z axis facing either inwards towards the head (as seen above) or outwards facing away from the head, either will work.
Export the model to Unity.
Save your existing scene in Unity before exporting the model and then go to a different scene, reopen the desired scene after the model has been fully exported and is in your Unity project. Otherwise it may screw with your model in undesirable ways. Reconfigure the model's rig by resetting the pose and enforcing T-Pose in the configuration screen. You should be able to safely return to your avatar's existing scene. If your model ends up contorting, I recommend using Pumpkin Tools to reset pose.
In Unity, adjust your physbone angle limit to whatever how much you believe you'll need, then adjust the pitch so that the blue angle cone is pointed away from your avatar, enough so it won't clip into yourself as much. Test in play mode to see if it clips through your model.
If your model has longer hair, or a long cape, I recommend using curves for your angle limit and pitch to fine tune it.
As we can (sort of) see below now, it helps prevent a great deal of clipping into the model! Especially when moving backwards.

Contacts... How Do They Work?
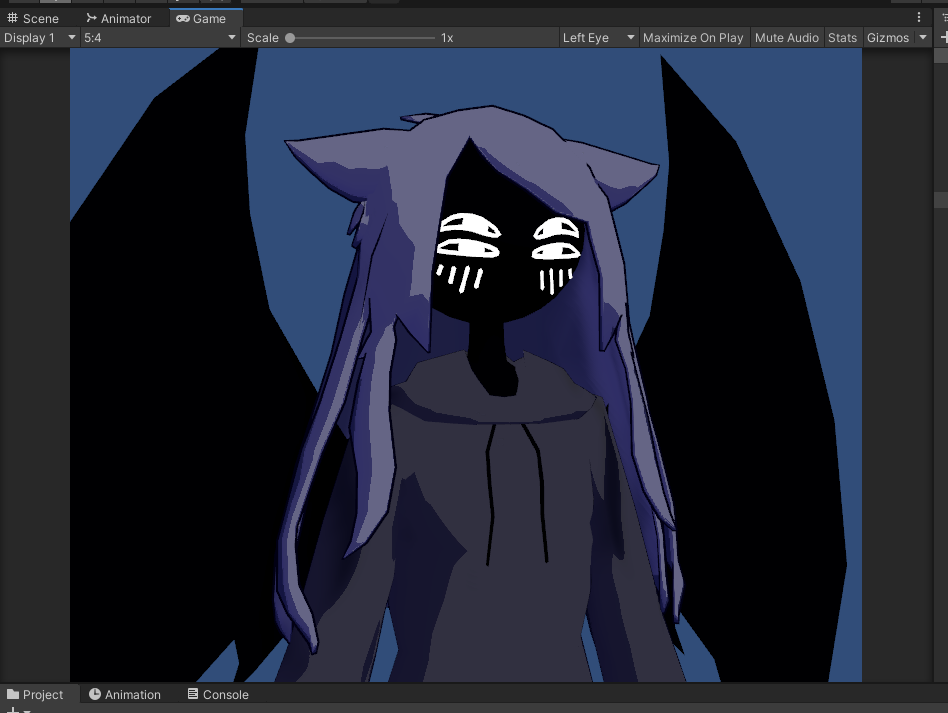
 Give headpats to the shadow creature
In this semi-guide I'll explain how contacts work to my own limited understanding of them, great idea right?!
I recommend reading the official documentation for contacts for a more technical look at how they function! This page is just the utmost basics.
The Contact Receiver Component

I won't be going through every function of the component as the official documentation lists it all pretty clearly.
Collision Tags
This is where you choose what the contact receives signals from when touched by the corresponding contact. You can add pretty much as many as you want, including custom tags which are really cool! Those will be talked about in another page.
Reciever Type
There are three types of receiver types, Constant, OnEnter, and Proximity.
I may be slightly incorrect on some of these
Constant - When a sender (as determined by what is listed in collision tags) touches the reciever it'll change the value of a parameter. For Float values, it will be 1.0, for Bool values, it will be True, for Int values, it will be 1. It is recommended to use a Bool
OnEnter - When a sender touches the reciever, the value will reset on the next frame. For Float values, it will be 1.0, for Bool values, it will be True, for Int values, it will be 1. It is recommended to use a Bool. You can set a "Min Velocity" which dictates how fast that sender has to move to trigger the contact. It is recommended to use a Bool
Proximity - Gives a float value of 0.0-1.0 depending on how close a sender is to the center of the contact. When multiple senders touch the contact, it'll prioritize the closest sender.
Parameter
This is the parameter is updated when the reciever is touched by a sender. This can be used in your Animation Controllers to drive animations as you would with any other parameter.
These do not have to be listed in your expression parameters.
Cross-Avatar Interactions with Avatar Dynamics
VRChat #AvatarDynamics enables Avatar-to-Avatar Interactions.
— Haï~ (@vr_hai) March 7, 2022
Have you tried the spray can in the Avatar Dynamics Hub world?
This is a Contact Receiver. It reacts to a Contact Sender from @Yash884's avatar lighter!
VRCContactReceiver / VRCContactSender: https://t.co/QNAfEriHQI pic.twitter.com/ss2ut2ZACT
Contacts allow you to have cross-avatar interactions such as the one above.
The lighter has a VRC Contact Sender tagged with "Fire".
— Haï~ (@vr_hai) March 7, 2022
The spray has a VRC Contact Receiver tagged with "Fire".
When the lighter comes in contact with the spray, the spray bursts into flames!
The spray enables its own VRC Contact Sender. It will light up other Receivers! 🔥 pic.twitter.com/FYBHPC7ROn
The tweet above explains it perfectly, by creating a custom tag as such, you can make a contact reciever that allows contact senders with the same exact tag to send signals to it.
Both tags must have the exact capitalization!

So if you were to create a Contact Sender with a the tag "Fire" you could interact with the avatar's spray can in the tweet seen above and set it ablaze! You can apply this idea to nearly every avatar to create special cross-interactions with avatars!
Always Reconfigure Your Rig
If you make any changes to your rig, move a bone a little. Delete a bone, rename a bone.
Reconfigure your rig in Unity.
Not doing so can create a myriad of problems, such as bones becoming long and contorted, or turning in odd ways.
Go to your model file, go to "Rig" in the Inspector window, then click "Configure" once you've done so, scroll down until you see the "Pose" button, click that and click "Reset Pose" then after that, go into Pose and click "Enforce T-Pose" then hit Apply. This should automatically fix any issues with the model. Note that if you have any animations that affect non-humanoid bones then you may have to fix them, this is just part of the process.
Reduce Your Max Particles!!!
I'll be fully honest I am very inexperienced with particles, but this is one thing I know that a lot of people apparently don't.
Reduce the Max Particles in the main module to just what you're actually using, by default, it's set to 1,000. This will cause VRChat to count that Particle System as if it was actually using all 1,000 particles, while it probably won't actually affect performance, due to how performance ranking works it’ll mark your avatar as medium or lower.

(The performance rankings from Excellent to Poor with the particle thresholds.)
Nesting Parameters
You can nest parameters by naming it along the lines of "ParentParameter/ChildParameter" to nest parameters inside each other like so. Helps a ton when you have a large amount of parameters. Nesting can also be done on the Shape Keys of a model.
Don't Waste Parameter Space
Many avatar creators, including myself have made the mistake of putting VRChat's default parameters into their parameter staging file.
While this typically doesn't cause issues, it does take up unnecessary space you could use for other things. Default parameters are already networked and don't need to be put into the parameter list.

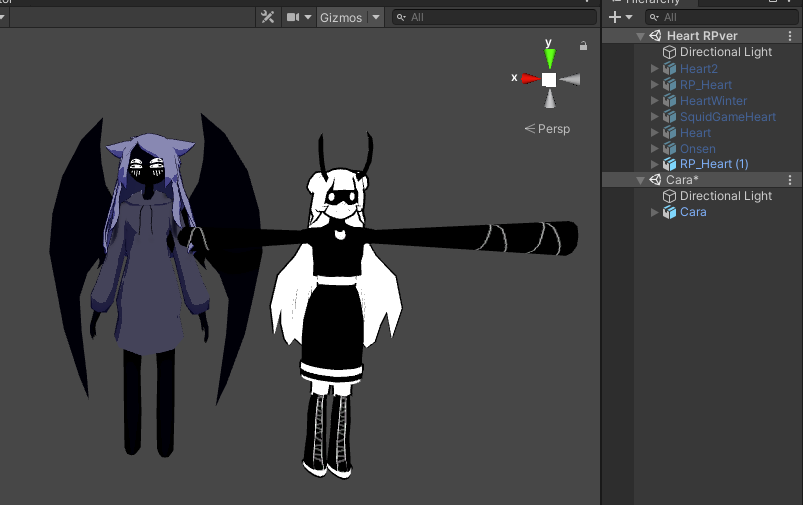
Open Multiple Scenes at Once
Have multiple variations of one avatar strewn across multiple scenes? Do you need to copy something from your main version of that avatar to all those variations? Tired of swapping scenes constantly? or want to have multiple lighting setups to see what your avatar looks like in various lighting? Do I have the tip for you!
You can have multiple scenes open at once by right clicking any scene file in your projects window and clicking "Open Scene Additive"
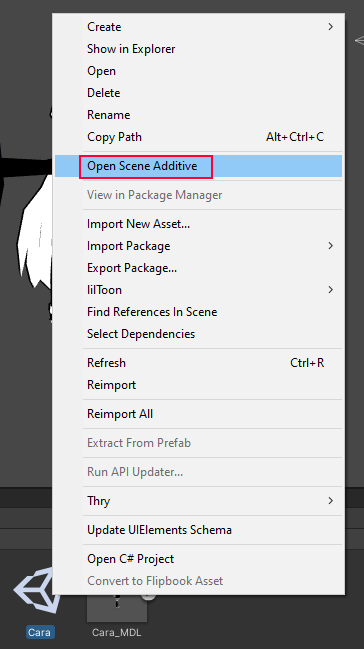
You'll now have two scenes open at once!
Note: If you have lights in both scenes, both will be used. If you have a Directional Light in each scene, the lighting will be very bright, turn off one of them in a scene to avoid this.
Along with this, I'll explain what these all do when you right click the scene name while you have multiple scenes open.
The Unity documentation explains all this too.
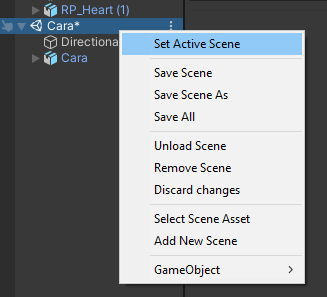
Set Active Scene
Whichever scene is set to active will be the scene new GameObjects are created in when you create a new GameObject from the "+" button in the Hierarchy.
Save Scene (As/All)
Saves the scene, saving the scene as will let you save the scene as a different one, save all will save all scenes open in the Hierarchy.
Unload Scene
Unloads the scene, but keeps the scene in the Hierarchy window.
Remove Scene
Unloads and removes the scene from the Hierarchy window.
Select Scene Asset
Selects the scene’s asset in the Project window.
Add New Scene
Adds a completely new scene to hierarchy.
GameObject
I typically like to use this to test different lighting setups on my models, like so.
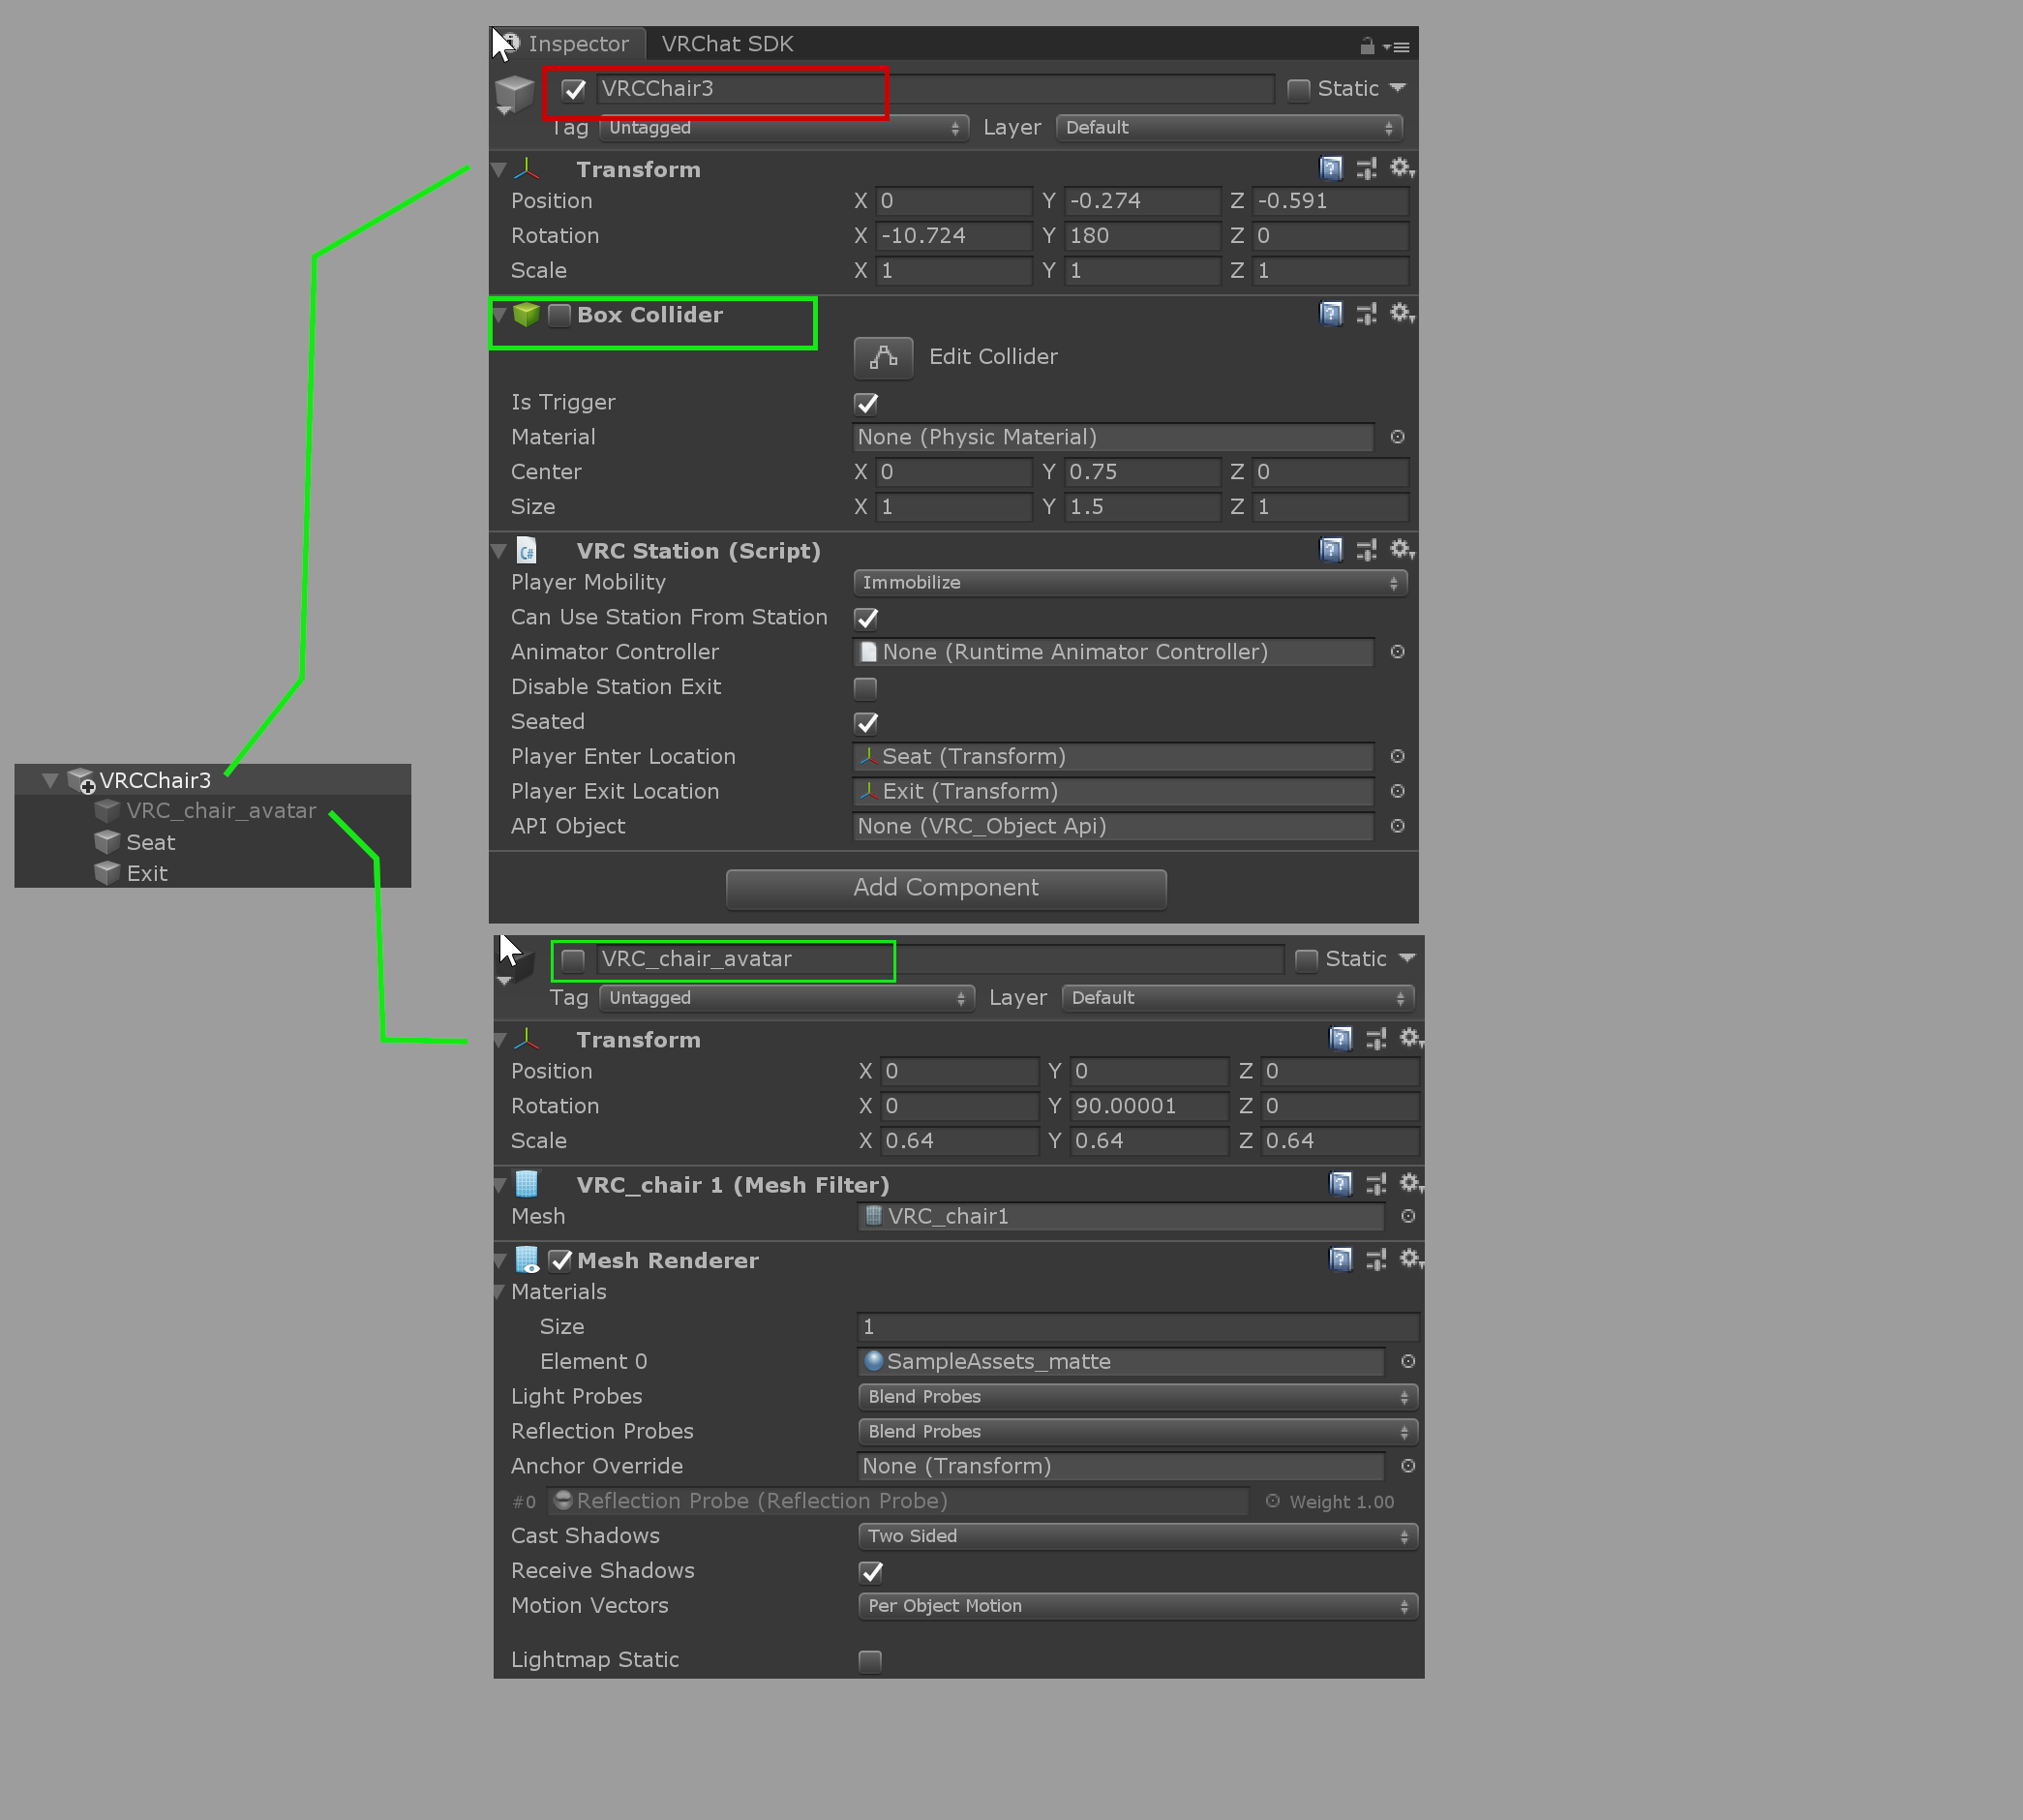
Notes On Stations On Avatars
Don't Put Anything Into the "Enter/Exit Location"
This appears to cause the entire avatar to break and not load, I have no idea why, just don't do it. (This is possibly a bug?)
Don't Disable the Parent Gameobject
The documentation notes to not disable the parent gameobject of the chair.
Don't animate the stuff in the red box, you can animate the stuff in the green boxes basically.
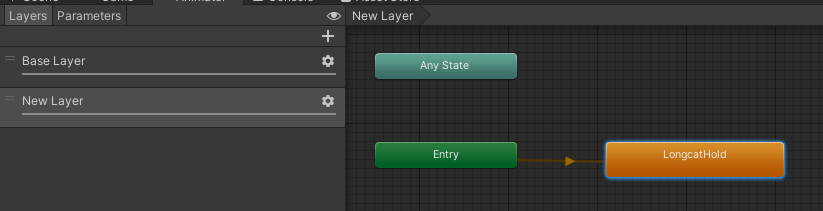
Forcing an Animation
Don't put your sitting animation on the base layer! Do it on a new layer, make sure to add a Tracking Control state behavior to enable and disable what you want tracked or not by VRChat if your animation needs to animate any of those specifically.
How I Test Weight Painting on Avatars
Typically most people (at least the people I know) often test their avatar using MMD worlds and such. This involves uploading the avatar which takes time and isn't really ideal. You could try converting an animation onto a character in Blender but that can be time-consuming and wonky, and it's a bit odd to do in Unity normally. I have a way that is significantly easier!
Prerequisite: Install Pumkin's Avatar Tools
Pumkin's Avatar Tools is a Unity Editor Script that adds a ton of useful functionality for avatar creation, I recommend it for everyone, I use it a ton.
I've been calling it Pumpkin's Avatar Tools this entire time and I only realized it now god help me
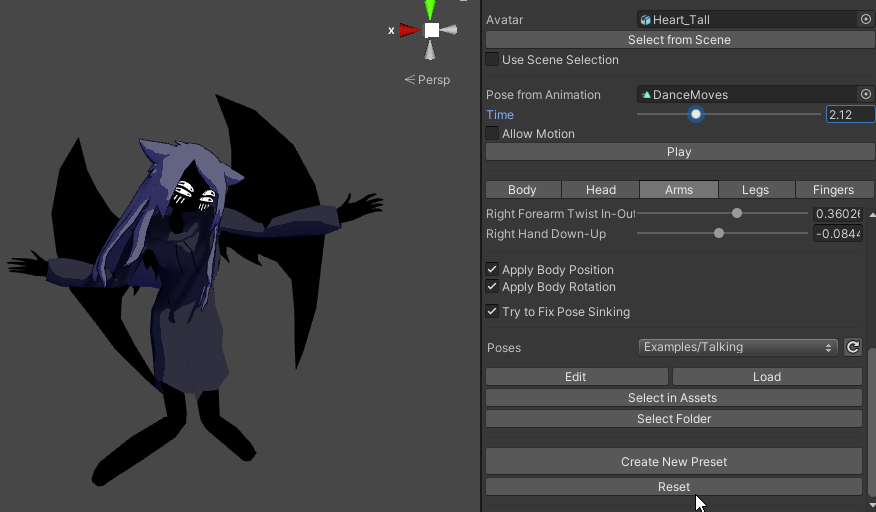
Using The Pose Editor
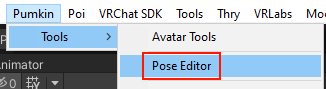
Once you have Pumkin's Avatar Tools installed, there should be a new tab at the very top of your screen of the titular name "Pumkin" then open the "Tools" dropdown and select "Pose Editor"
Once the window is open, drag in your avatar into the "Avatar" slot, or select the avatar in your Scene Hierarchy and click "Select from Scene"
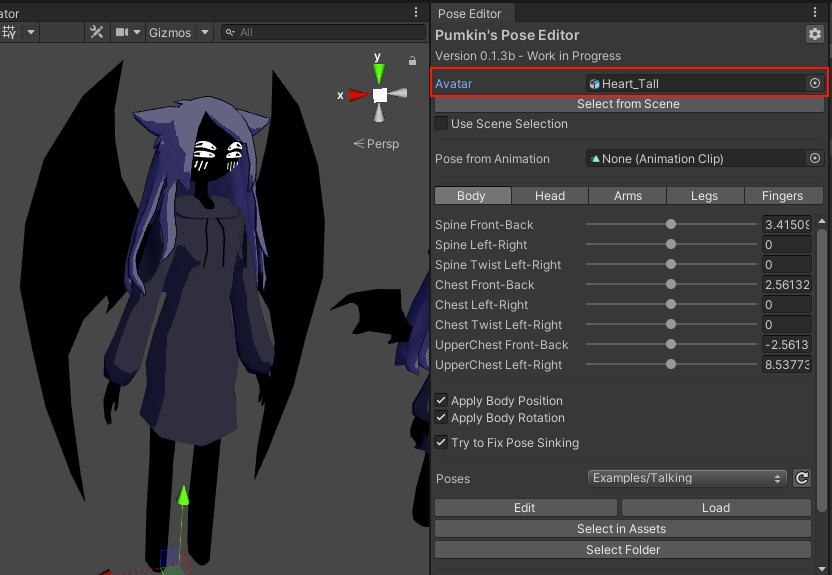
You'll now have several sliders you can use to mess with your avatar! This should sufficiently assist in your goal to test weight painting, however you can go a step further and put an animation clip into the "Pose from Animation" field.
You must have usable HUMANOID animations in your project for this to work! You can find some around the internet.
Personally, I have a pack of Fortnite animations that I've had on my computer for a couple years now, so that's what I'll use to demonstrate.
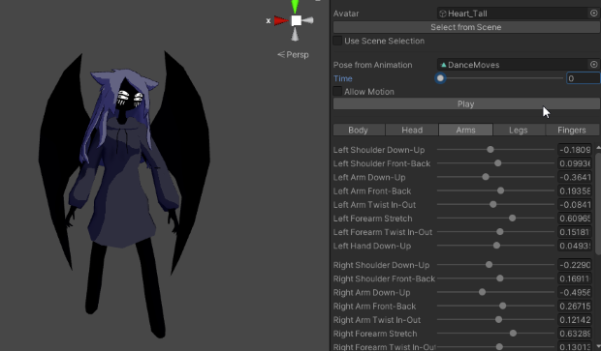
With this, you can change the animation on the fly, and even use it in playmode as shown in the GIF above! It'll also automatically loop.
Once finished, you can scroll to the bottom of the window to reset to the avatar's original pose.