Post Processing and You
Post-processing is an arcane topic if you've never dealt with it before. And with changing standards, and years of various games and applications having different definitions for "post-processing", the term can be pretty confusing. This guide will explain what post-processing is in Unity, and specifically, VRchat, and why you should use it on everything.
This is based on my guide at
https://gitlab.com/s-ilent/SCSS/-/wikis/Other/Post-Processing
- Why does post-processing matter?
- Installing the post-processing stack
- Setting up post-processing in your scene
- Setting up local post-processing volumes
- Creating post-processing profiles
- Scene setup tips when using post-processing
Why does post-processing matter?
To really understand how post processing works, we have to take a detour.
This is a camera.
A traditional camera works by using a lens to focus an image into a sheet of chemically treated film. The film, being exposed to the light, undergoes a chemical reaction. In response to the light, the image is etched onto the film.
The properties of the lens - how perfect it is, how it's curved - lead to certain artifacts in that captured image. For example, a halo around bright lights is typically caused by imperfections in the lens scattering the light around.
The human eye works differently, but the basics are the same - light, lens, receptor, chemical reaction.
In the history of photography and image capture, a particular pattern has emerged. It seems obvious to say that a photograph is not as bright as the place it was captured from. But it still looks like the real thing. How is this possible?
It's because the chemical reaction between the light and film is carefully tuned to respond to different levels of light in different ways. If you've heard of 'film stock', this is the difference between them - different stock has a different chemical profile, and responds to light differently.
From this page, which goes into great depth.
In this image, the section labelled gamma marked by dotted lines is all that can be seen without post processing.
Going back to the main point; why is this needed to understand post processing? Because neither your monitor nor a VR headset are as bright as the places they are displaying. To work around this, the solution is the same as with film - having a light response curve that fits things to their natural appearance. This is "tone mapping". With this, you have the building blocks of a proper render.
That goes for cel shading and non-photo realistic rendering too. After all, paintings and artwork aren't as bright as the real world. To get things looking right in VR, we need to use the right shading to evoke that colour contrast for us, and that's what tone mapping is for.
These are the true basics of post processing.
And Unity, by default, doesn't do any of this until you add the post processing stack! In scenes without post processing, all you're seeing is the raw colour/lighting data, carelessly thrown on your display. Colours get shifted, bright areas and objects look weird when they get brighter - none of this matches what we would expect to see with our own eyes.
This applies to the Unity editor, too. When you set up lights in your world, you should have post processing set up and enabled - probably the second or third thing you should add. If you don't, you will end up with light intensities that make no sense, and lead to areas of your world being too dark/bright. Even though post processing is the last thing rendered in game, it should be set up very early in creating a world.
Installing the post-processing stack
First off, you'll need the latest release of the Post Processing Stack VRchat supports.
Note: Post Processing Stack v2 is free. It does not cost money, and it is not on the Unity Asset Store. Do not buy post-processing systems off the Asset Store, they will not work in VRchat.
Fortunately, the latest version of VRC's SDK will install it for you automatically!
However, here are some manual install steps if you don't have it.
Now you've got Post Processing v2 installed!
Setting up post-processing in your scene
Okay, now you have it installed, let's go over the basics of using post-processing. First, we need to cover post-processing volumes and how they work.
Note: 1's VRWorld Toolkit can set up post-processing for you! I recommend using it to install it and set it up in your scenes.
There are two main components to be aware of when setting up post-processing:
-
Post Processing Layer, which goes on the camera and receives post processing. When you add this to your camera, it sets the camera as the Layer Trigger, which interacts with...
-
Post Processing Volume, which goes in the map and presents post processing. When a Layer Trigger is inside a volume, it will gain that volume's assigned post processing. You can have several volumes in your map with different colour grading settings, or even create adjustable graphical options by animating or toggling objects!
A volume with a collider/trigger component will affect anything inside it. You can set the width of the transition from not applied to applied here, too.
A volume set to Global will cover the entire map. This means you can modify post processing from triggers and animations through volumes!
The volume intensity slider can be animated. This means you can have post processing tied to triggers that animate the intensity of a volume.
And how do you set this up? First, let's cover adding a global scene profile.
-
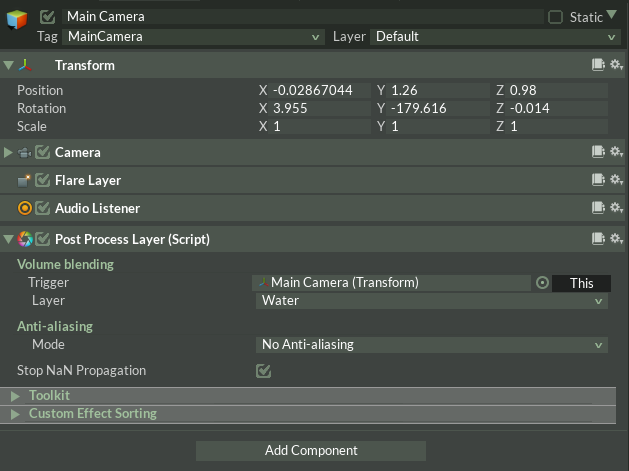
Add a Post Processing Layer to your Main Camera. The Layer is what receives the post processing. Note that the Trigger is automatically set to your camera. This means the Camera position is what controls what the post-process layer uses up.

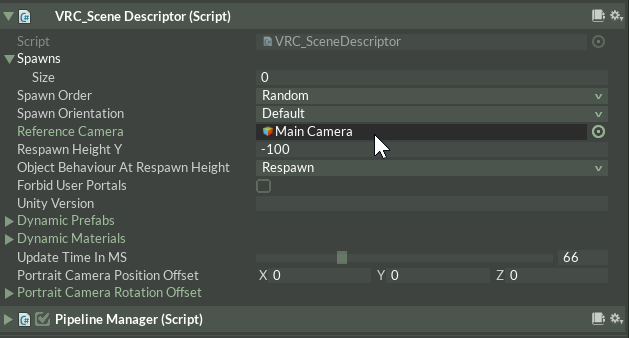
Make sure this camera is set as the Reference Camera in the VRC_Scene Descriptor.

Also, you will need to decide on a Layer - as in, a regular Unity Layer - for your Post Processing Layer to process. This is important, because without a Layer set it won't see your Post Processing Volumes. All your Volumes will need to be assigned this Layer in Unity. Because the post processing system will be scanning all objects on this layer, I recommend something that doesn't have many other objects on it - here, we'll use Water.
Note: Set Anti-aliasing to "No Anti-aliasing". Don't change it. Using anything else can cause brain-searing double vision in VR in the worst case, and glitchy flashing transparency in the best case. VRC already enables anti-aliasing.
-
Create a new GameObject in your scene, and add a Post Processing Volume component to it. Tick the box for Is Global.
Note: You can't have a volume and layer on the same object. Make sure this object isn't a child of your camera, or you'll run into issues.
-
I've made a sample profile to make things easier. You can download it here! (Right-click and Save As...) Drop it in your Assets folder, and then drag and drop it into your Post Processing Volume.
-
We're done! You should see a noticeable difference in your scene now.
Keep reading to see how to set up post-processing volumes that cover specific areas.
Setting up local post-processing volumes
This follows on from the previous page where we set up a global post-process volume Next, let's cover adding a custom effect that only affects a small specific zone in the scene - a post-process volume.
-
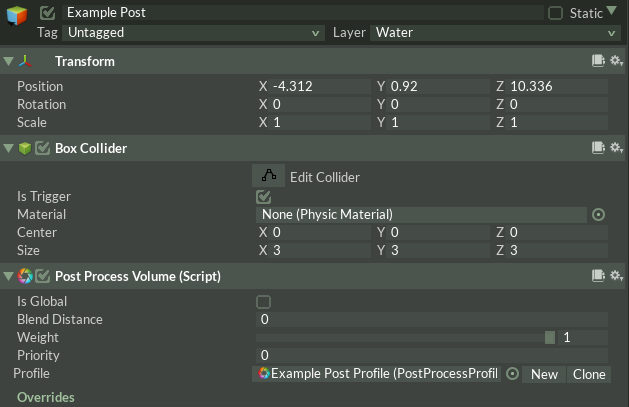
Create a new GameObject in your scene and add a collider to it, like a Box Collider. Tick "Is Trigger" on the collider.
-
Add a Post Processing Volume component to the object with the collider, and click the New button next to Profile.
-
When you click New, a new profile will be created next to your map, with the name Default Post Profile. Unlike Stack v1, you must add specific effects before you can use them. This allows for the Volume blending to work.


-
Click Add effect... and add some effects! To start, I recommend adding Color Grading.
You can use the On/Off button in the top right corner to toggle the individual effects. When activated, you'll also need to activate the specific overrides for each sections' options. For a base profile, you can click All at the top, which toggles all options to be effective.
-
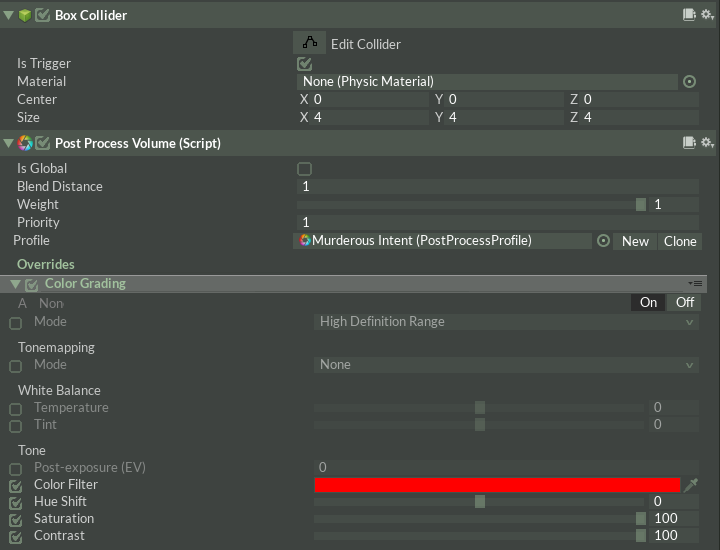
At this point, everything will still look the same. Play around with the settings, and you might notice nothing happens. But if you move the Main Camera inside the collider, you'll see them take effect! You should be able to tweak the post processing effects as you desire, and add more. Volumes tied to collider shapes that will only affect the player inside their area. For example...


This depicts a volume that, while inside, everything will go a deep and crazy red. Not for the faint of heart, or sound of mind!
But what settings should you use? Keep reading...
Creating post-processing profiles
There are some best practices to be aware of when adding post processing to your scene.
First, you should always have a base global post processing volume set up to have some basic tonemapping and bloom parameters. Then use seperate global or local volumes for colour shifting and other effects. For example, if you want to turn bloom off and on, have an extra object that turns it off, and toggle it with a trigger. Keep in mind that an individual volume can override as many or as few options as you want, and you can also use animations to smoothly interpolate between one set of options and any other!
Now, on to the available settings!
Colour Grading
The most important setting. You have four options for tonemapping: None, ACES, Neutral, and Custom.

- Don't pick None. It does nothing.
- ACES gives the most film-like image and is very popular with modern, cinematic games. It features powerful contrast, with bold colours and pale highlights.
- Neutral was most popular with games from a few years ago, and preserves colours well. It can look washed out compared to ACES, but it preserves colours and is well suited to stylised scenes. I recommend increasing the Contrast when using Neural to 30-50.
- Custom gives you many options, and allows you to define your own tonemapping curve. It's only recommended for experts who really want to achieve a specific look.
Between ACES and Neutral, which one you pick is up to preference. Try both and see which fits your map! Using Neutral allows you to receive the advantages of tone mapping without drastically changing the lighting of an existing map. It's also well suited to tweaking with the other colour controls. However, using ACES gives a rich colour balance, It needs strong lighting to reach full potential, but the end result can be very nice.
Underneath that, you're given a bunch of options for changing the colour tone of your scene. These are great for doing something artistic, or for providing options like a night-time filter that tints the world darker. If you want to tweak the colours, I recommend playing with the colour wheels, as they give fine controls that let you get amazing detail!
But keep your adjustments small! Unlike a film or game displayed on a screen, having intense colour toning will cause people in VR to get sick, as it will affect everything they see, including menus. A good benchmark is that if white objects are hard to identify as white, you have gone too far.
Auto Exposure
This can be enabled, but you can do without it too.
In a real camera, the brightness and darkness are defined by the camera's dynamic range, and the exposure point it's set to. Also, the human eye has incredible dynamic range, so you can see things really well even if there's a lot of difference between the darkest and lightest areas.
By default, Auto Exposure won't do anything until you raise the Minimum or Maximum value. The Minimum controls the lowest brightness the Auto Exposure will correct for, and the Maximum controls the highest brightness it will correct for. In other words, to make a dark place brighter, lower the Minimum, and to make a bright place darker, raise the Maximum.
In real life, things can get very bright. So, you might think to use really bright lights and take care of them with exposure. However, there is one caveat with VRchat - anything that is using a shader that doesn't account for Unity's lighting will likely be too dark or bright.
So, for safety's sake, you should keep things around the default values. This generally comes down more to your lighting than the post processing, though, but auto exposure drastically affects how people see your lighting.
Bloom
This should be enabled and tweaked according to taste.
An ideal set-up means having a low bloom intensity and little to no threshold. This combination means normally lit objects don't produce visible bloom, but bright objects and glancing reflections will, properly simulating a clean but not perfect lens into our world.
- Intensity: 0.01 to 0.3, don't go any higher!
- Threshold: Below 1.0, but ideally 0.
- Soft Knee: 1.0
- Clamp: 30 - not required, but prevents some kinds of griefing.
- Radius: Ideally 7, but higher is fine
- Anamorphic: Ideally 0, as it will rotate with the headset in VR.
- Fast Mode: Off, unless your scene has no bright objects.
- Dirt: Off. Don't use dirt. As Unity will tell you, "Using a dirt texture in VR is not recommended."
Bloom is additive. Any light that comes out of the bloom effect is added onto the image. If the bloom's Intensity is set to 1, that means the average brightness of everything is doubled, and everything is blurry on top. Also, eye adaptation values are calculated before bloom, so it won't stop your bloom from making the image too bright.
But if the threshold is zero, won't everything bloom?
No, because low bloom intensity means only bright objects will have visible glow!
In VRchat, lighting worlds isn't just about how the world looks, but about how players look in it, too. Because of this, relying on Threshold is a bad idea. This is an example of bad bloom. Because of a threshold, only the bright parts of the image have bloom... but because the intensity is high, the result is completely blown out from just a regular white shirt.
It's also worth noting that a harsh threshold can cause flickering spots of bloom that cause eye strain. So please, ease off on the intensity and threshold! If your world needs bloomy things, make them very bright.
To check your bloom is set up correctly, place a white sphere with white emission at 1.0 strength and verify that it has little to no glow.
Film Grain
You can tweak it as you like, but don't make it too strong or you'll overwhelm people! In VR, film grain doubles up about a metre out in front of you, and setting it too strong will cause people to get a broken sense of parallax.
Unlike Stack v1, you don't need to use this to cover up for the broken dithering. I'm only mentioning this here so that you know you shouldn't use it... unless you want film grain.
Everything else
That concludes what you can use. Now here's what you should NOT use.
- Anti-aliasing: Don't use it. This has lots of bugs. SMAA will cause the screen to double up. FXAA will make everything blurry. TAA will make everything super blurry, and renders objects out of order. In summary, don't use post-process anti-aliasing.
- Ambient occlusion: Ambient occlusion is an effect that looks best in games using Deferred rendering. VRchat is using Forward rendering. This means it gets applied on top of everything else after they get shaded, which is bad! It is also not optimised for VR - the performance cost is huge, and it renders differently for each eye! On top of that, the best quality AO is broken in VR. If you want AO, please bake your lighting. Don't use this.
- Depth of field: Has a high performance cost, and is very disorientating in VR. Please don't use this. If you really want to, make it be disabled by default.
- Motion blur: If you really want to use it, make it be disabled by default. Motion blur can cause motion sickness. In VR, it is automatically disabled.
- Screen-space Reflections: Only works for games using a Deferred renderer. VRchat doesn't support deferred rendering, so this can't be used.
- Lens Distortion: Often, people find this effect makes them really uncomfortable. It causes sickness in VR. In v2, Unity disables Lens Distortion automatically for VR.
- Vignette: Only to be used in very small amounts. A full-on vignette can cause sickness in VR.
The next section will cover some final notes for setting up your scene with post-processing.
Scene setup tips when using post-processing
When using post-processing, there are some useful rules of thumb to keep in mind about designing your scene.
- In real life, things are normally pretty bright before they glow... unless you're using a foggy lens. So don't set your glowing light emissive object intensities to 2, set them to 12!
- The falloff "shape" of bloom depends on the type of tonemapping used, and subsequently, the colour grading settings as a whole. With ACES tonemapping, high intensity red will become a glowing white-hot white at the core, fading to orange, but casting a red glow. Just like real life! But if you want your super-bright reds to glow red with a red core, use Neutral instead.
- It's tempting to control the colours in your scene with post processing, but do it by changing the colours of your lighting first. It'll look more natural that way, due to the effect of tone mapping, and it won't affect the menu.
- Don't be afraid to experiment, but it's always better to have the normal post-processing be plain and neutral first. Check by placing a basic Unity sphere or cube in your scene, and see if you can tell it apart from the background. Does it still look white? If it looks like it's a different colour, or glowing, or too dark to be visible as a result of the post-processing, then that's how players will look too.
Conclusion
I hope this helps you understand how to use post processing properly - and why it's really important to have.
Happy building!