Miscellaneous Avatar Knowledge
Chapters ported from various pages at https://notes.sleightly.dev
Write Defaults
Original page: https://notes.sleightly.dev/write-defaults/
Write Defauts
Write Defaults is an option on Animator States, and a headache for many Avatar Creators, as they behave in weird and unexpected ways. The expected behaviour is as follows:
The Write Defaults field decides whether or not the changes made with this animation are persistent or not.
If the Write Defaults field is enabled, the animated fields will return to their default state upon leaving the Animator State.
If the Write Defaults field is disabled, the changes will stay.
By default, Unity enables Write Defaults on newly created states, but the sample Animator Controllers VRChat provides are Write Defaults Off.
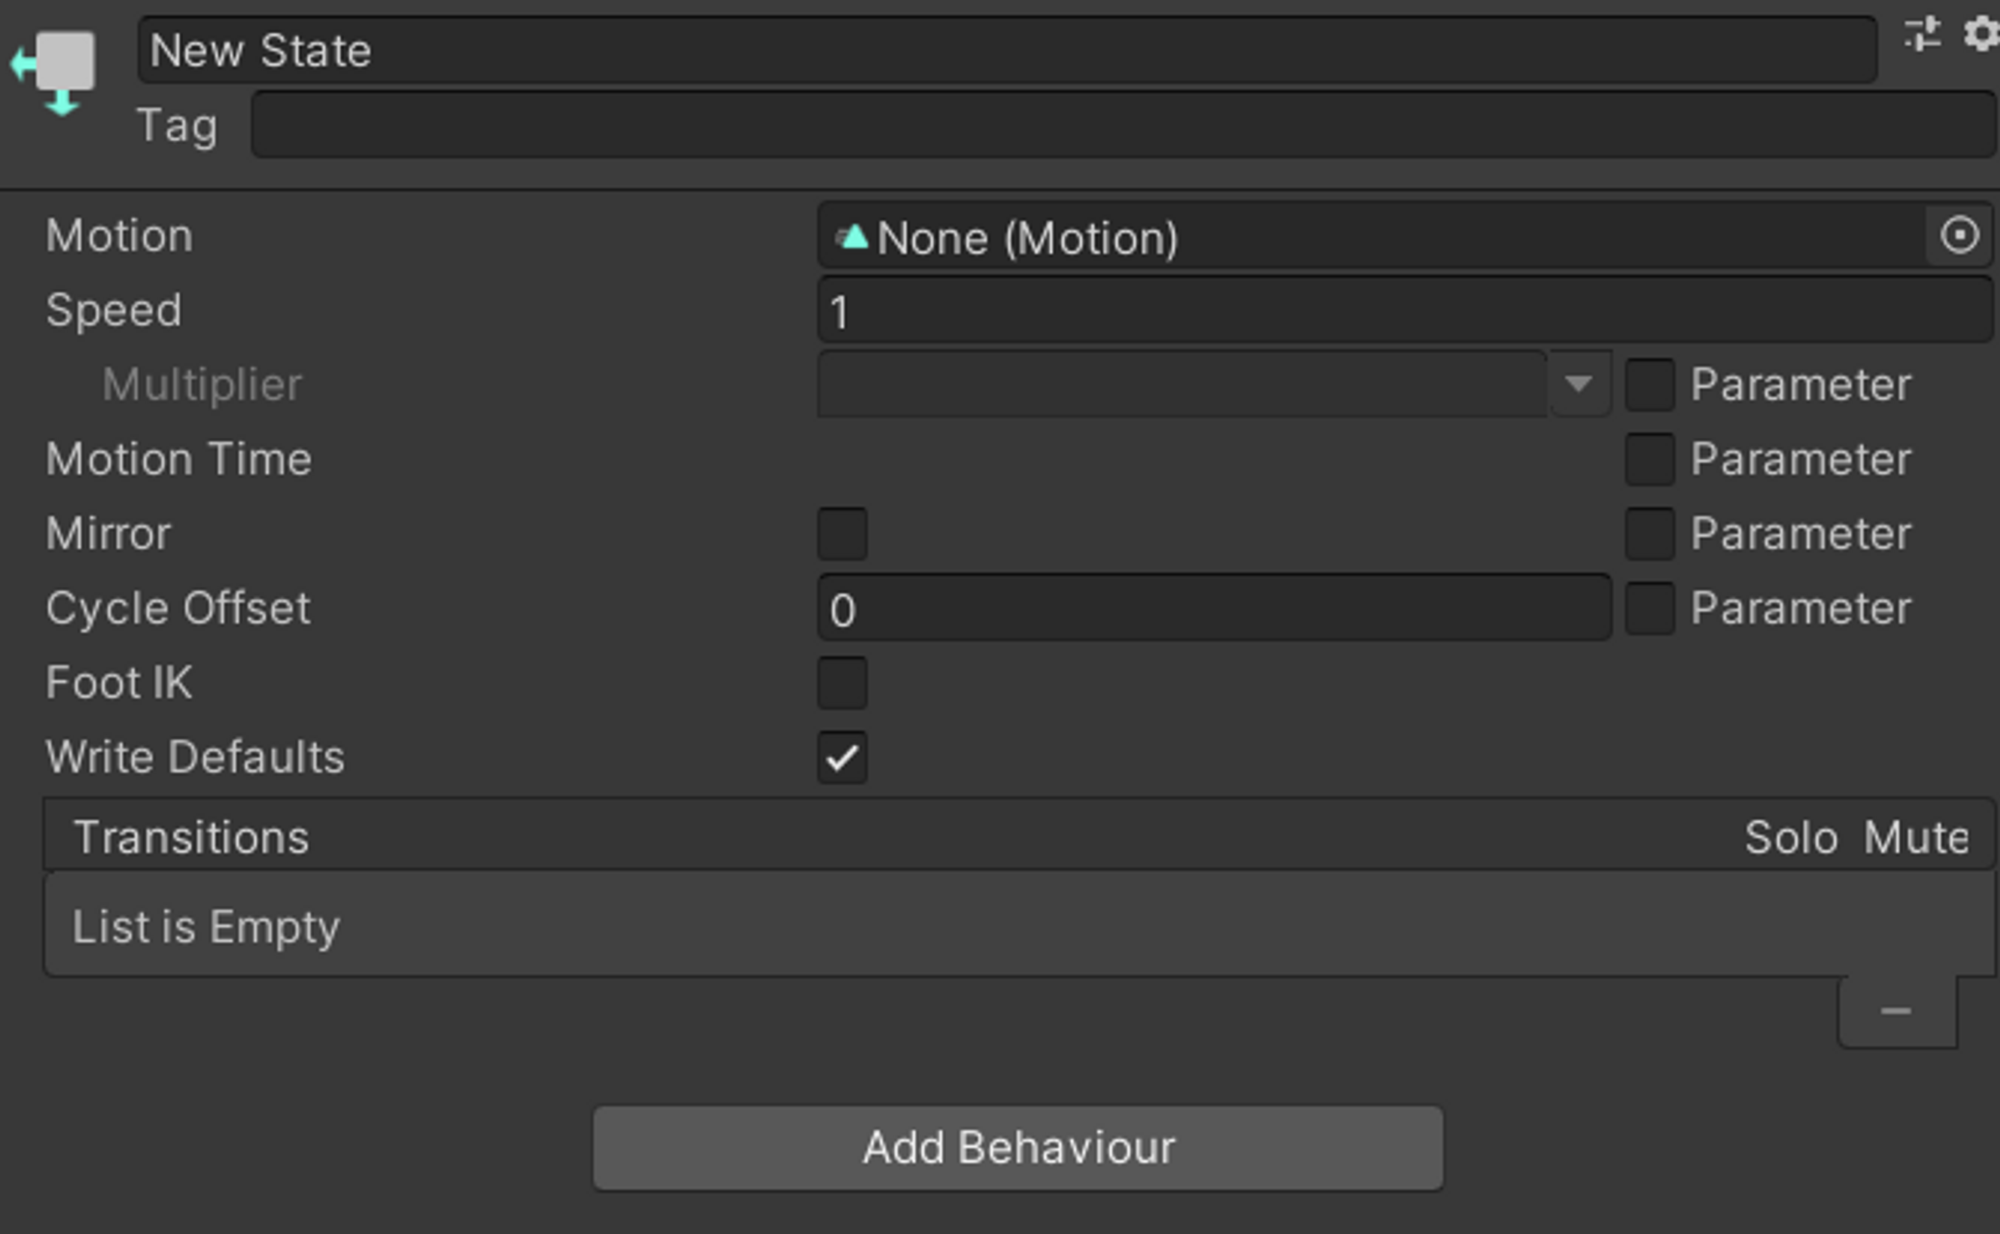
The default animator state, which defaults to Write Defaults on.
Example:
If you have a hat that is disabled in the hierarchy when starting the upload process (a.k.a. off by default), and you have a Layer that looks like this:

In the case of Write Defaults On:
- When going to the Hat On state, the hat would toggle on
- When going back to the Hat Off state, the hat would toggle off (since that is the default state being written back)
In the case of Write Defaults Off:
- When going to the Hat On state, the hat would toggle on
- When going to the Hat Off state, the hat would stay toggled on (since you’re not explicitly toggling it back off or writing back the default)
Guidelines
There are a few guidelines to follow when using Write Defaults Off. Afterwards I will explain why these guidelines exist, just for completeness’ sake:
- Don’t mix
Write Defaultsin a single controller. Mixed Write Defaults will behave like WD off.- The exception to this is layers with a single state in them. These can, and in the case of Direct Blend Trees, should be set to
Write Defaults On. - It is okay to do this since they never leave their state, and therefore, we never rely on the WD On behaviour.
- The exception to this is layers with a single state in them. These can, and in the case of Direct Blend Trees, should be set to
- Don’t use
Write Defaults Offon Direct Blend Trees - If you are using
Write Defaults Off, all your states should have an Animation Clip or a Blend Tree in them. This Animation Clip can be empty, but it is generally recommended to use an Animation Clip that animates a GameObject that does not exist for two frames (sometimes called a buffer clip). - Note that animating a Transform animation with
Write Defaults Offoverrides all other animated Transforms from other playing Animator Controllers. This specifically means that, for VRChat, if you are animating any Transform in the FX Layer, it will overwrite all Transforms in the Gesture layer, unless you apply an Avatar Mask that enables only the animated Transforms and disables all others, and apply this mask to your FX Layer Animation Layer. More information about Masking can be found at the Avatar Masks page.
Note: If you have to use masks due to WD off Transform animations in both your Gesture and FX layers, you can’t use matswaps on any slot but the first one, since a masked transform (whether it’s masked on or off) can’t have animated matswaps apart from the first material slot.
A useful tool to check if you are breaking these rules (at least the first and third rule) is the VRLabs’ Avatar 3.0 Manager. In the Write Defaults tab of this tool, it will tell you if you have mixed Write Defaults and set them for you if you press the corresponding button. Do note that it doesn’t make an exception for Direct Blend Trees, so their animator state has to have (WD On) in its name to mark it as Write Defaults On.
Explanations
Don’t mix Write Defaults in a single controller
Playing a single Write Defaults Off state will cause all other Write Defaults On States to not write their default values, and thus behave in a Write Defaults Off manner.
Don’t use Write Defaults Off on Direct Blend Trees
Write Defaults Off Direct Blend Trees will display weird behaviour, like influencing other Direct Blend Trees that use the same Parameters in them, and also multiplying their results over time, causing unexpected results. They should, in general, never be used.
To clarify the multiplying behaviour a bit, the final result is that, in a Write Defaults Off Blend Tree, the final weights get multiplied by a factor of x/(1-yx) where x is the weight of the current child at and y is the sum of the weight of the other children, divided by the weight of the current child. Note that if the denominator of this fraction is 0 or lower, the values go to infinity and never stop adding. This means that if you have n children, and you set the weight of every child to 1/n, then the final result is that the multiplier is 1, and therefore this allows you to use Write Defaults off Direct Blend Trees. This doesn’t mean it’s advisable though, as the affecting-other-Blend-Trees and other weird behaviour make it a lot easier to just use Write Defaults on.
If you are using Write Defaults Off, all your states should have an Animation Clip or a Blend Tree in them
Write Defaults Off States without an Motion in them can overwrite Animation Clips in previous layers with the default value of the Animation Clip in the Animator State they came from.
Pros/Cons
Write Default On
Pros:
- Less complicated since you can have empty states/buffer states which fall back to the default upload behaviour
- Allows for transform animations on the FX layer without overwriting the Gesture layer
- 33% decrease in frametime over WD Off for basic 2 state toggles (in Unity 2019)
- Easier changing of defaults (if you rely on upload state)
Cons:
- Relies on upload state
- Generally breaks when using Mixed Write Defaults
- Doesn’t allow for sequential operations without the use of Parameter Drivers or AAPs
Write Default Off
Pros:
- Doesn’t rely on upload state
- Is generally fine with Mixed Write Defaults
- Allows for sequential operations
Cons:
- Need Buffer animations in empty states
- Overwrites all Gesture transforms when animating a transform without a mask
- 50% increase in frametime over WD On for basic 2 state toggles (in Unity 2019)
Guidelines for Creators
These guidelines are useful when creating prefabs that should be compatible with both Write Defaults On and Write Defaults Off:
- Always have each layer always animate one set of properties by its own (e.g. every state in the layer should animate the same set of properties).
- If you need to animate a property on multiple layers, make sure every state has an animation in it, know that lower layers overwrite higher layers, and always have a Reset layer at the top with the default state.
If you follow the guidelines outlined in this article, every property is always animated, and your system will always work with both Write Defaults On and Write Defaults Off.
Blendshape Values Tripling
In very specific conditions, Blendshape values triple when relying on Write Defaults On
(Example: you have an empty Write Defaults On state, which transitions into a Blendshape-animating Write Defaults On state. The defaults value of the animated Blendshape get multiplied by 3 when in the empty Write Defaults On state).
This issue is a bit more finnickey and less clear than the rest, so don’t take what we say here as fact, but more as observations:
- It seems to be caused by the Additive layer with it being
Write Defaults Off. - It is blocked by having a Gesture layer with only
Write Defaults Offstates (like the default ones). A single playingWrite Defaults Onstate will cause it to happen again. - It is independent from any masking and from the animation actually being reachable. Just existing on the layer is enough.
- It doesn’t impact behaviour as long as you are only using values 0 and 100, since 03=0 and 1003=100 (due to Blendshape clamping, you can enable this in your unity project by going to Project Settings → Player → Other Settings → Clamp Blendshapes (Deprecated). This is enabled in VRChat).
- The proper way to fix this is by always explicitly animating the Blendshape value.
- A quick and dirty way to fix this is to set the states in your idle layer to
Write Defaults On.
Avatar Masks
Original page: https://notes.sleightly.dev/animator-masks/
Unity Behaviour
A mask blocks out humanoid muscle values, material swaps and transform values based on what is enabled and what is disabled in the mask. If a layer has a mask with a certain value enabled in the mask, the animation is allowed to animate that value. If a layer has a mask with a certain value disabled in the mask, the animation is not allowed to animate that value. To be specific:
- If a layer has a mask with a humanoid value (such as left hand) enabled, that humanoid muscle can be modified by an animation in that layer
- If a layer has a mask with a humanoid value (such as left hand) disabled, that humanoid muscle can't be modified by an animation in that layer
- If a layer has a mask with a transform value enabled or not specified, that transform can have its position, rotation and scale modified by an animation in that layer, as well as a material swap on the first material slot
- If a layer has a mask with a transform value disabled, that transform can't have its position, rotation or scale, or a material swap on the first material slot modified by an animation in that layer
If a layer has any mask whatsoever, it can't animate material swaps on any material slot beyond the first, or the root transform of the object with the animator on it.
Anything else (blendshapes & any other components) is unaffected by masks.
The reason we have masks is because if you animate a humanoid muscle on one layer, and then animate any humanoid muscle on a different layer that gets applied later (whether lower down in the animator or on a different playable layer), it gets overwritten (unless the other layer is the Additive layer, if so it adds on top of it).
With transforms, this only happens if the second animation uses WD off and is on a Playable Layer that gets applied later.
So for example if we didn’t have masks, if you animated a humanoid muscle on your Gesture Layer for hand movement, and on your FX Layer you used a different animation for facial expressions which also happens to animate a humanoid muscle, the hands value would get overwritten by the FX Layer.
Notes:
This means that if you have a humanoid animation, without masking just the humanoid muscles you want to be enabled, and the rest disabled, all other humanoid muscles will be overwritten.
This also means that if you have Transform animations on your Gesture layer, and you have an unmasked WD Off Transform animation on the FX layer, all the Gesture Layer Transform animations will be overwritten.
The default VRChat FX Layer uses an unmasked WD off blend tree. This can cause transform animations to not play in VRChat as long as you are using the default FX Layer. If you want to animate transforms on the Gesture layer, you have to either use your own FX Layer or remove theirs and set it to be empty
VRChat layer behaviour
All playable layers are played one after the other. First the Base, then Additive, then Gesture, then Action and lastly FX.
On the first four layers (Base, Additive, Gesture & Action), you should only use animations which affect transforms (so either humanoid muscles or transform animations) and toggle gameobjects on/off.
This isn't because of masking, but because these four layers are played only on your local avatar clone, but not on your mirror and shadow clones. VRChat copies the transforms and on/off state of every GameObject on your local avatar and applies them to your avatars mirror and shadow clone. However, VRChat does not copy anything other than transforms and the on/off state of each GameObject, meaning that if you were to animate anything other than that, such as blendshapes, material swaps or shader settings, VRChat will not copy those attributes to the mirror and shadow clones. The clones do however play their own FX Layer, which is why anything other than the transforms and on/off states of GameObjects should be animated in the FX Layer.
For example: if you do a material swap on the Base Layer, it won't run on the mirror & shadow clones.
This article only goes into detail when it comes to masking and behaviour. If you want more information on what VRChat does with layers or what VRChat recommends you do with them, you can find this at the following page:
Playable Layers | VRChat Creation
Base Layers
Base
This layer should only animate transforms (either directly or through humanoid muscles) and/or GameObject on/off states for the reasons stated above.
VRChat recommends this layer to be used for locomotion and to only animate humanoid muscles.
Additive
This layer should only animate transforms and/or GameObject on/off states for the reasons stated above. It is blended additively, meaning that any animations don’t replace the base layer ones, but instead the values get added.
VRChat recommends this layer to be used for tweaks to locomotion, like breathing effects, and to only animate humanoid muscles.
Gesture
This layer should only animate transforms and/or GameObject on/off states for the reasons stated above. It has some special behaviour, namely that VRChat takes the mask on the first layer, and applies it to all the layers in a way where if an animation (humanoid or transform) is disabled in either this mask or the layer mask itself, it is disabled.
So if you want to animate any of the humanoid muscles, you will have to make a mask that specifically allows those muscles and put it in the top layer.
And if you want to animate any transforms with WD off, you will have to make a mask that specifically allows those transforms and disables the others, and put it in the top layer.
VRChat recommends this layer to be used for animations that animate transforms and humanoid animations that only affect certain body parts.
Action
This layer should only animate transforms and/or GameObject on/off states for the reasons stated above. This layer is blended to zero by default. Before you do anything in the action layer, you need to use the Playable Layer Control State Behavior to blend this layer up before transitioning to the actual action you're performing. Make sure you blend it back to zero when you're done, otherwise other animations won’t play.
VRChat recommends this layer to be used to overwrite any humanoid animations from the previous layers, like for example for emotes or AFK animations.
FX
Since this layer runs on all your clones, this is where you can run any animations. Note that you can still animate transforms, given the right masking.
If the first layer mask is empty, it will create a default mask that disables all humanoid muscles and enables all transforms, and applies it to all the layers in a way where if it is disabled in either this mask or the layer mask itself, it is disabled.
If the first layer mask isn't empty, it will take the first layer mask and apply it to all layers in the same way.
So if you want to animate any of the humanoid muscles, you will have to make a mask that specifically allows those muscles and denies the others and put it in the top layer. If you don’t deny them, they will replace the Gesture animations on them.
If you are using WD off, this same logic applies to transforms.
VRC's default FX layer has a blendtree with write defaults off, this can break transform animations. If you want to use transform animations on any layer, do not use the default VRC FX layer.
VRChat recommends this layer to be used for anything that isn’t transform animations, like enabling/disabling GameObjects, components, material swaps, shader animations, particle system animating, etc.
Special Layers
T-pose:
The T-Pose is used to determine various measurements of your avatar, especially for placement of your viewpoint (or view-ball). It is played on its own, so masking doesn't really matter
IK Pose:
IK Pose is used to determine major joint bends. In the IK pose, your joints should be bent slightly in the direction they're intended to bend. It is played on its own, so masking doesn't really matter
Sitting Pose:
The controller used in this slot is used for both animation and posing. When you sit, the viewpoint of your avatar is used for calibration. The animation is played, allowing you to create a "sitting down" animation, as well as a "sitting" idle animation. It is used like Action, where it should override all humanoid animations to make your character sit.
Expression Parameter Mismatch
Original page: https://notes.sleightly.dev/parameter-mismatching/
In typical VRChat Avatars 3.0 creation, VRChat expression parameters are expected to be set as the same parameter type (Bool, Int, Float) as their respective local animator parameter counterparts.
However, parameters between your Expression Parameters vs your local animator parameters can have mismatched parameter types and still function. This behaviour differs from type to type, and is documented below.
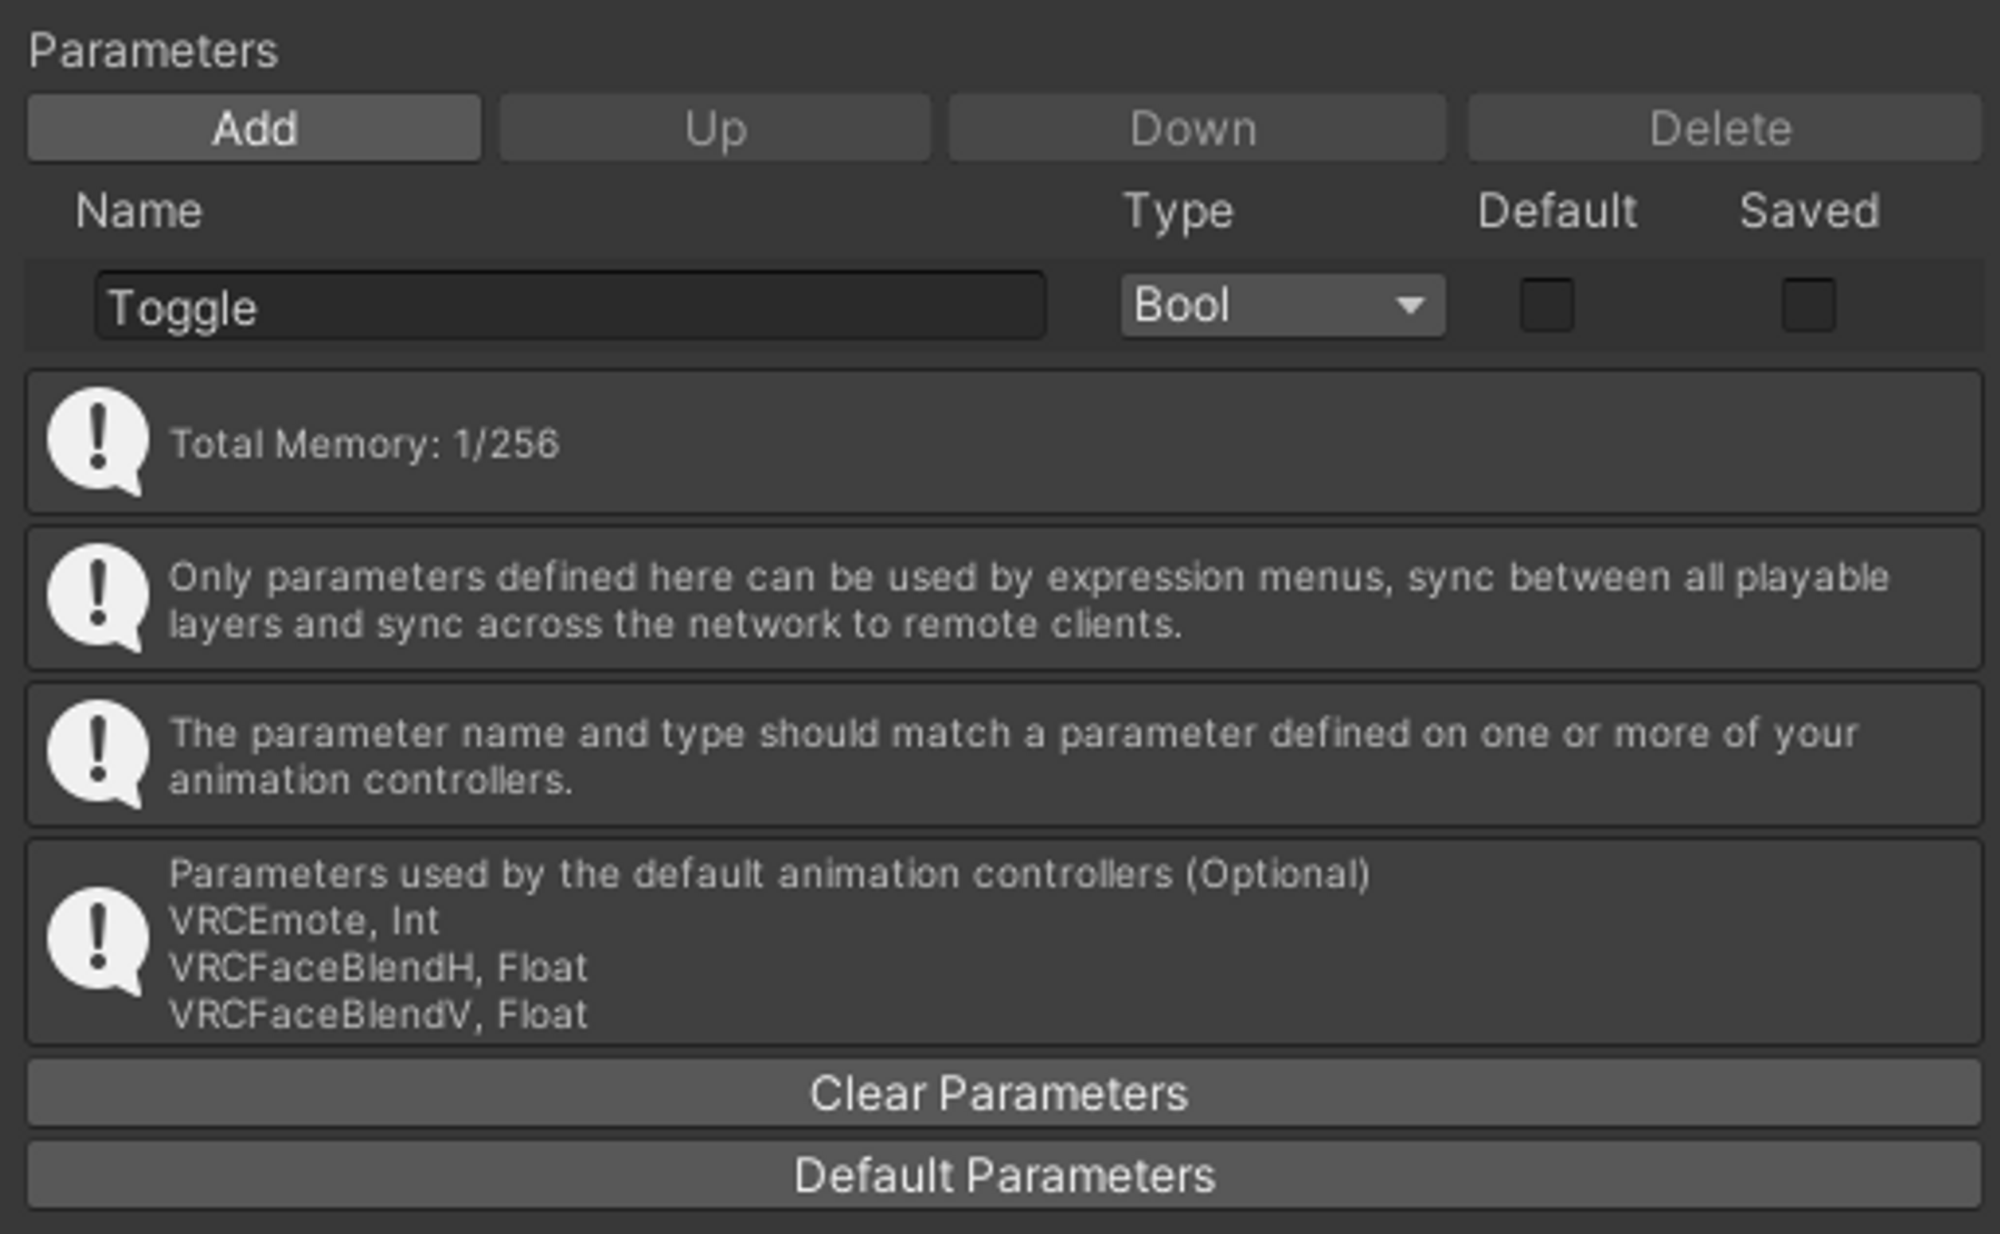
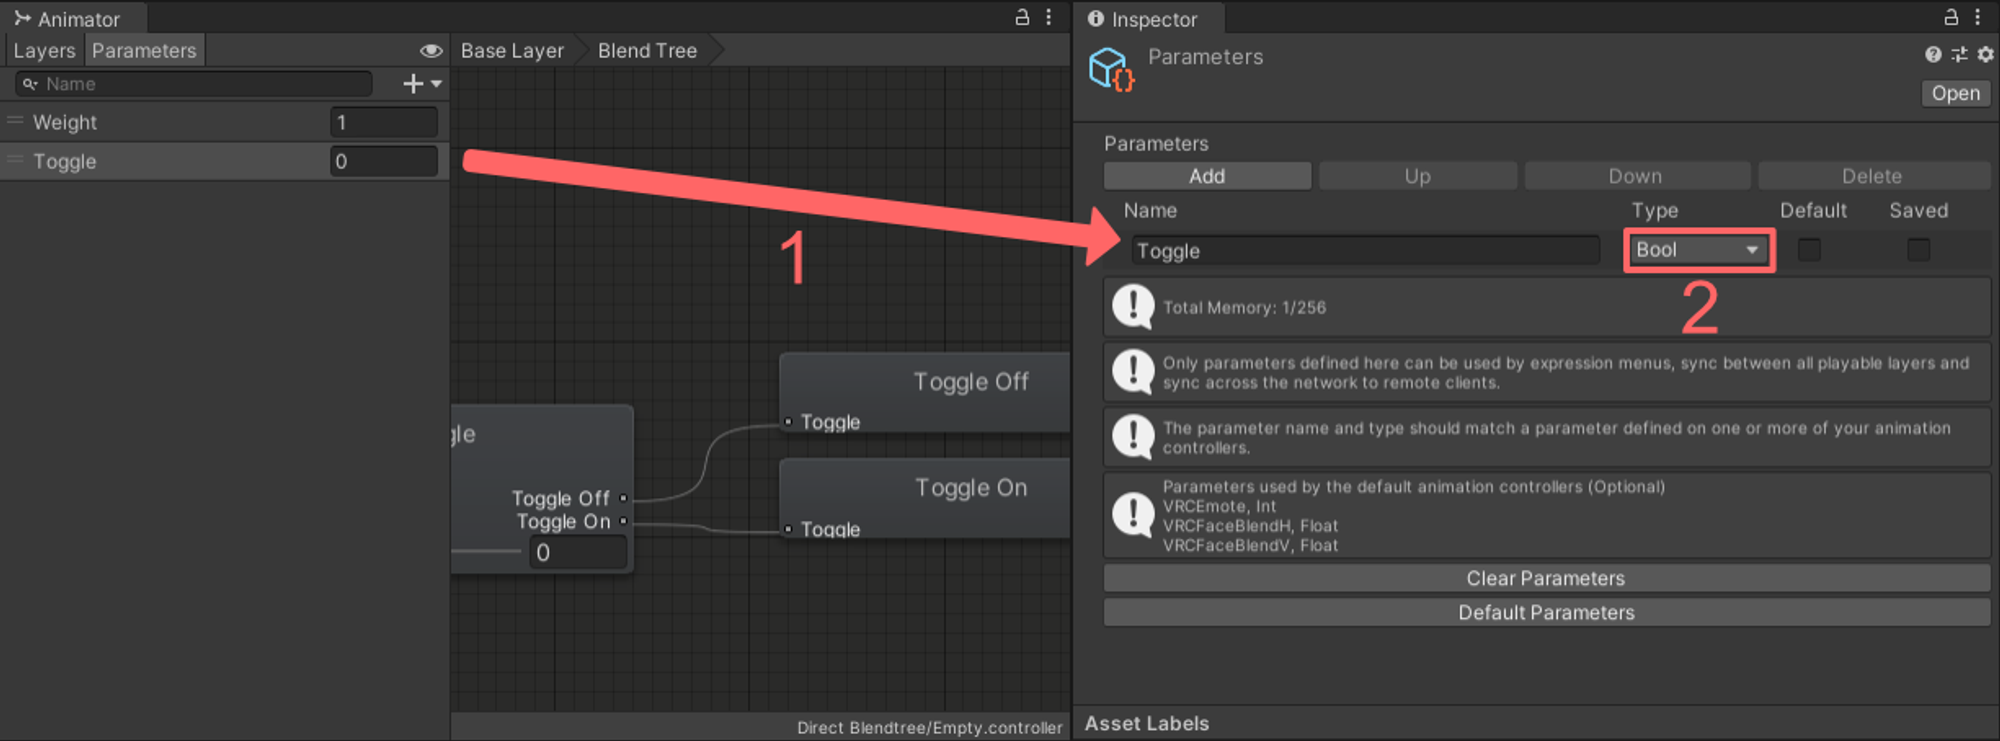
A parameter labeled Toggle added to VRChat Expression Parameters as a Bool
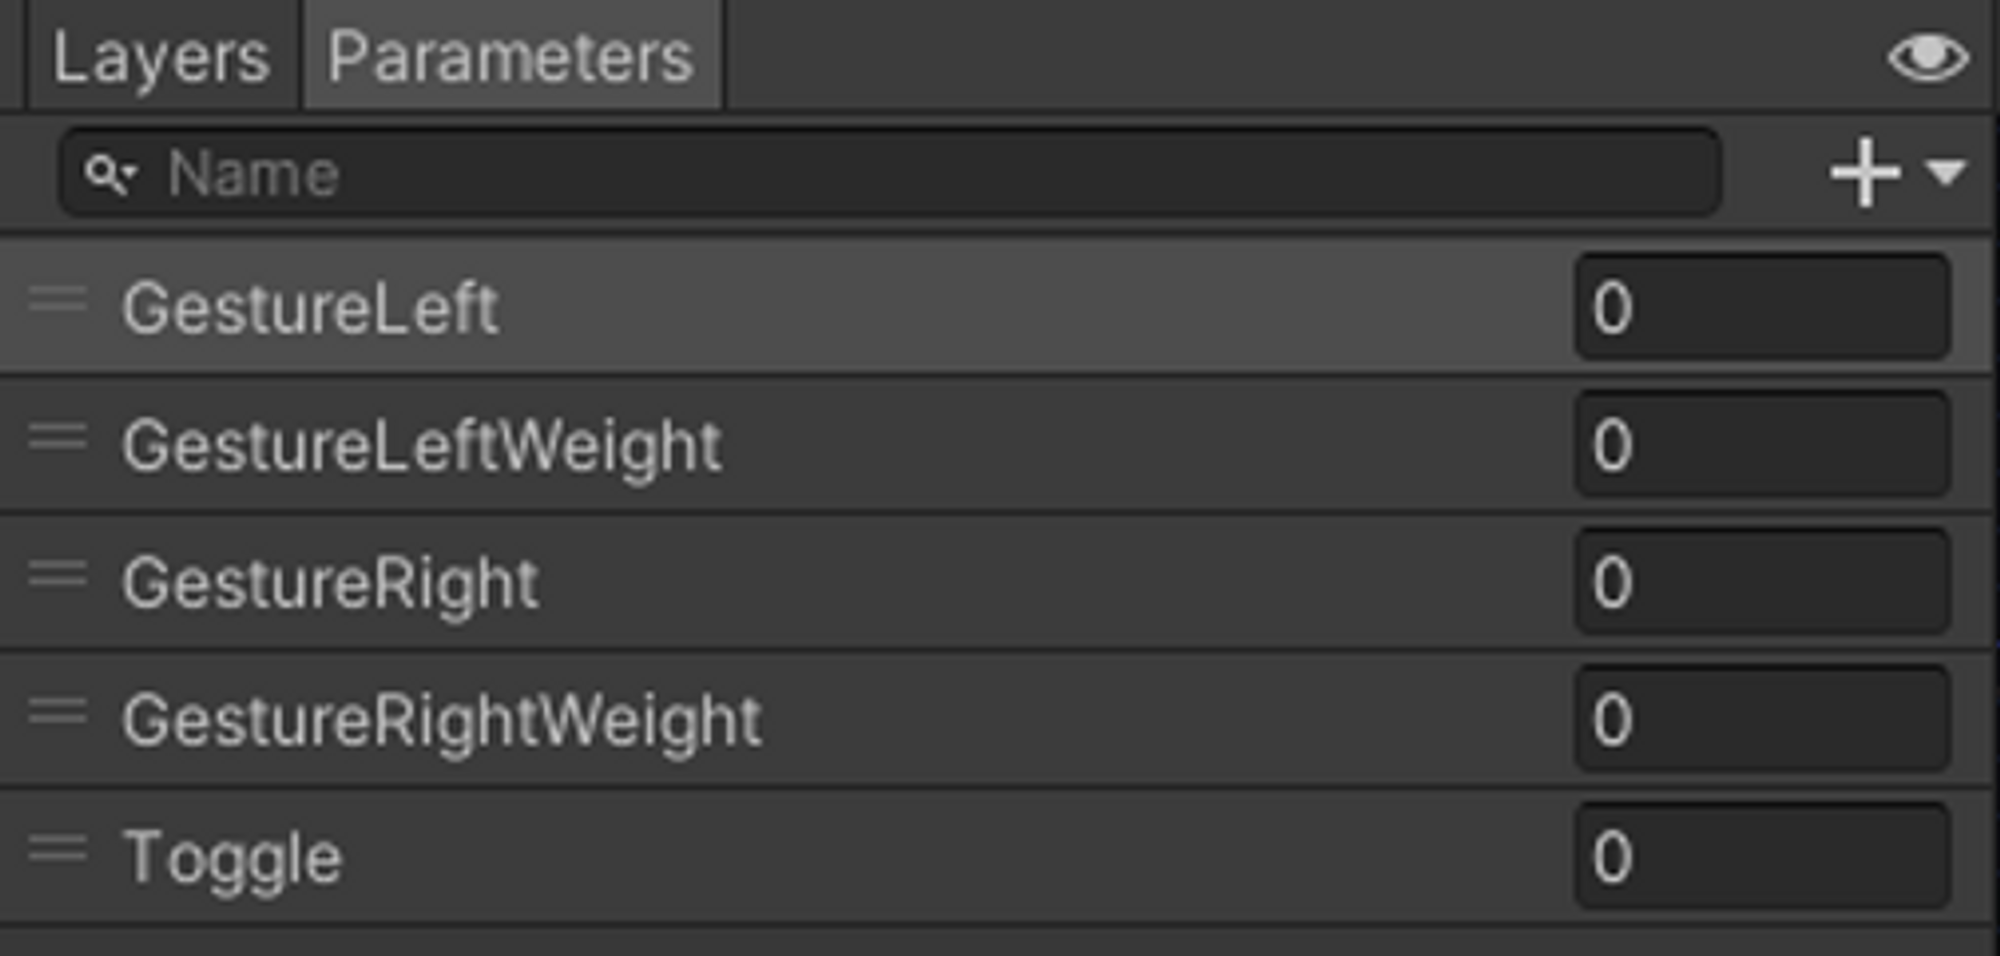
A parameter labeled Toggle added to local animator parameters as a Float
Verified Parameter Mismatch Behaviour:
Expression Parameter Bool:
| Animator Controller Parameter | Expression Bool = False | Expression Bool = True |
|---|---|---|
| Bool → Bool | Bool = False | Bool = True |
| Bool → Int | Int = 0 | Int = 1 |
| Bool → Float | Float = 0.0 | Float = 1.0 |
Expression Parameter Int:
| Animator Controller Parameter | Behaviour |
|---|---|
| Int → Bool | Any Int value above 0 sets bool to True |
| Int → Int | Expected Behaviour |
| Int → Float | Straight Conversion: Ex: Int = 2 → Float = 2.0 |
Expression Parameter Float:
| Animator Controller Parameter | Behaviour |
|---|---|
| Float → Bool | Any Float value above 0 sets bool to True |
| Float → Int | Rounded Conversion: ≥0.5 → 1 : <0.5 → 0 |
| Float → Float | Expected Behaviour |
Why does mismatching work?
Unity Animators use floats on the C# back-end regardless of parameter type, while VRChat uses SBytes instead of bools, ints, or floats.
The Animator window and VRCSDK themselves makes the user experience simpler by allowing you to select the parameter types from the interface.
In this sense, the parameters are not being casted but mismatched.
Mismatching parameters also works with the VRChat native parameters.
Both the AV3 Emulator and the GestureManager have implemented Parameter Mismatch at this point in time
Combining Layers Using Direct Blend Trees
Original page: https://notes.sleightly.dev/dbt-combining/
Due to the high performance impact of Animator Layers in an Animator Controller, it is often a lot better to combine things such as toggles and radial menus into a single Animator Layer by using a Direct Blend Tree.
Due to the high performance impact of Animator Layers in an Animator Controller, it is often a lot better to combine things such as toggles and radial menus into a single Animator Layer by using a Direct Blend Tree.
Understanding Direct Blend Trees
Direct Blend Trees allow you to assign a parameter directly to each Animation or Blend Tree child, instead of blending between them. This allows you to animate more than one thing at the same time in the same Blend Tree.
For VRChat, we can abuse this behaviour to create multiple toggles and radial puppets within a single Direct Blend Tree, similar to how we would in separate Animator Layers.
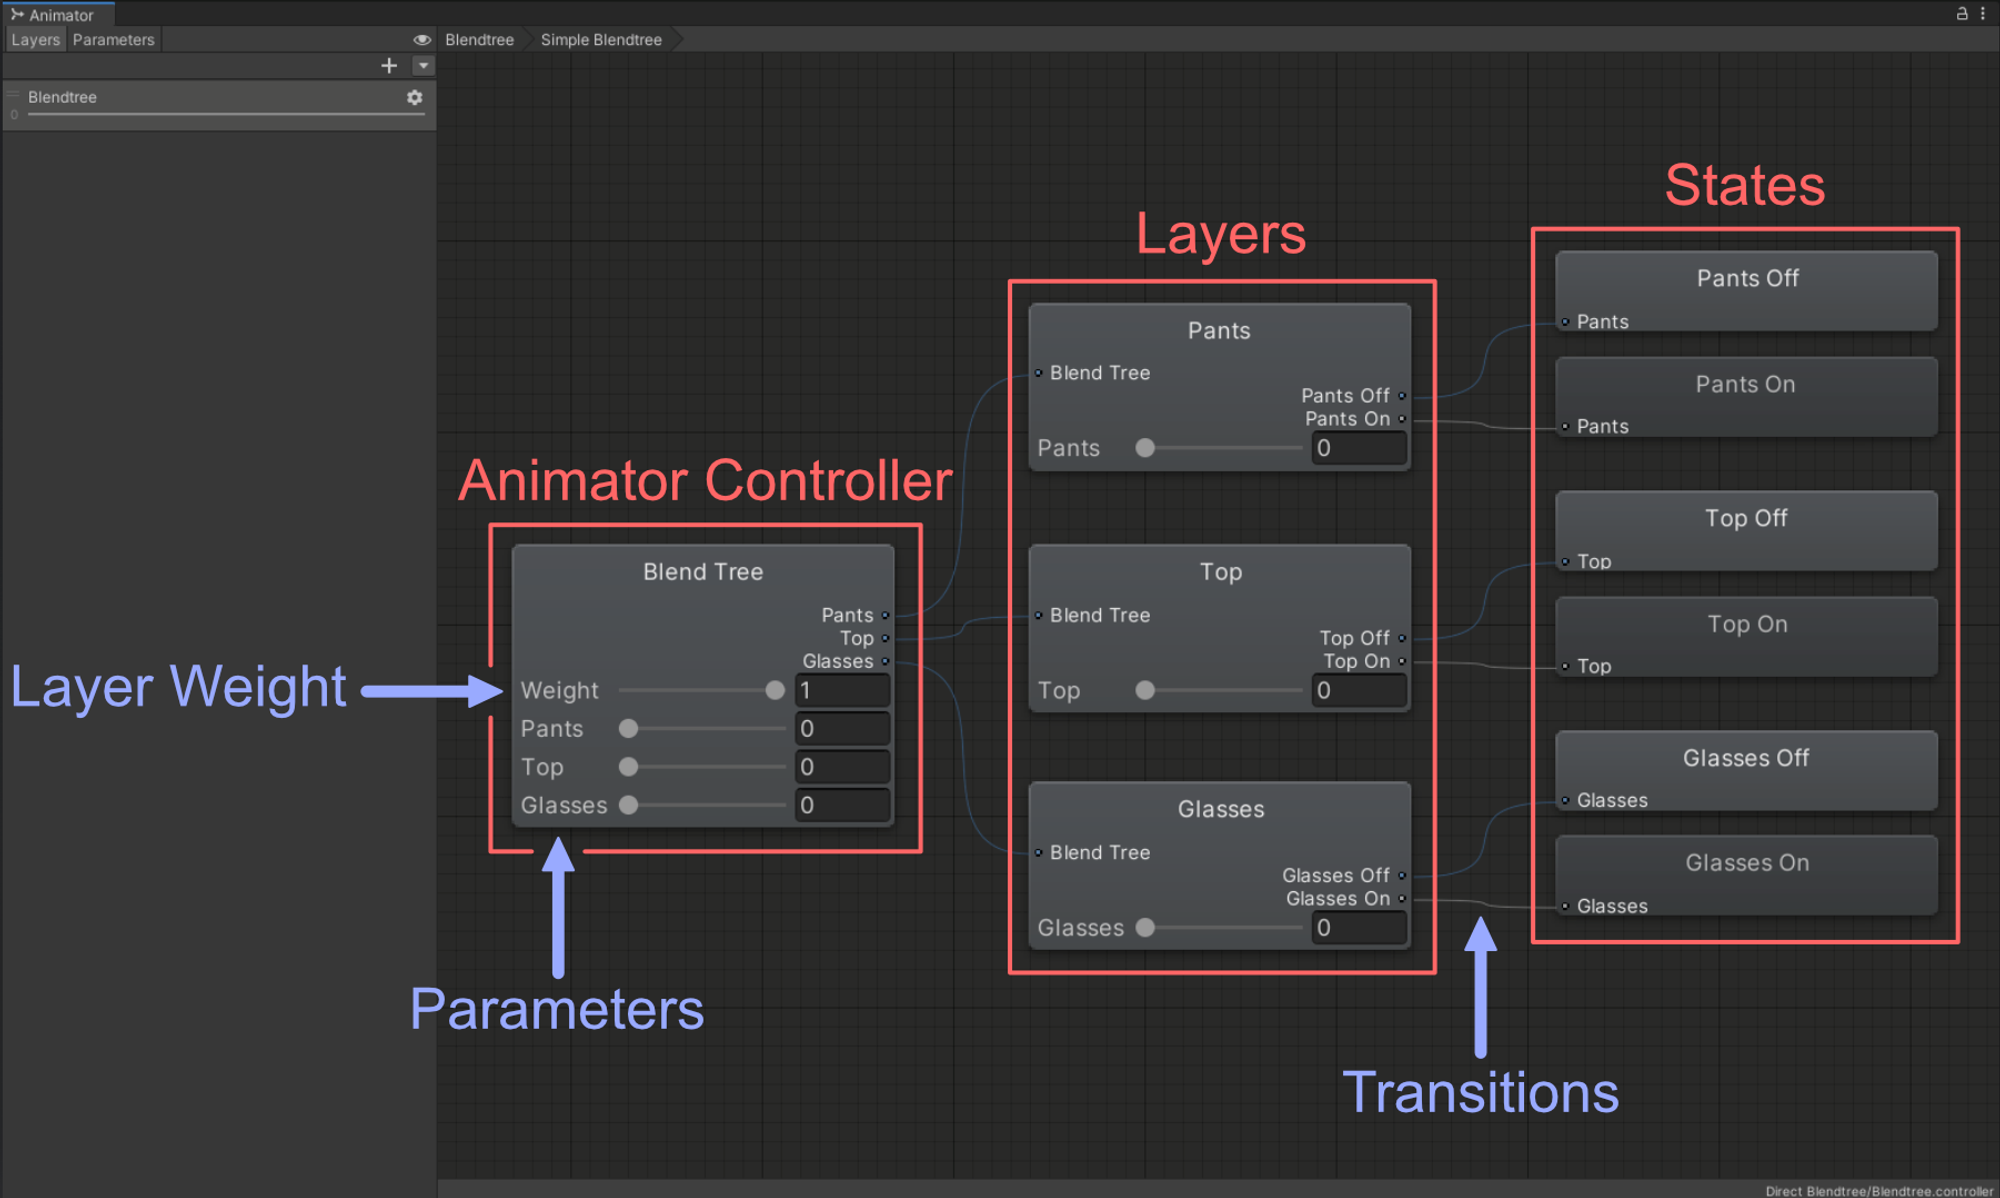
The structure and functionality of a Direct Blend Tree is very similar to that of an Animator Controller, so it might be easier to understand them if you look at them as if they were Animator Controllers. This is a very simplified way to look at and understand Direct Blend Trees, so it should be noted that while they are very similar to Animator Controllers, they are NOT the exact same!
There are a few key differences between the two which heavily limit the use cases and implementations of Direct Blend Trees compared to Animator Controllers. More info can be found in the Current Limitations And Known Issues section.
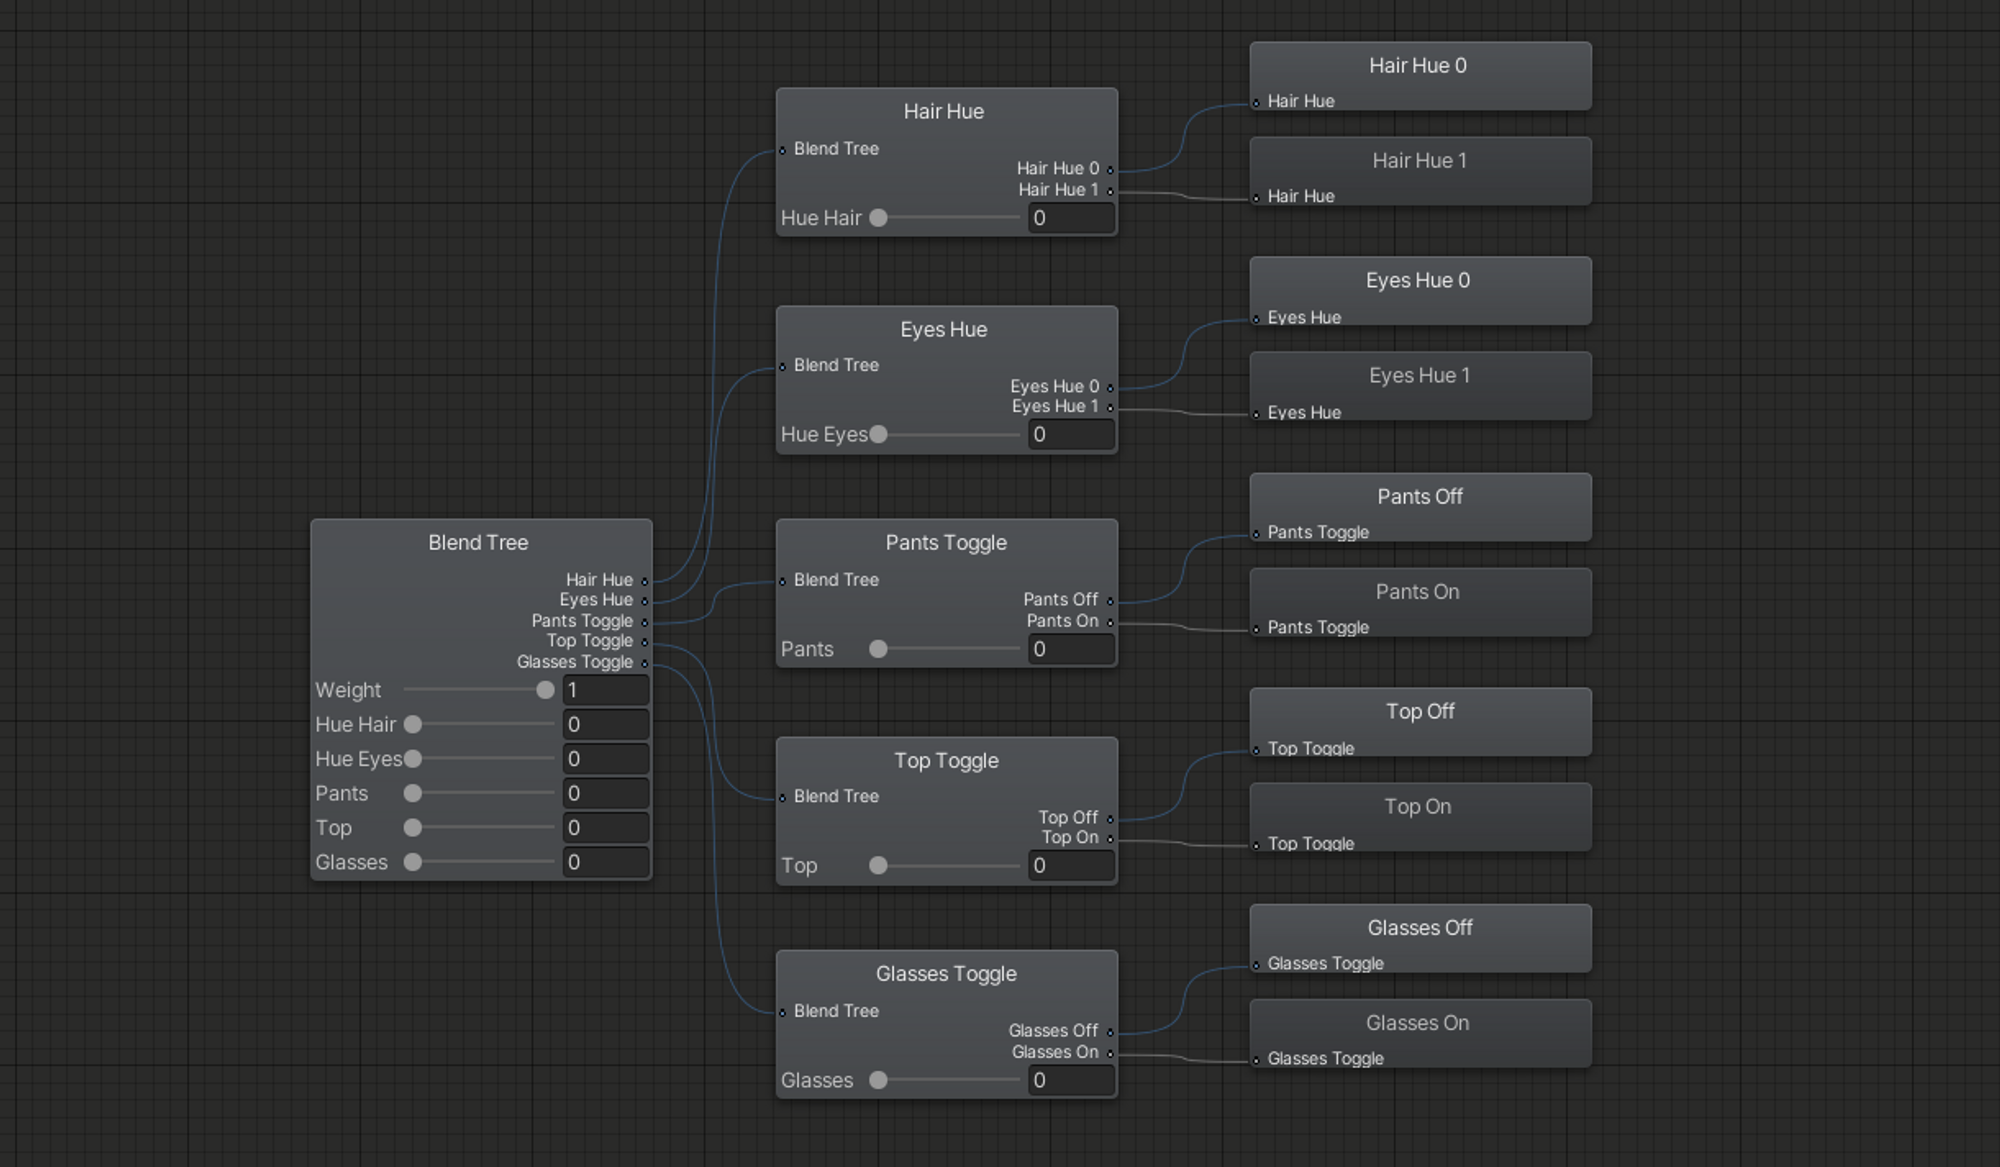
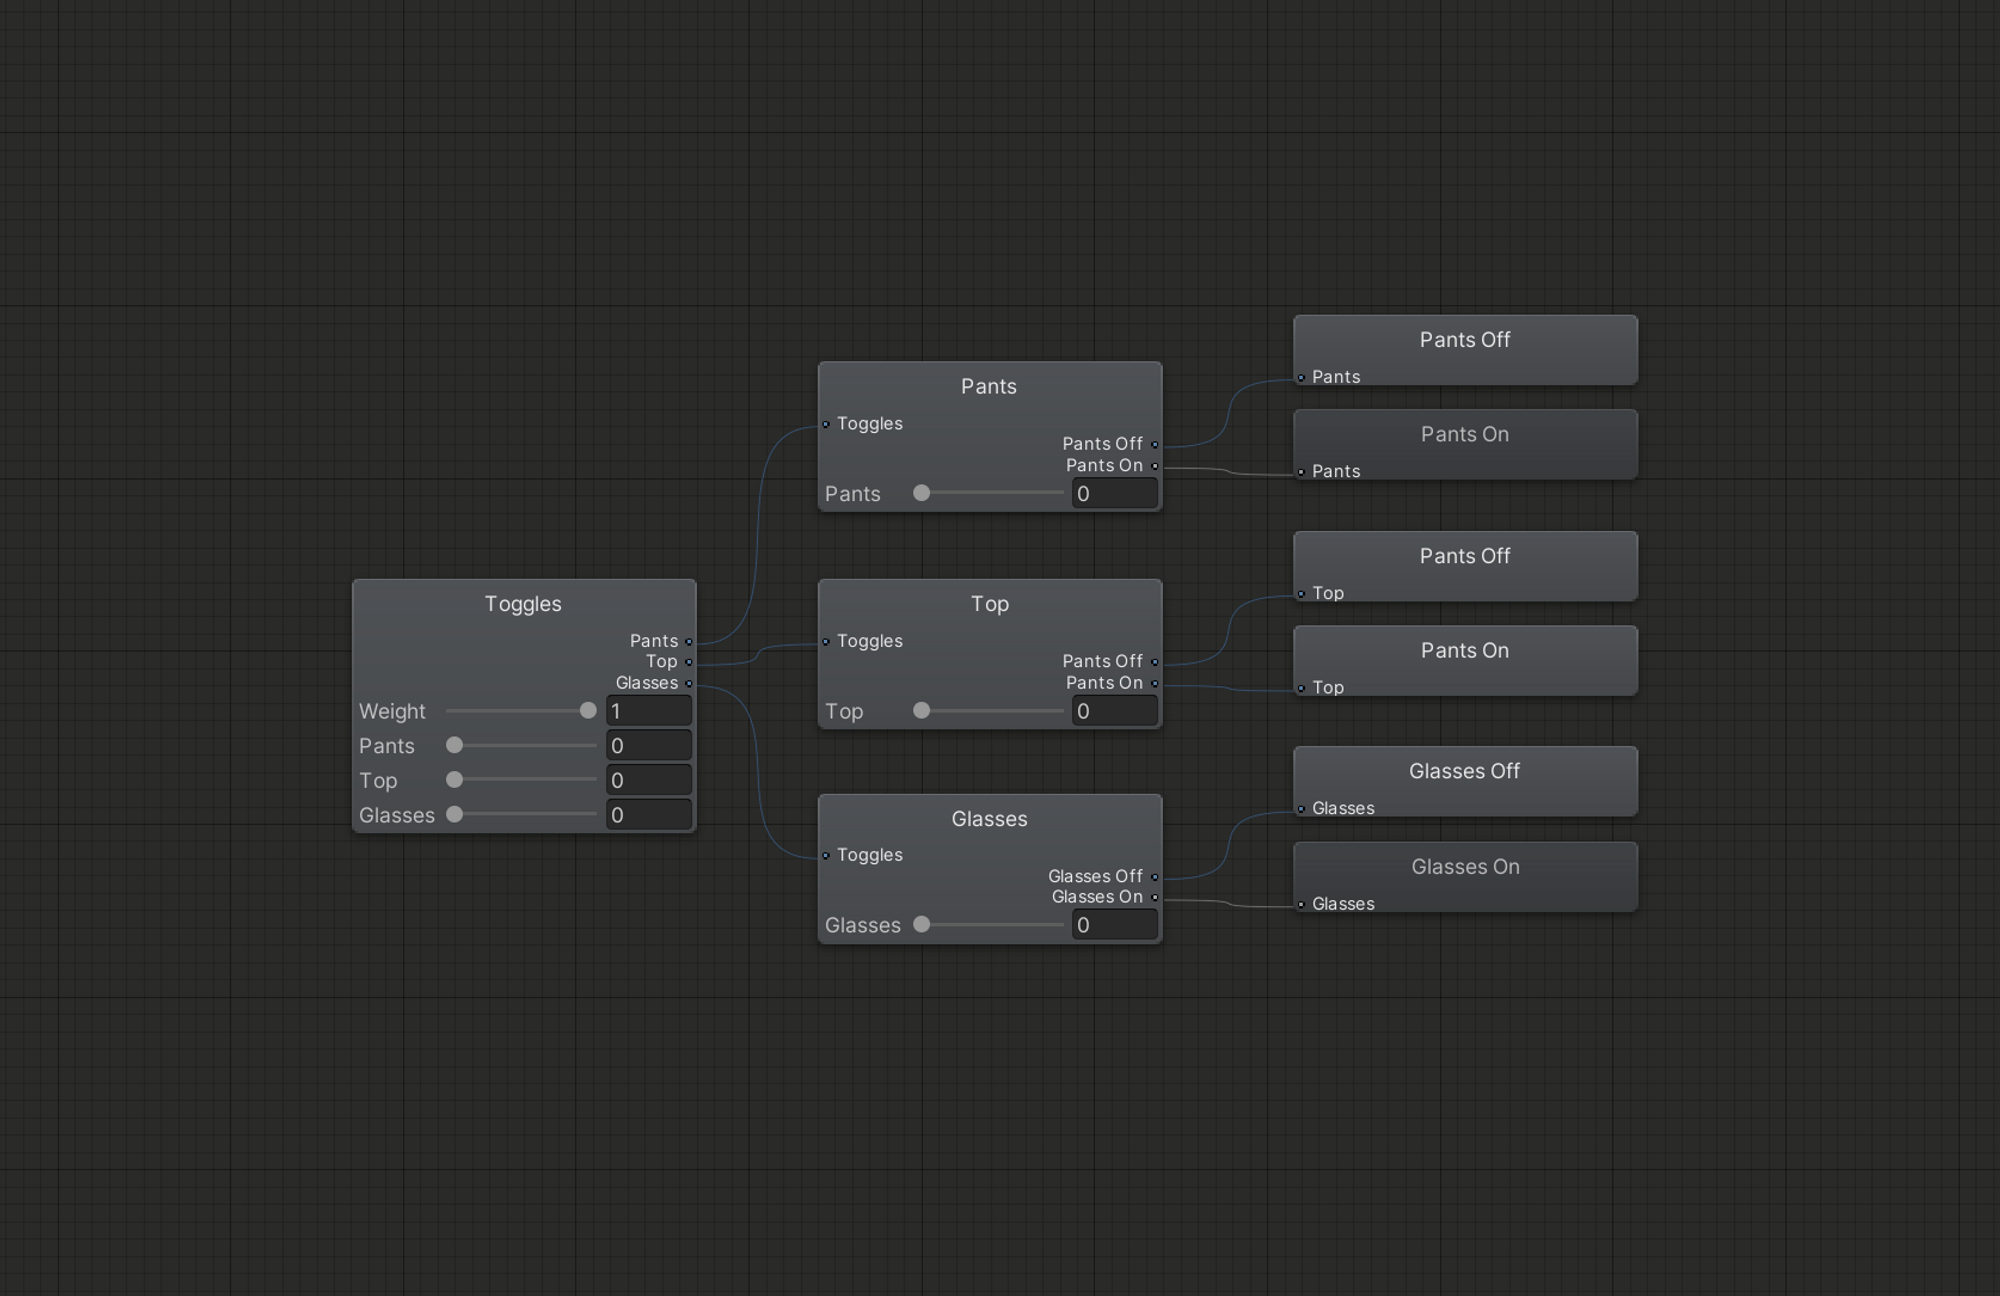
A Direct Blend Tree with 3 Clothing Toggles
Creating Toggles And Radial Puppets
Making toggles and radial puppets in a Direct Blend Tree is not much different or any more difficult than creating a regular toggle in an Animator Layer.
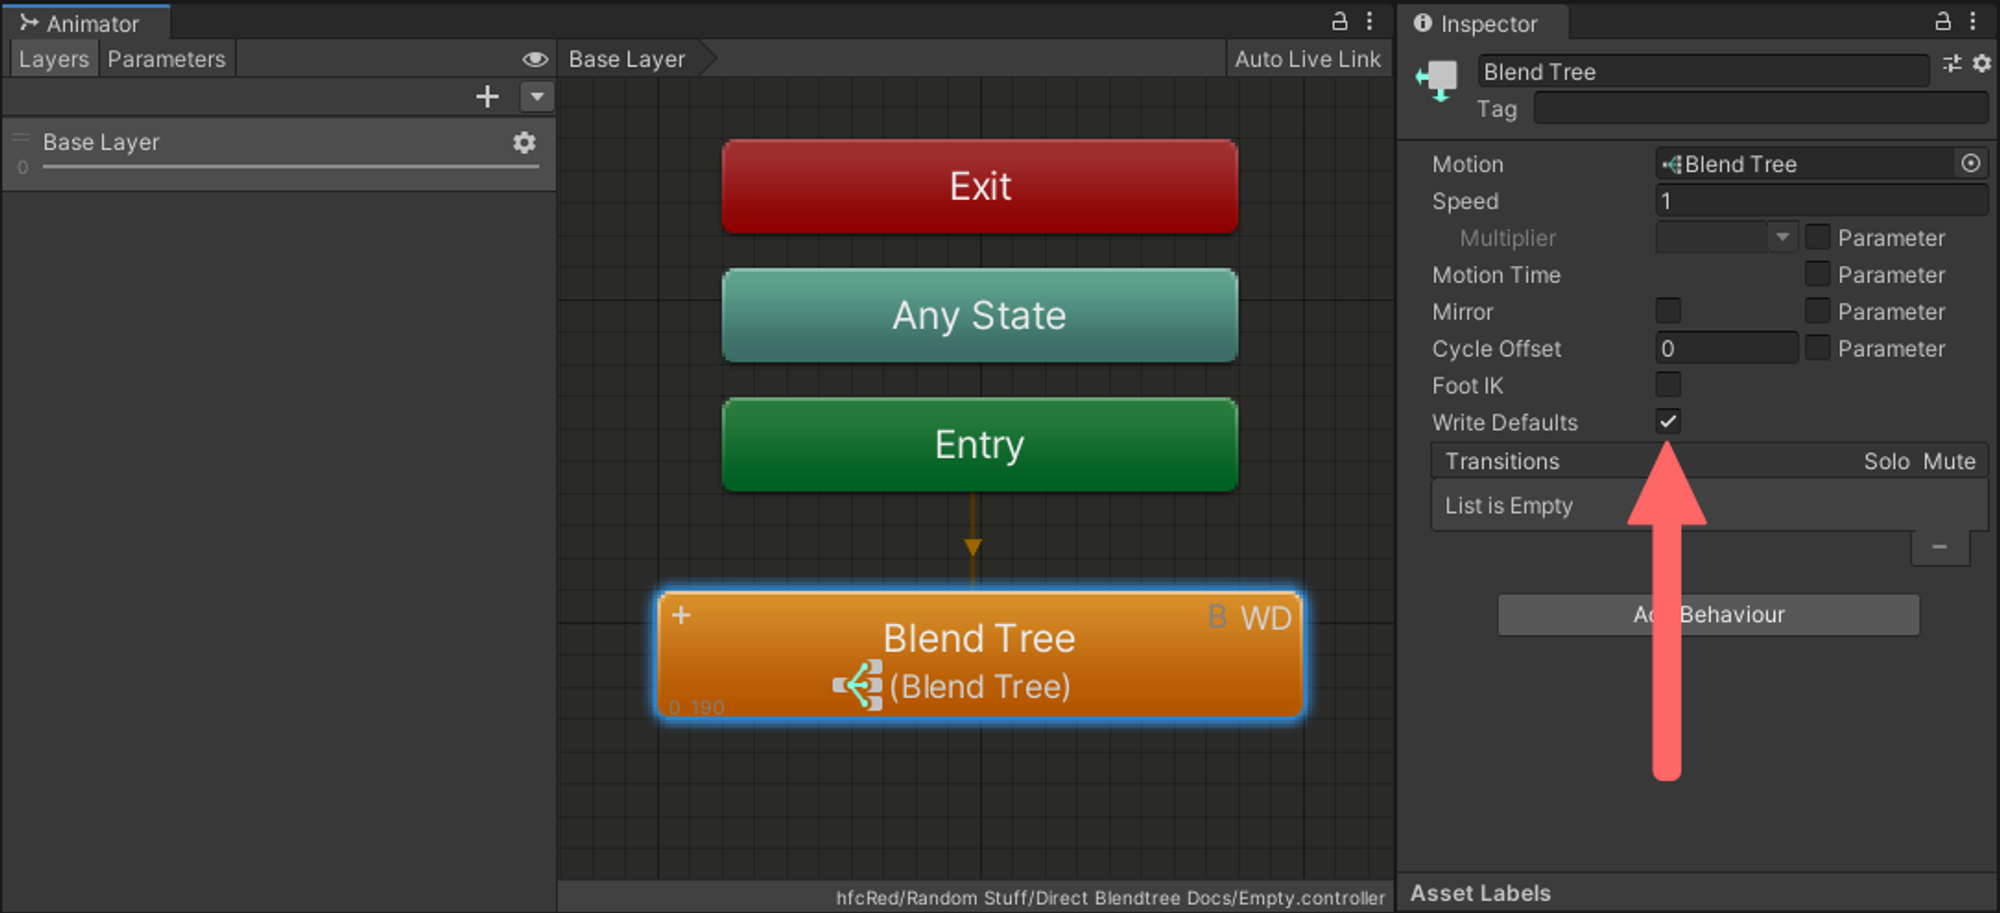
Step 1
- Create a new Animator Layer and right click in any empty space to create a new Blend Tree State

- Set the Write Defaults value of the Blend Tree State to ON! This is necessary! We will go into detail about why under the Write Defaults section
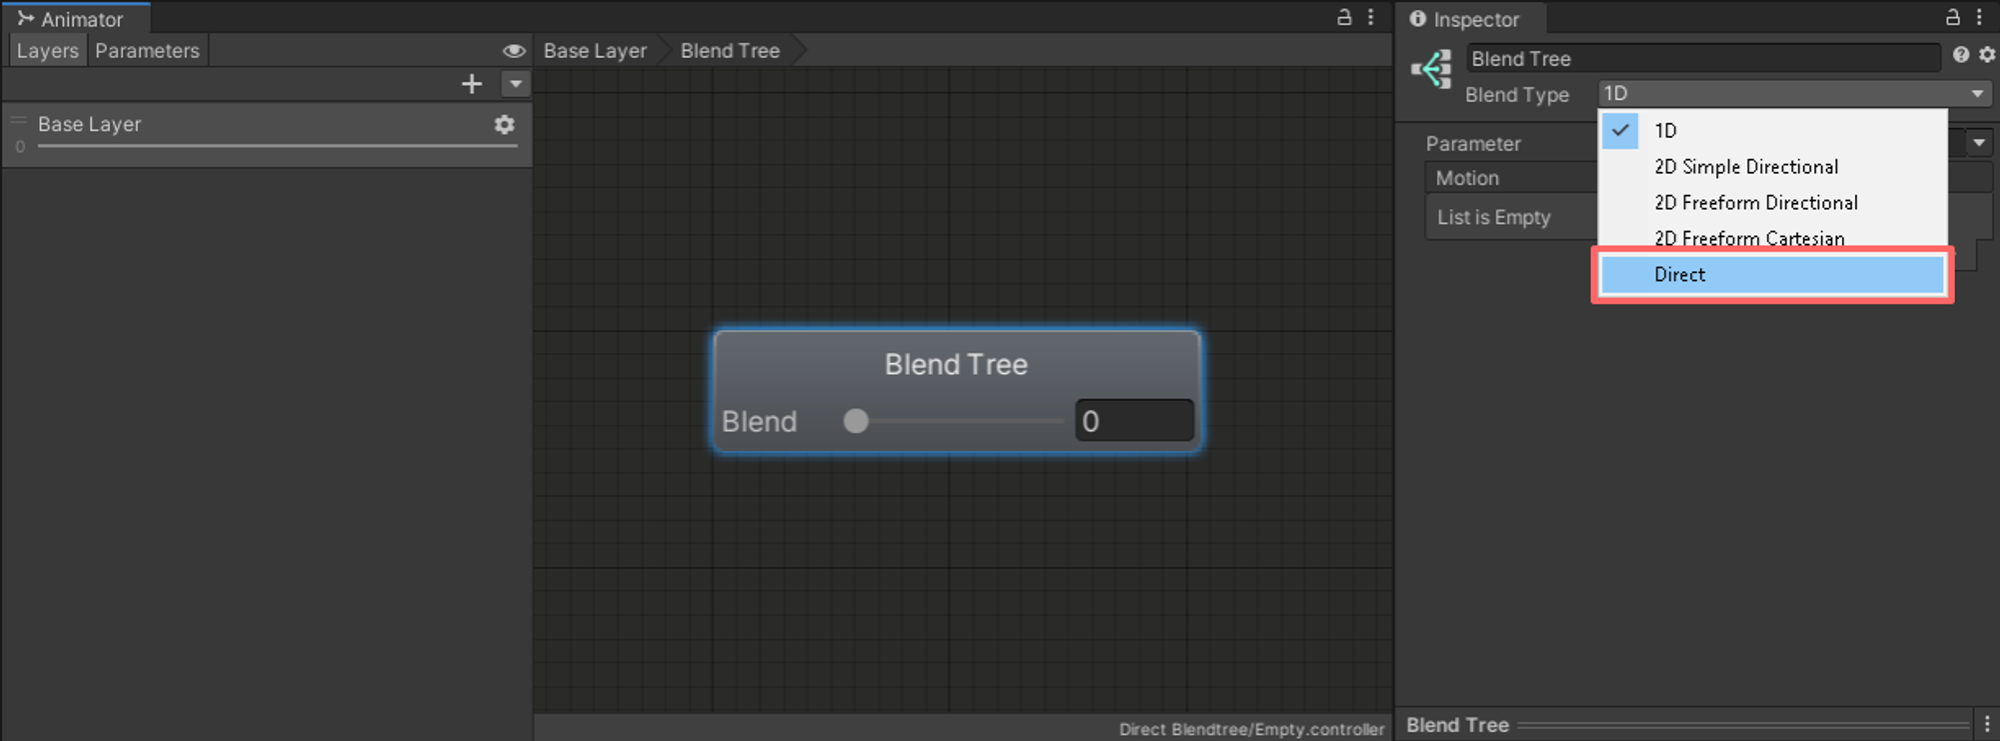
Step 2
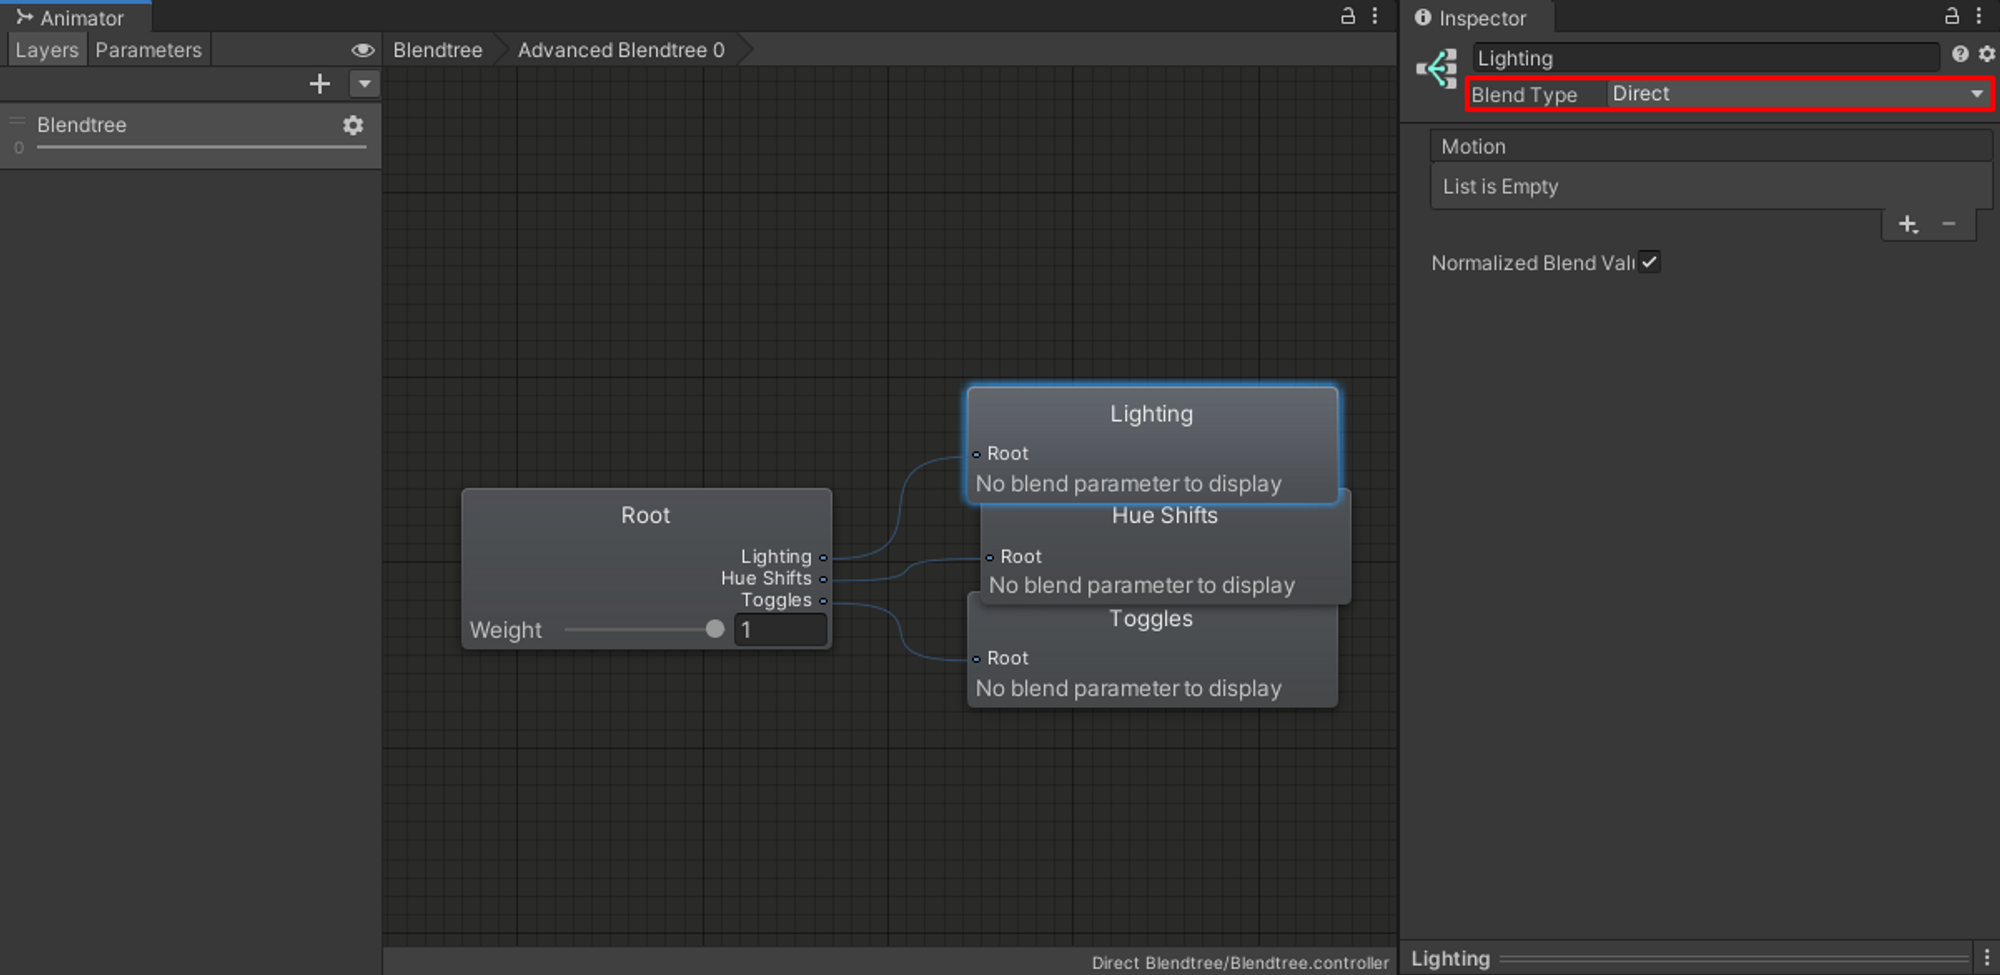
- Double click or right-click the Blend Tree State to open it
- Select the Blend Tree and, in the inspector, change the Blend Type to
Direct
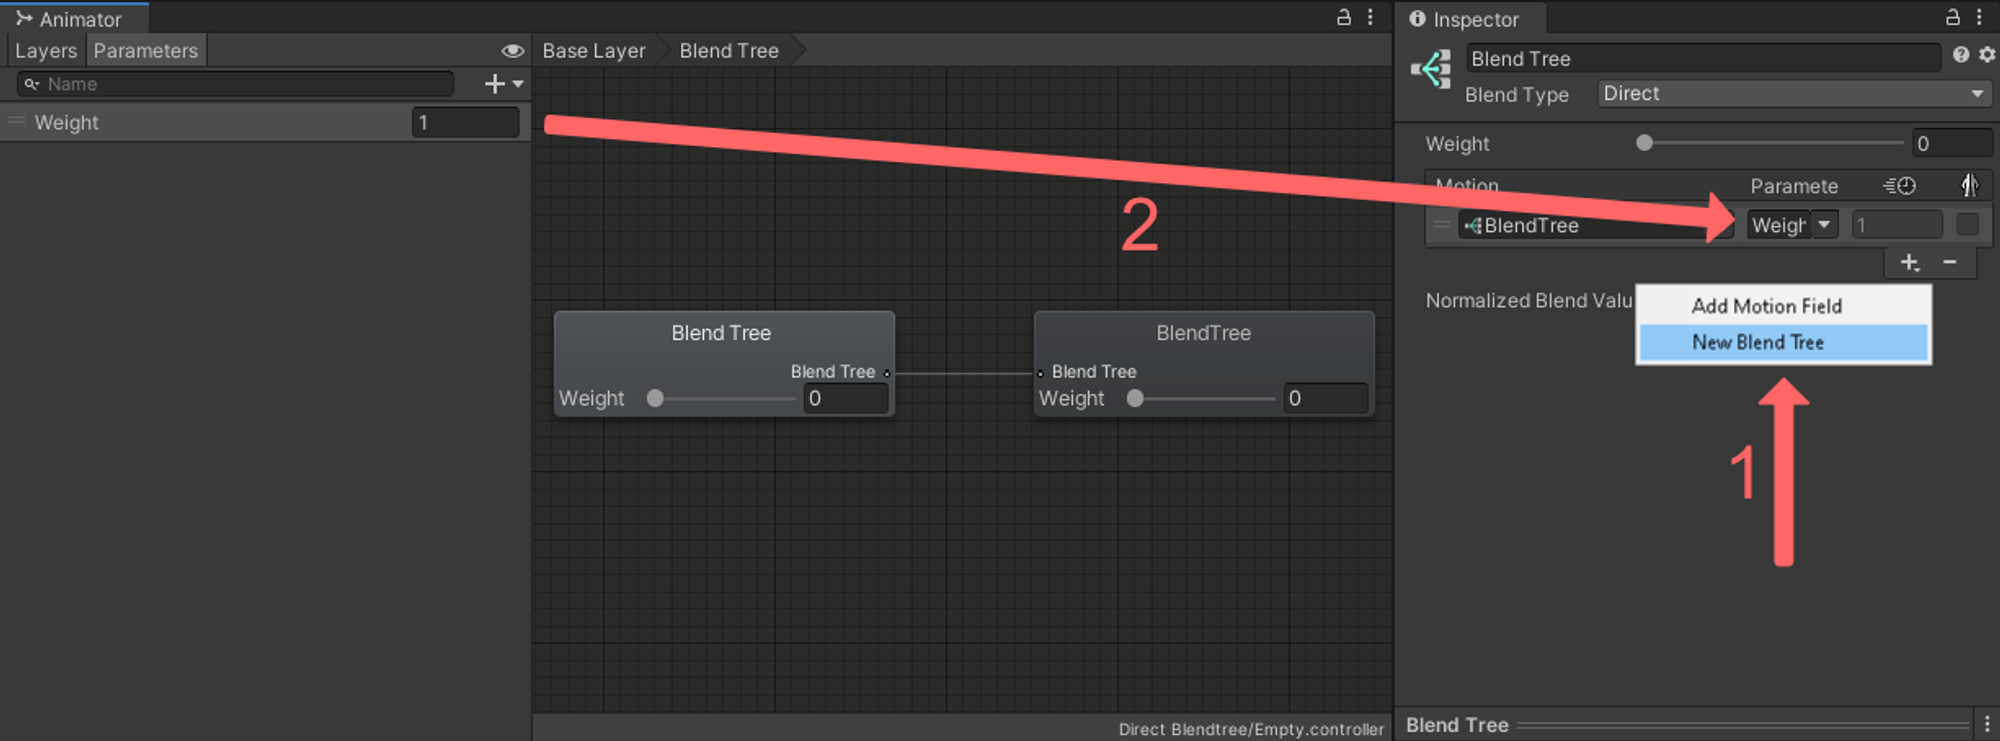
Step 3
- Add a new Blend Tree as a child to the Direct Blend Tree
- If you do not already have one, create a new float ****parameter in your Animator Parameters list and set its value to 1
- In this example, the parameter is called
Weight - This is not the parameter that will be used for your toggle itself, it is a separate parameter that sets the weight of the child to 1 so it fully animates, similar to how you set the weight of an Animator Layer to 1
- In this example, the parameter is called
- Set the parameter of the child to the float parameter.
- You can re-use this float parameter for all the children, you do not need to create a new one for each child
- Make sure the Direct Blend Tree has
Normalized Blend Valuesunchecked.
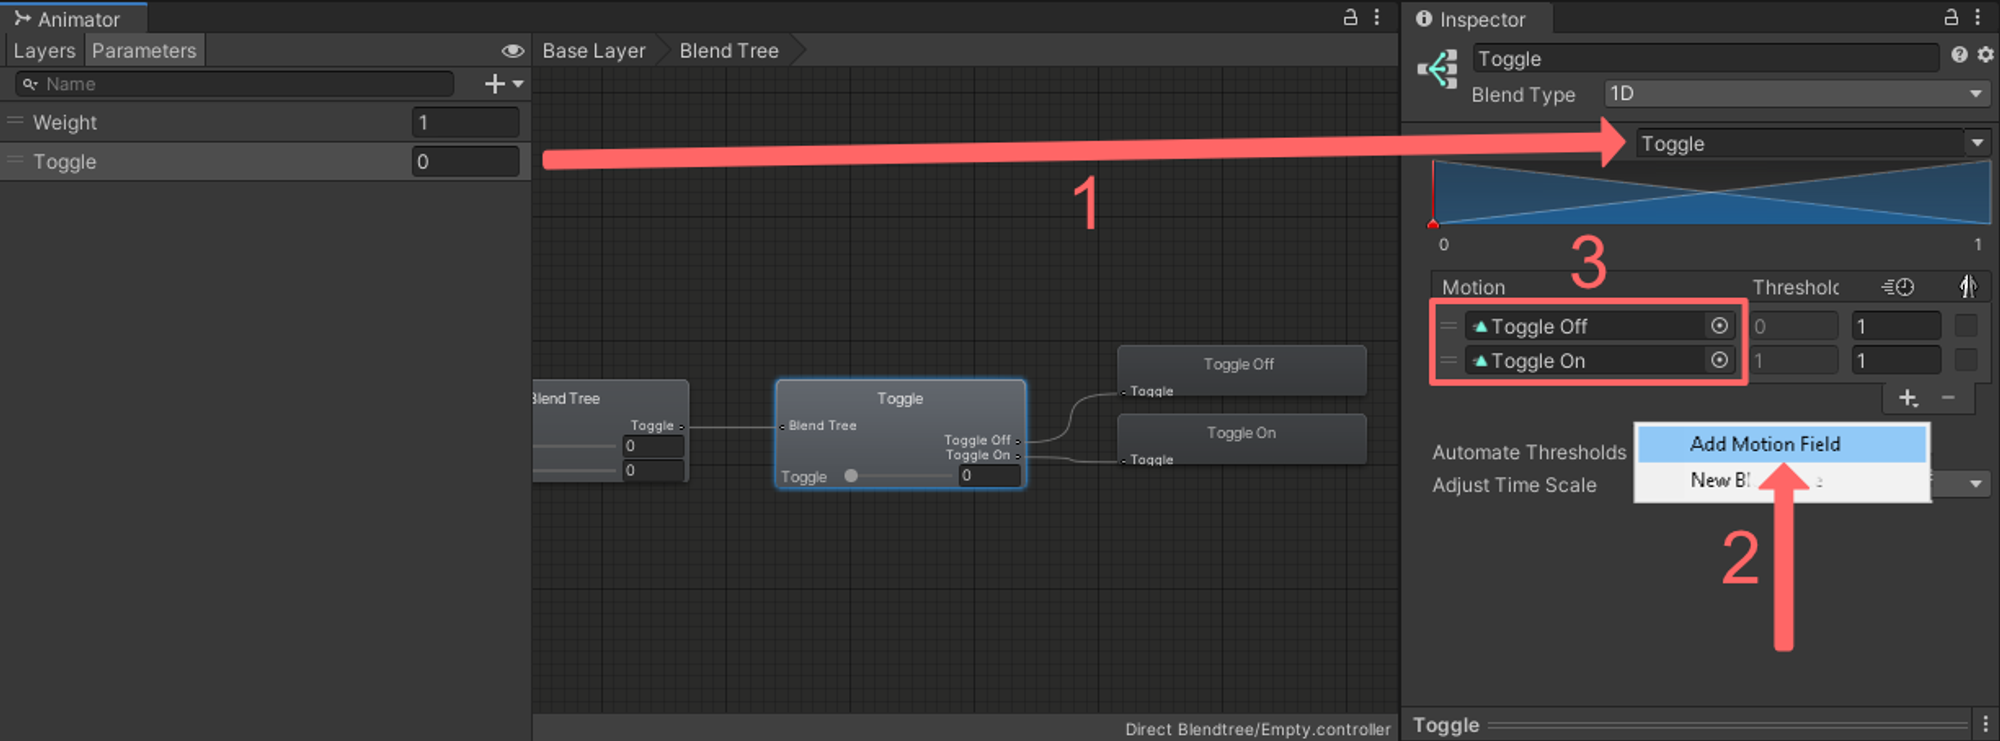
Step 4
- Select the child Blend Tree and make sure the Blend Type is set to
1D- You can rename the Blend Tree at the top of the inspector for organizational purposes
- Create a new float parameter for the toggle or radial puppet you are creating, and set it as the parameter of the current child 1D Blend Tree
- Add two new motions as children to this child 1D Blend Tree and put in the same animations you would typically use for your standard toggle or 1D radial puppet
- If you are used to utilizing single animation clips with Motion Time for your radial puppets, you will have to make your animation clips in 1D Blend Tree radial puppet fashion instead
Using only one animation clip like you would with a WD On workflow will not work! You need separate animation clips or a combined clip.
Step 5
- Add the parameter that is used by the 1D Blend Tree to your VRChat Expression Parameters List
- If you are making a radial puppet, set the type to
float - If you are making a toggle, set the type to
bool- This will work due to Expression Parameter Mismatching
- If you are making a radial puppet, set the type to
Repeat steps for every toggle and radial puppet you want to create, there is no limit to how many you can add.
Write Defaults
Direct Blend Trees are an exception when it comes to Write Defaults. Their Write Defaults value does not have to match that of the rest of your Animator Controller, meaning it is okay to mix Write Defaults, as long as you do not mix within the same layer.
In the case of Direct Blend Trees this means we can safely use Write Defaults On, even if the rest of the Animator Controller uses Write Defaults Off. This lets us avoid a handful of problems:
Write Defaults Off Direct Blend Trees
- need to be normalized
- need their animations normalized
- are not stable when using multiple Blend Trees
- smoothen their outputs
- can not have an animation as their first child
Therefore it is NOT advisable to use Write Defaults Off Direct Blend Trees as they are less stable and a lot more difficult to work with than their Write Defaults On counterpart. Again, it is completely safe to use Write Defaults On Direct Blend Trees even if the entire rest of your Animator Controller uses Write Defaults Off.
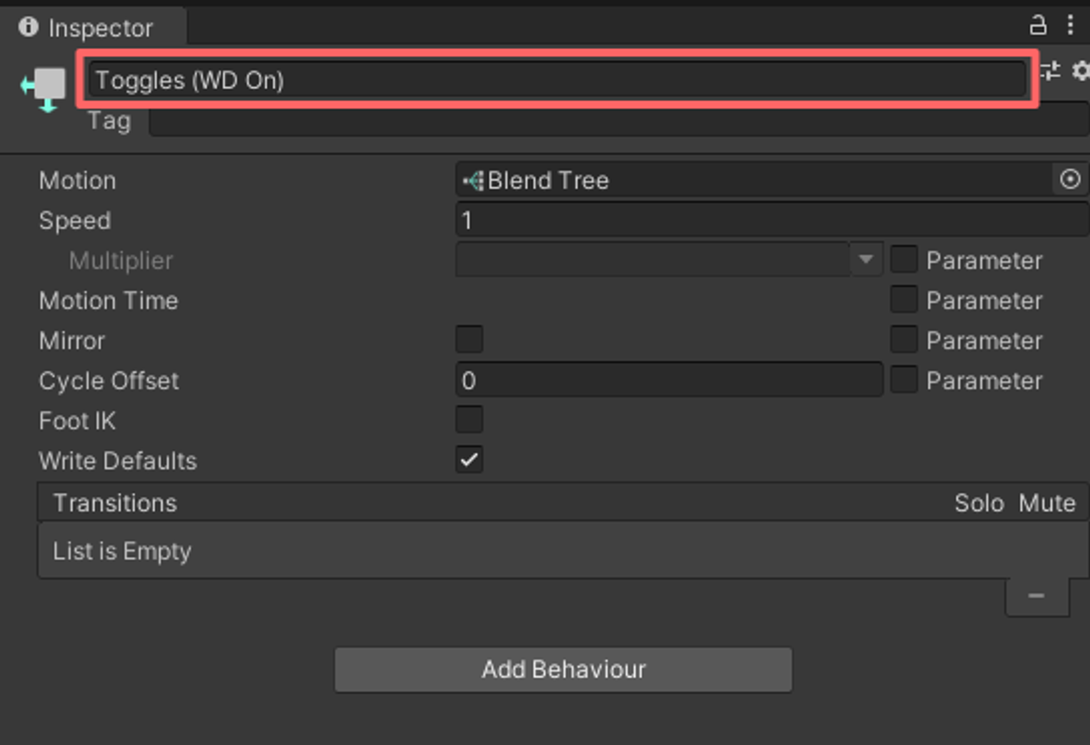
You can add the prefix (WD On) to the name of your Blend Tree and it will be skipped when using the https://github.com/VRLabs/Avatars-3.0-Manager to set the Write Defaults values of your Animator Controllers.
This is especially useful for Avatar and Prefab creators that want to make sure that users do not accidentally turn off the Write Defaults when using the tool.
Changing the Write Defaults value from On to Off WILL break the Blend Tree until Write Defaults is turned back to On!
Nesting Direct Blend Trees
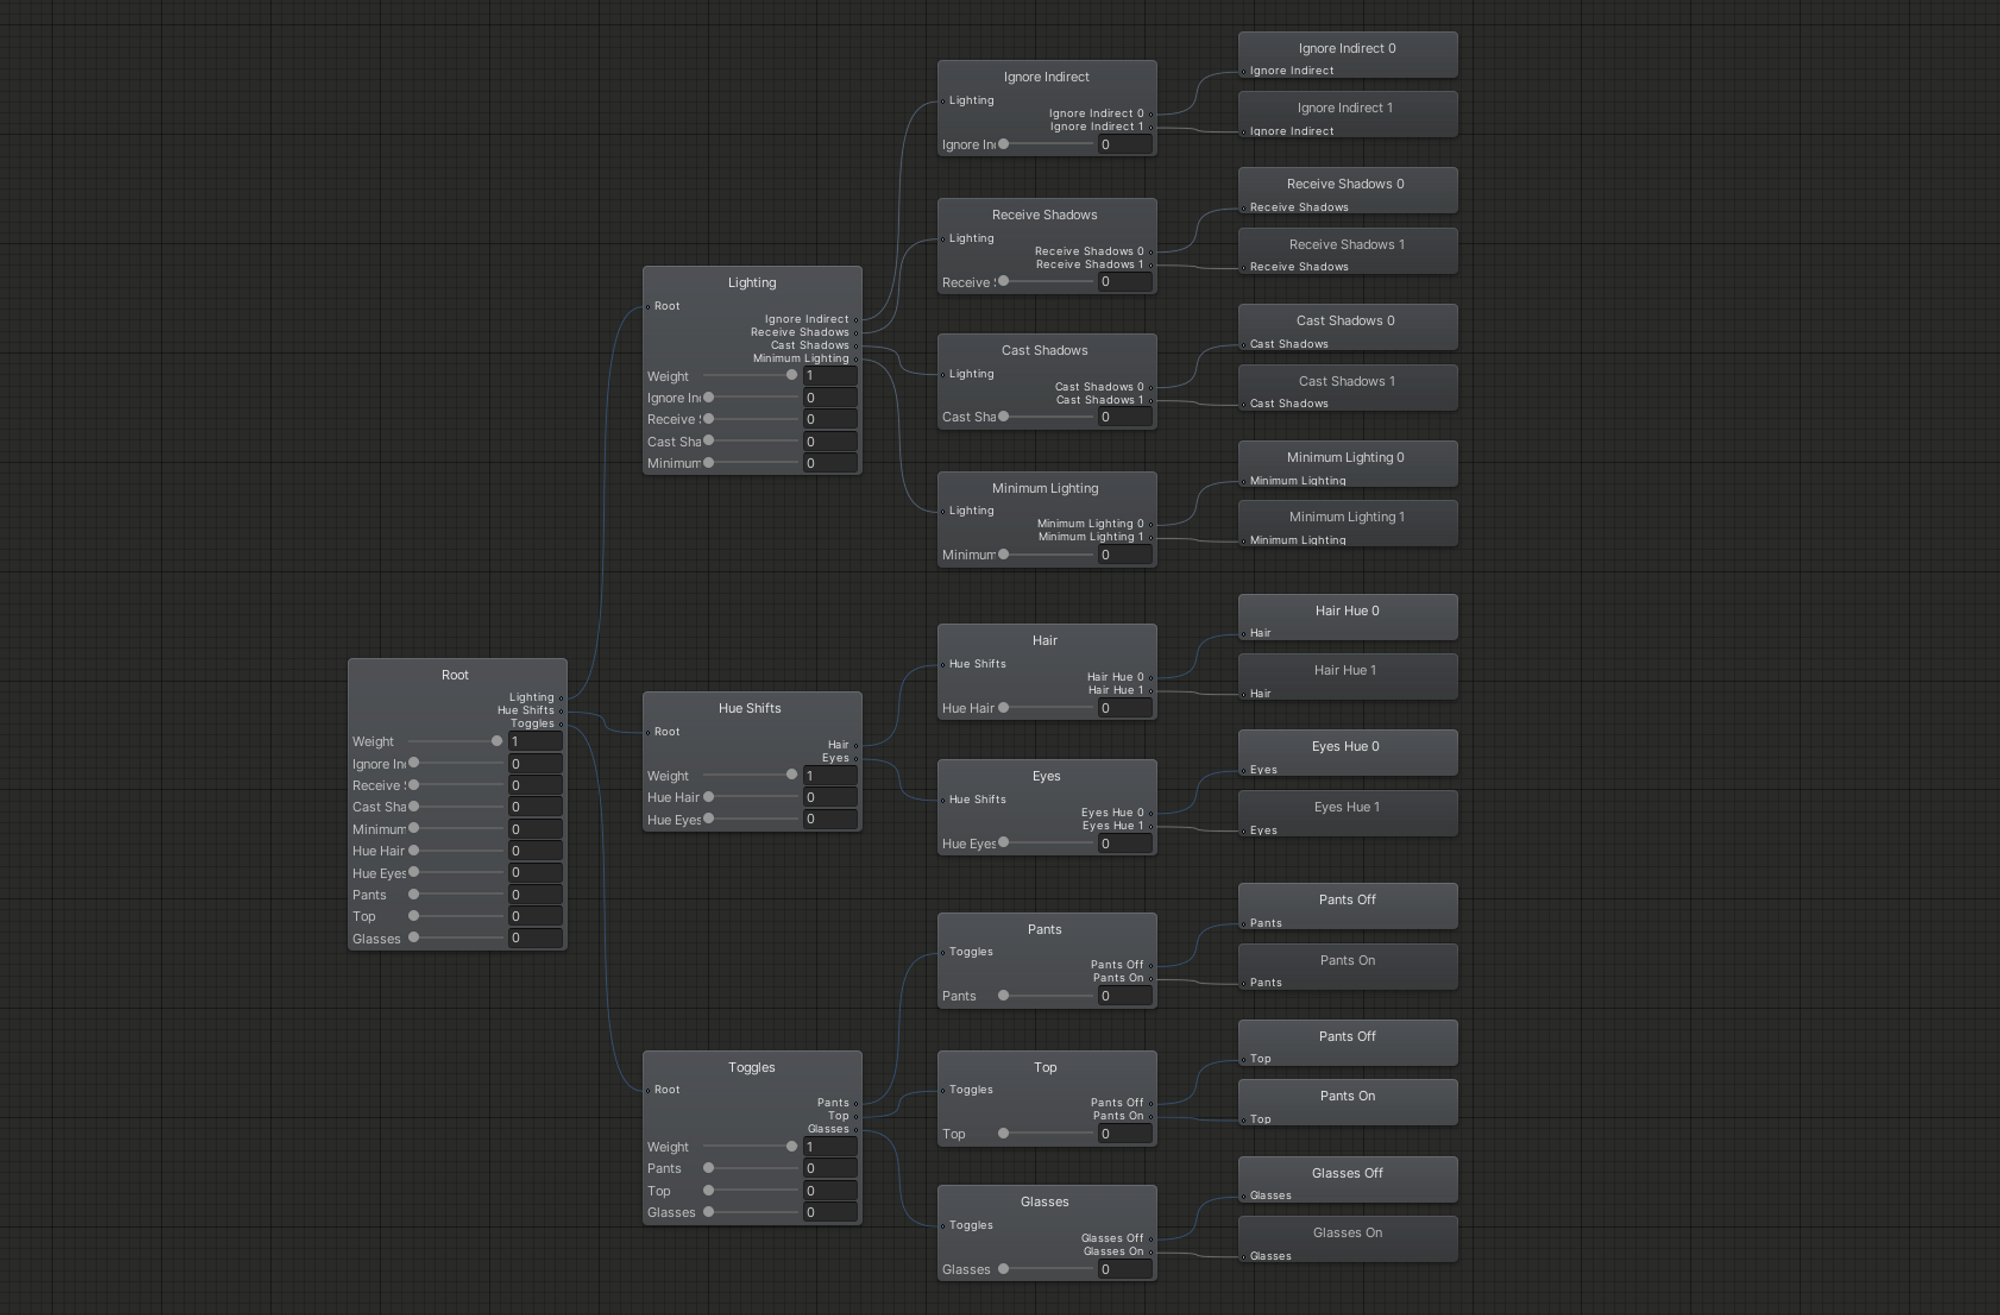
If you have a lot of toggles and radial puppets, your Direct Blend Tree can very quickly become really big and hard to read. You can nest Direct Blend Trees within each other to simulate folders and improve organization.
If you have already created all your toggles and radial puppets before nesting, you will have to delete and remake them inside their folder, so it is better to account for this in advance (unless you have a tool to rearrange Blend Trees).
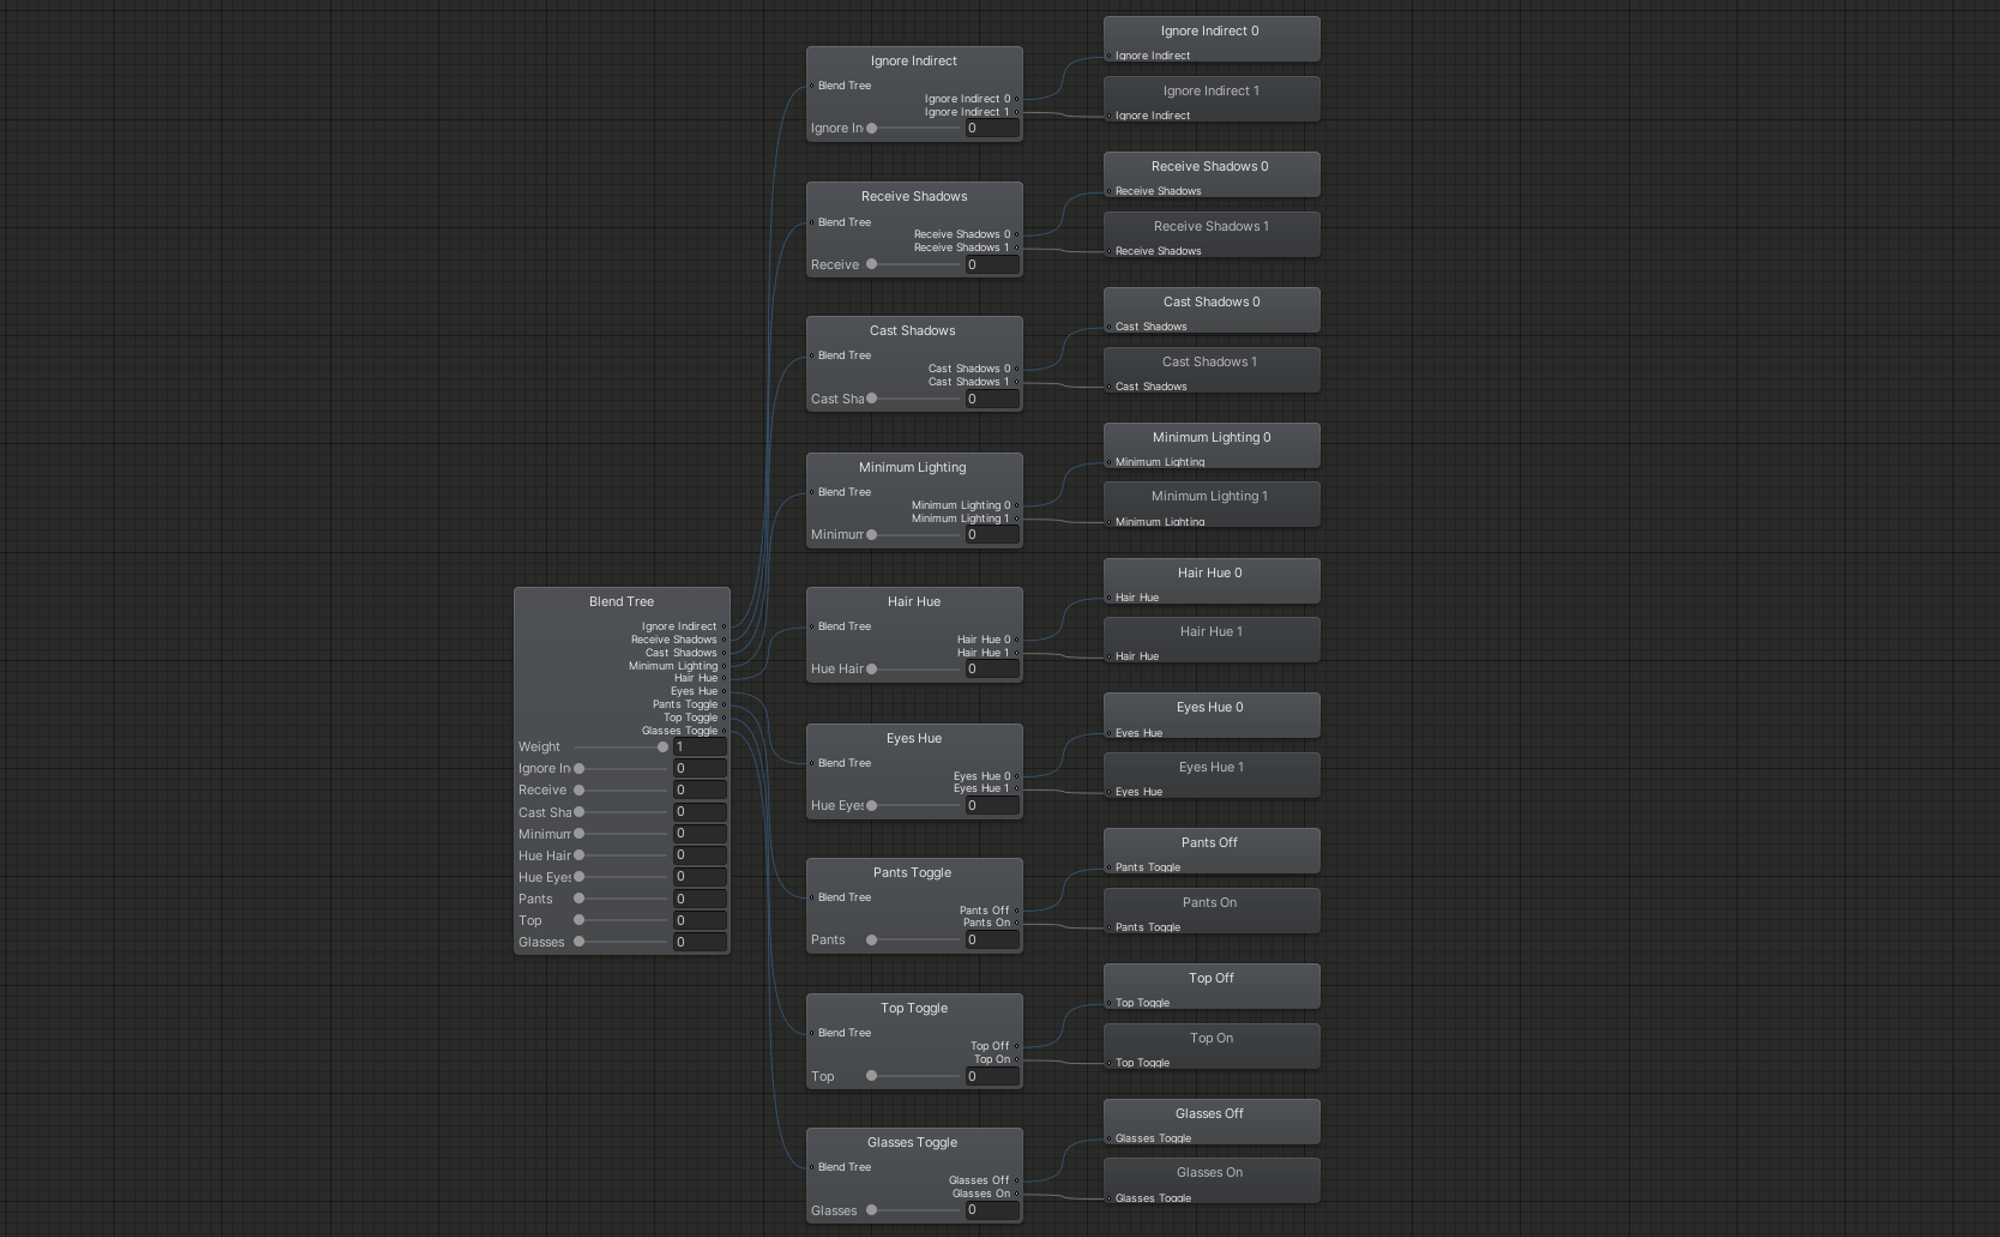
Here we have a Direct Blend Tree containing nine children, we can organize them into folders by utilizing more Direct Blend Trees.
Start by adding a child Blend Tree to your Direct Blend Tree for each folder you would like to create, the same way you would when making a toggle or radial puppet.
Next, select each child and change the Blend Type to Direct in the inspector.
Now simply create your toggles and radial puppets the same way you would in the previous guide, except that now you are creating them from within the folder.
For better organization you can also rename the folders at the top of the inspector when selecting them.
You can use the same Weight parameter from your root Direct Blend Tree described in Step 3 for each of these sub-folders.
An example of combining multiple radial puppets and toggles can be found at Direct Blend Tree Radials and Toggles (Nested).
You can double click on any of the Direct Blend Trees to open them in an isolated view, this can be especially helpful when working with a Blend Tree that is causing performance issues due to its size.
Advanced Blend Tree Techniques
Blend Trees can be used for a lot more than just simple toggles and radial puppets, such as:
- Performing basic mathematical operations such as addition, subtraction and multiplication
- Solving mathematical equations such as basic exponential smoothing
- Simulating logic gates such as AND, OR and XOR gates
As of writing, these mentioned techniques are relatively undocumented and out of the scope of this guide.
An extension article may be added in the future if there’s enough demand.
Current Limitations And Known Issues
- There is currently no satisfactory solution for animated toggles such as dissolve toggles, as well as any motion time
- There is no satisfactory solution for driving other parameters, such as for exclusive toggles using parameter drivers
- The values of the animations may be set to 0 for a single frame when entering the Blend Tree for the first time