Introduction to VRChat Specific Unity stuff
The topics under this section will address things in Unity that are specific to VRChat.
- Mirror Toggles with UI
- Collider Toggles with Udon
- Pickupables and Physics
- Videoplayer, Pens and Other Prefabs
- Uploading to VRChat and Quest Compatibility
- Never Stop Learning
Mirror Toggles with UI
Let’s get to the moment most of you have been waiting for, adding a mirror! In the project tab, search for mirror. Drag VRCMirror into your scene, rename it to HQ Mirror, then position, rotate, and scale how you want it. If you imported VRWorldToolkit (like you should have in part 1) then you will see a button that says Show Players/World. Click on it, and then under Reflect Layers also enable Pickup and Walkthrough. Now disable the mirror.
OK, we have a mirror, but how do we toggle it on and off? This is where UI comes in. We want to have a toggle we can click, so in the Hierarchy, right click, UI>Toggle. This will spawn a UI toggle parented to a canvas, which is a necessary component to display UI elements; however, we need to fix a few things first. In the Hierarchy, click Canvas, then change its Render Mode to World Space. Under Rect Transform, change the XYZ scale to .001. Then change the layer from UI to Default. Add two components, a box collider and a VRC Ui Shape. Now position it against a wall; turn off progrids so you can position it slightly off of the wall, not inside of it.
In the hierarchy, under Canvas click toggle and set its width to 700 and height to 120 and untick Is On.
In the hierarchy, under toggle click label. Make the text “HQ Mirror Toggle”, change the color to white and increase the font size. You can change the font, and you can even import custom fonts by dragging in a ttf font file from C:/Windows/Fonts. You can also add a shadow by clicking Add Component and searching for it.
Click Background in the hierarchy and change the width and height to 100. Then change the offsets to 50 and -50 to position the checkbox correctly. Then click Checkmark in the hierarchy and change the width and height of that to 100 as well. Finally select the label again and set left to at least 100 (you can use the gizmos to translate UI elements the same as other objects).
Now under toggle, set navigation to None. Click the plus icon at the bottom of the component where it says On Value Changed and drag in the mirror from the hierarchy. Click the dropdown that says No Function and select GameObject>SetActive under dynamic bool.
Duplicate your HQ Mirror, rename it to LQ Mirror, click show players only, and duplicate the button we just created. In the toggle drag in the LQ Mirror in place of the HQ one and change the label to LQ Mirror Toggle.
To ensure that only one mirror is on at a time, add a new slot, drag in the HQ Mirror Toggle, and under the dropdown select Toggle>isOn under static bool and leave the box unchecked. Do the same for the HQ Mirror Toggle, with the LQ Mirror Toggle in the slot. However, if you have a mirror on and want to select a different one, you have to click the button twice, once to turn the current mirror off and another time to turn the desired mirror on.
Press the play button to test this out by using CyanEmu (which you also should have imported in part 1).
If you want to make this UI but using Udon you can check out Vowgan’s video! https://youtu.be/E0D9Z8-HVBI
Move one of the mirrors slightly in front of the other to avoid z-fighting.
If you have a larger world, note that the LQ mirror will render avatars behind it, even if they are through walls. For the sake of performance and privacy it would be wise to position mirrors where they are not going to do this, or even design your spaces where mirrors will go with this in mind.
By the way you’ll probably want to organize your hierarchy at this point. You can essentially use empty gameobjects as folders, but make sure you reset their transform first or else it will mess with the position of the child gameobjects which will mess with progrids! If you forget and don’t reset the transform, drag out all of the child gameobjects, reset the transform and then drag them back in.
A bit of a bonus, I had a question asked in the comments about how to do neon lighting. First add in an object you want to give neon to, so I’ll go into the probuilder window and add a skinny cylinder with no height segments. I’ll extrude it to form it how I want. I can create extrusions and then rotate with a center pivot to create turns in the neon tube. After you finish modeling, create a new material and check the emissive box and set it to baked. Apply it to your object and select the color you want it to emit. Bake and you’re done!
A few tips with this: one, you can enable bezier curves (and booleans!) in probuilder by going to Edit>Preferences>Probuilder>Experimental Features Enabled. However, neither of these work great in probuilder so I would recommend doing them in Blender instead.
Two, make sure the lighting fits your scene. If you are going for a warm or natural look you will want to limit yourself to the colors on the kelvin spectrum. If you are going for an artificial look you can use colors on the full visible light spectrum. This is covered in the Blender Guru lighting course I recommended at the beginning of lesson 4.
That’s it for this lesson. The next one will be a continuation of this one, where I’ll show you how to toggle objects between the default and walkable layers by using UI with Udon!
Collider Toggles with Udon
This is a continuation from the last lesson, where we will be making a world space UI button to toggle whether players will collide with certain objects, or more specifically, switch those objects between the walkthrough and default layers.
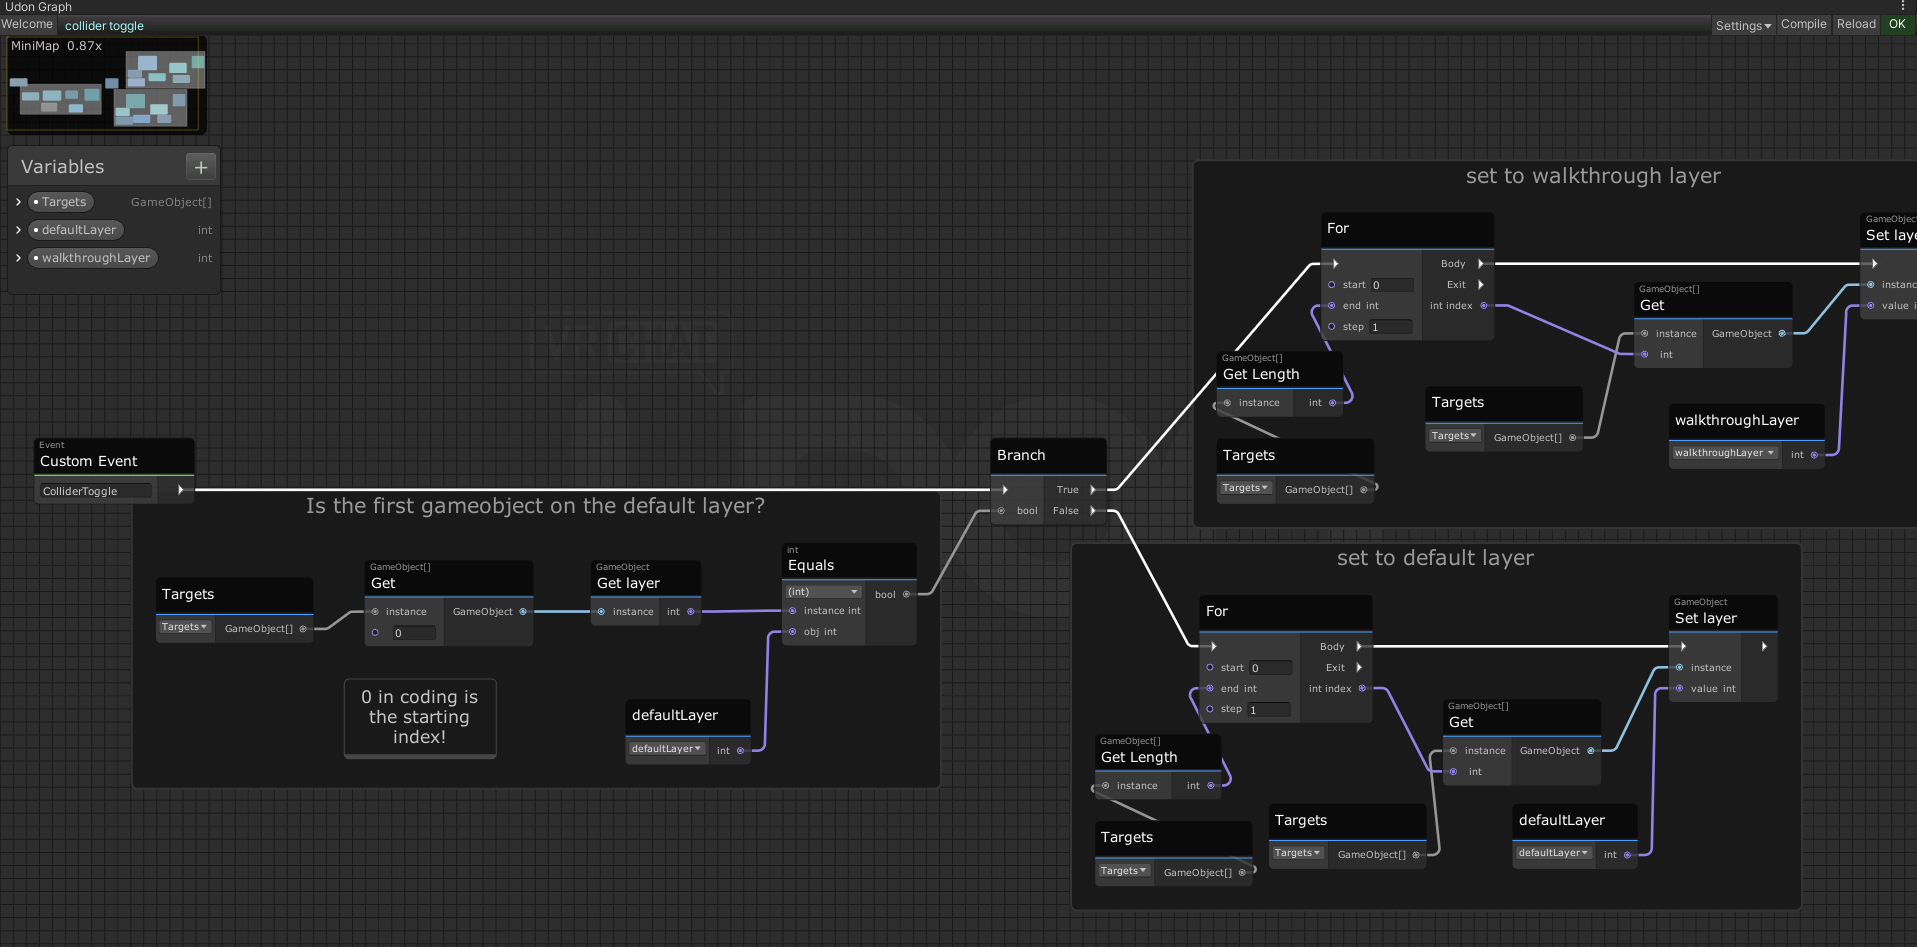
In the project tab, right click, Create>VRChat>Udon>Udon Graph Program Asset. Rename (right click or F2) this to Collider Toggle. Duplicate one of the toggles and rename the object and the label to colliders. Click the toggle and add an UdonBehavior component and drag in the udon script. At the bottom of the toggle component, click the minus button to remove the old slots, then click the plus icon and drag in the UdonBehavior.
Click the program in the project view, and then press “Open Udon Graph”. The Udon tab should pop up now!
The welcome screen should be the first thing you see. You can change the grid size if you want, I like to set it to 20 but that’s just my preference. Now click Open Collider Toggle, and this is the Udon Graph!
Udon is visual scripting, or essentially code, but visualized as nodes rather than as lines of text. I know the word “coding” scares some people, but it’s probably not as hard as you think. If you never want to touch Udon again after this that’s fine, I’ll be holding your hand through this entire tutorial.
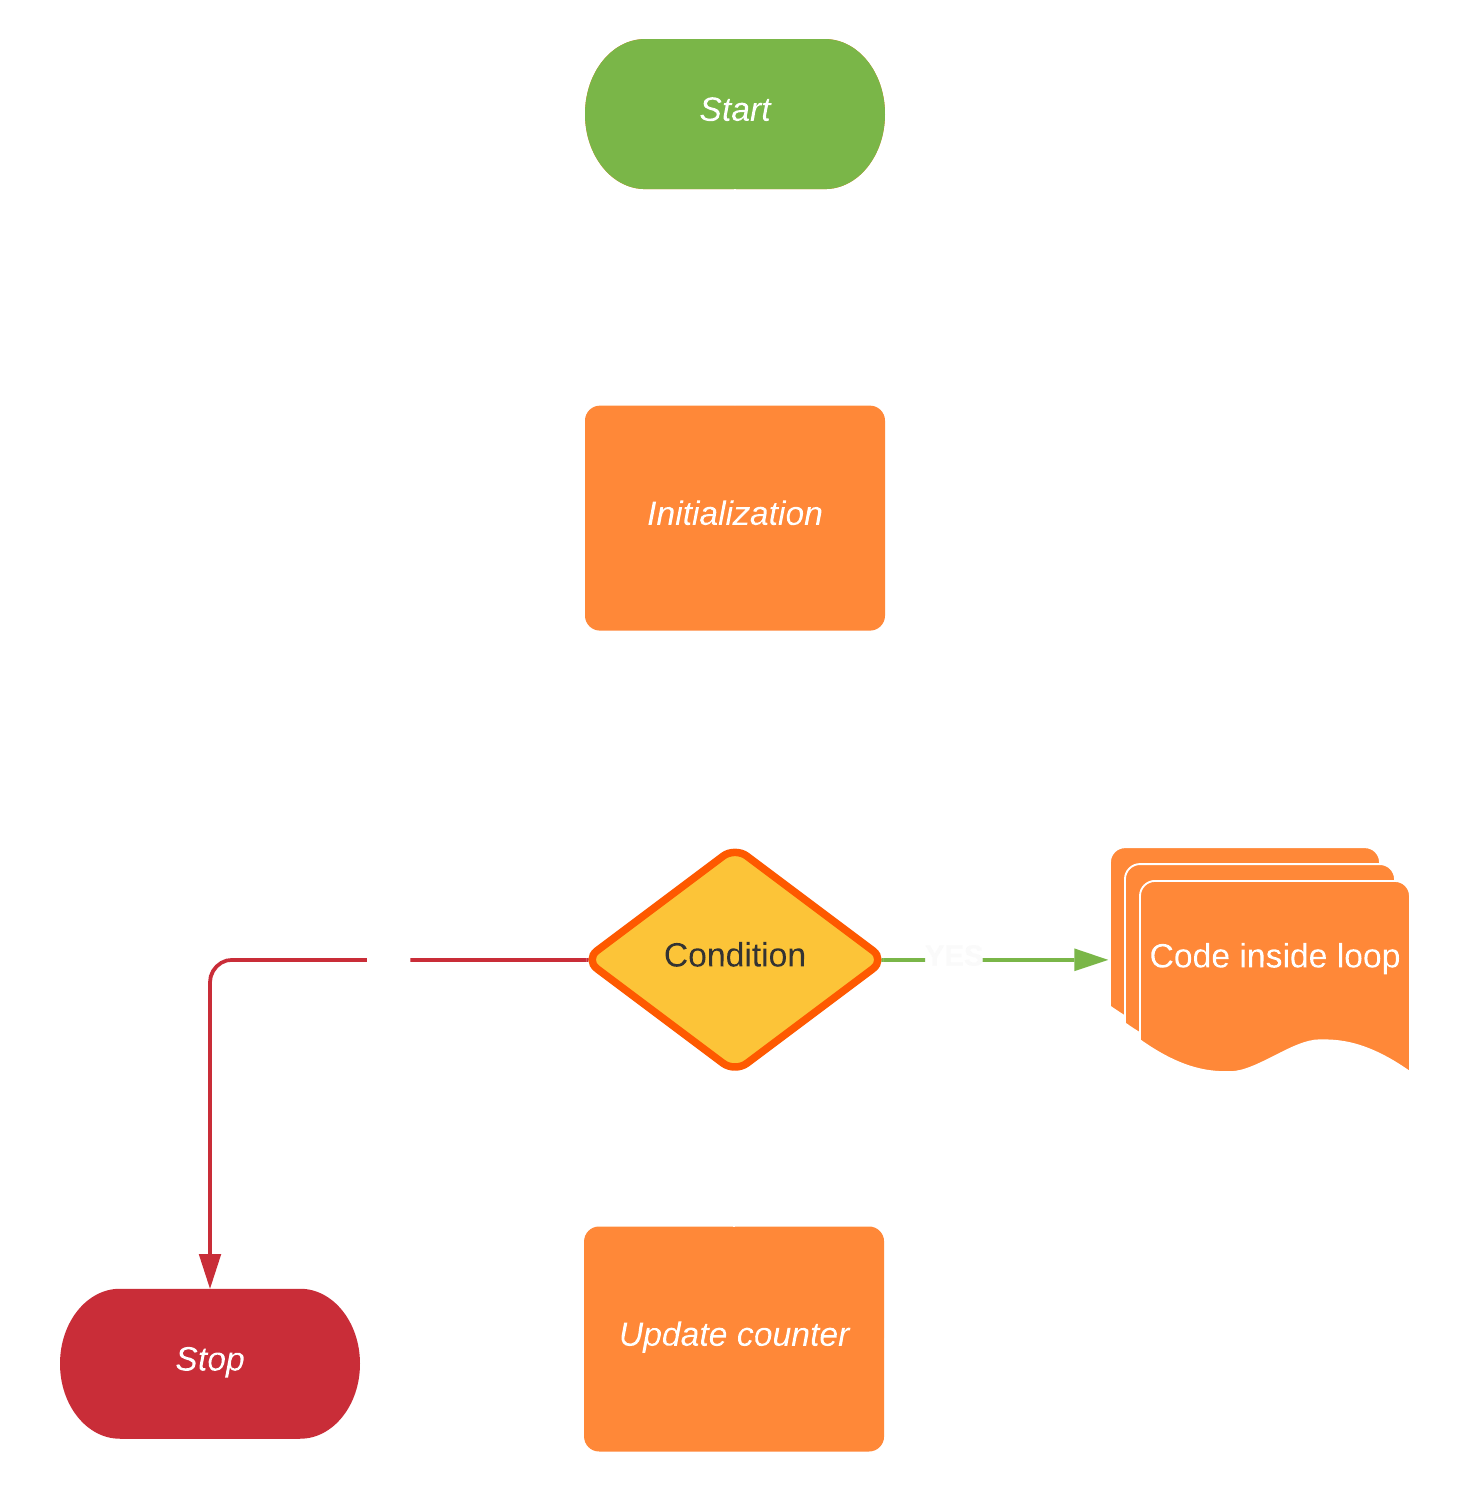
It’s best to first think of how our code would work in a purely logical way, just the steps written in plain English that we can then convert into code.
The prerequisites before our code is run is that all of our objects are on the same layer, and we want to have a list of all the objects we want to toggle.
- When the code starts, we want to check the first object to see if it’s on the default layer. (Since all of them are on the same layer it makes sense that we only have to check one)
- If it is on the default layer, then it means that all of the other objects are on the default layer too, and we want to switch them to the walkthrough layer.
- If it isn’t on the default layer, it means all the objects are on the walkthrough layer and we want to switch them to the default layer.
The first thing we need to create are some variables. Variables are used to store information that can later be referenced or manipulated. There are many types of variables we can create for the many types of data we can use, such as ints which are essentially integers, booleans which are true or false, gameobjects, any type of component among many others. A variable can also be an array, which is a variable composed of multiple variables of the same type. An array is represented with [square brackets] next to the variable type. We can add new variables to our script by clicking the plus in the variables menu in the top left corner.
- The first variable we need is an array of gameobjects, the one with the [square brackets]. Rename it to Targets. Click the arrow beside the new variable and check public; this makes our variable accessible outside of our script. If you click on the collider toggle UI button we made you should see it in the inspector. Drag in all of the gameobjects that are to be toggled. Make sure to drag in the gameobject that actually has the colliders on it! Also, child objects are not affected!
- The last two variables we need are the layers. Layers in Unity are stored in numerical order and must be referenced by that assigned number. If you click the layer dropdown on any component you can see that the default layer is 0 and the walkthrough layer is layer 17. Add two ints and set one’s default value to 0 and the other to 17. Rename them to defaultLayer and walkthroughLayer.
Now we can start adding in nodes! The first thing you should know about them is that individual nodes represent either data or an operation. Sockets on the left of the node are inputs while those on the right are outputs. I know that coding can be pretty daunting for the complete beginner, but you’ll start to understand some of the basics after this lesson.
Press space in the empty grid for quick search; this is how we can add in new nodes. The first node we need is one that starts the rest of the script. That type of node is called an event, and we want the script to be run when the toggle is pressed, so search for “event custom”. Type “ColliderToggle” into the node’s box. Then in the inspector in the toggle component change “no function” to UdonBehavior.SendCustomEvent(String). Copy and paste “ColliderToggle” into the box.
The next thing we want to check is if the first gameobject of the array is on the default layer. First, click and drag the Targets array variable from the menu in the top left into the grid. This will make a node where we can access our array of gameobjects; however, we only want the first gameobject, not all of them. Drag out from the node, then search for and add “get”. This node allows us to get only one gameobject from our array of gameobjects. Since 0 represents the first thing in the array, just leave that in the box. 0 is typically the starting number for things in programming, not 1.
Now we want to get what layer that gameobject is on. Drag out from the get gameobject, search for layer and choose “get layer”.
Now we have the layer of the first gameobject, as an integer. We want to compare it to the integer representing the default layer, to see if they match. Drag from the get layer and search for equals. Drag the default layer variable into the grid and plug it into the int slot. The equals function is comparing the two integers to see if they are the same. If they are, then the output is true; if not, the output is false.
You might have noticed that before we plugged in the default layer, the value in that input was already zero. We can actually click in the box and set it to anything we want. Since the default layer is a constant (it will always be the same, the number 0), we could have simply not created the default layer int variable at all. The reason I told you to is to show that making constants as variables can make your code easier to read, especially if that constant is used multiple times in the code.
Before we move on, it is best practice to organize our code into groups to make it easier to read. Highlight all the nodes we just created except the Custom Event node, right click and then select “create group”. Now all of those nodes are in a big box. Double click group to rename it to “Is the first gameobject on the default layer?”. You can also right click to create comments. This is often overlooked by beginners but it is a godsend when someone else is trying to interpret your code, or when you are trying to interpret your own code when coming back to it after a long time.
All the gameobjects of the array should be on the same layer. If the first gameobject is on the default layer, that means all of the gameobjects in the array are on the default layer and we want to switch all of them to the walkthrough layer. If the first gameobject is on the walkthrough layer then we want to do the opposite.
An “if” in our logic is typically an indicator that we want a branch in our code. Drag out from the equals node and search for branch. Drag the custom event arrow to the left branch arrow.
Let’s start with the true branch first. What we want to do is iterate through all of the objects in our array and change them to the walkthrough layer. If we want to repeat the same code, this is typically an indicator that we want a loop. There is a specific loop we can use for an array called a for loop (or a foreach loop if you’re using UdonSharp!). Search for “For” and add it. Drag the true from the branch into the left arrow of the for loop.
Our array starts at 0, so just leave that input at 0. For the end input we want to get how many objects are in our array. Drag the targets array from the variables menu into the grid. Drag from the node output and search for length. Choose the first one, “get length”, with the lowercase g and 2 separate words. Now drag the output of that into the for loop “end” input. We want the step to be 1 so just leave that.
What the for loop does, essentially, is for each gameobject in the array, execute the body of the code. How many times the code is run is determined by the 3 inputs.
Now that we have the for loop set up, we want to just change the gameobject’s layer from default to walkthrough, from 0 to 17. Drag targets into the grid again. Drag out from the output and search for get. This node will give us only one of the gameobjects in the array. Drag the int index from the for loop into the int input of the get gameobject node. This gets us the specific gameobject at the index that the for loop is at. So if the for loop is at the first index, the get gameobject node will give us the gameobject at the first index in the array.
Drag out from gameobject, search for layer and choose set layer. Drag the walkthroughLayer variable into the grid and connect it to the int value input. Now connect the body arrow from the for loop to the set layer node
And that’s it for the true branch! For each gameobject in the array, that gameobject’s layer will be set to the walkthrough layer! Outline all the code and create a new group, name it set to walkthrough layer.
The false branch is actually really similar. Just select all the nodes from the true branch, press ctrl+d to duplicate them, drag them down and then replace the walkthrough layer with the default layer. Connect the false branch to the for loop, create a new group called “set to default layer”, click compile at the top right of the window and you’re done!
Now just test it using CyanEmu (press play)!
You can use Debug Log to send messages to the console when running a script. This is incredibly helpful for troubleshooting.
I want to stress that I cannot help you in the YouTube comments section. For some of you, because you are new to coding and Udon something may go wrong. The YouTube comments section is not engineered so I can give you much back-and-forth help. Your best bet is to look at the console for errors if there are any, look them up yourself, use debug log to troubleshoot yourself, and if none of that works then ask in the udon channel of the VRChat official discord (or the udonsharp discord if you are using udonsharp). Again, please do not ask in the Youtube comments section. I can’t help you.
There is a simpler way of creating these Udon systems for SDK3 which emulates the way in which Triggers worked in SDK2; it’s called CyanTriggers and this is an extension can be downloaded either from Github for free or from the creator Cyanlazer’s Patreon for the most up to date version. I’m not familiar with either of these and to avoid importing too many external tools which may be subject to change I didn’t cover it. I would recommend Cyantriggers to anyone who doesn’t already know coding and doesn’t want to learn it or to anyone who is more familiar with triggers from SDK2 and wants to use a workflow more similar to that. SDK2 is now deprecated so I would never recommend it to anyone starting a new project.
If you want to create udon programs using more traditional line-by-line C#, you can check out UdonSharp.
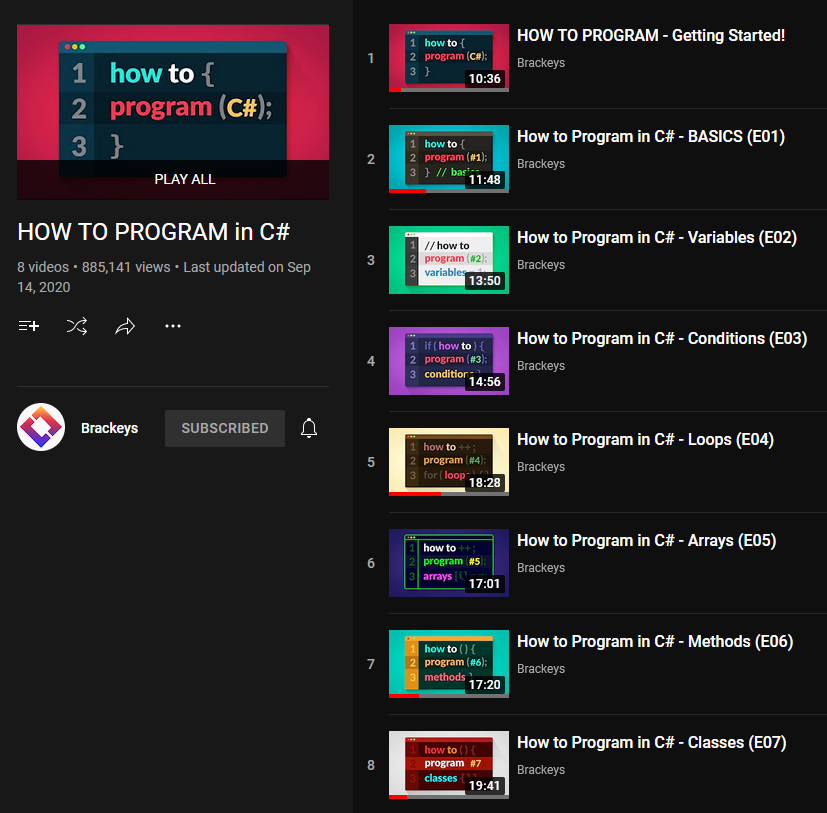
If you want to learn more about coding, specifically C# which Unity and UdonSharp uses, I would recommend checking out the beginner series by Brackey’s. He used to make a lot of really good Unity tutorials so these tutorials have in mind that much of the audience wants to learn the basics of C# so they can program in Unity.
If you want to learn more about coding for VRChat in both Udon and UdonSharp, I would recommend watching Vowgan’s tutorials. These are the coding tutorials that are going to be the most specific to VRChat but I would recommend having a decent grasp on the basics of coding first.

In the next lesson I’ll go over pickupabbles and physics!
Pickupables and Physics
Now what about things that you want to pick up or throw? This, unsurprisingly, requires physics. Don’t worry, you won’t have to do any calculus, this only requires a simple understanding of a few components.
Create a small cube. On that cube, click add component, search for pickup, and click VRCPickup. You should now see that there are two components added, a rigidbody and VRCPickup.
A pickup in VRChat requires 4 components:
- Rigidbody: this calculates physics
- Collider: for collisions
- VRCPickup: so you can grab/use the object in VRChat
- VRC Object Sync (optional): so the object can be synced between players. Note that each synced object must have an owner, which is why pickupables look fine in your hand but look laggy if they were last held by another player
If you enable Is Kinematic, your object will only be able to be moved by a player interacting with it. It will not collide with other objects (though other objects will collide with it), and will not have physical forces applied to it. This is a popular setting for pillows.
Physics materials give objects more realistic physical properties. You can add them to the colliders of your surfaces and pickupables to make them more believable.
You can use multiple colliders for more accurate collision; for example, for my glass bottles, I start with a box collider, then shrink it on the X and Z axes. Then I add a capsule collider and shrink it on the Y axis until it aligns with the bottle. This allows the bottle to roll but also stand up if placed on its top or bottom. Note that you will only be able to grab the first collider that appears in the inspector.
Videoplayer, Pens and Other Prefabs
I figured I’d dedicate a separate short lesson to VRChat specific prefabs, because there are a few that I know a lot of people want in their worlds.
Many VRChat prefabs can be found on the VRCPrefabs database. Note that SDK2 prefabs will not work in our SDK3 world, only Udon Prefabs will work.
Many prefabs require UdonSharp to work; this complies C# code to Udon. You don’t need to know how it works, just make sure you import it before importing an Udon prefab that requires it.
One of the most popular features of small worlds is a video player. The most popular of these is Merlin’s UdonSharp player (which we will be using), but some other ones are VRCUdon’s and there is also ProTV which is quest compatible. First, we need to import UdonSharp. Grab the unitypackage from the Github page under releases for both UdonSharp and UsharpVideo. There should be a videoplayer prefab in the UsharpVideo folder in the project, drag that into the scene, unpack and you’re done!
You can change some options on the player, like whether control is locked to the master of the world or whether anyone can paste video links. You can change the UI style by going to the ControlsUI gameobject in the prefab, clicking on the style file and selecting a different one in the folder or you can make your own.
Prefabs with Udon elements can cause conflicts, so it’s best to unpack your prefabs in your scene to ensure they work properly. You can right click on the prefab in the hierarchy and click unpack prefab; this will make your object no longer a prefab.
Another popular prefab is Qvpens. Grab these from their page on booth and make sure it is the Udon version. After importing, drag the prefab into the scene.
If you want a low quality mirror without the skybox, you can use VRCPlayersOnlyMirror. It comes with a UI pre-setup.
The standard shader isn’t very good but thankfully there are community created replacements that are much more intuitive and fully featured. Some of these include z3y’s shaders or Silent’s Filimented, but the one we are going to use is Mochie Standard because it is the easiest to install and tells you if your grayscale textures are set to sRGB and provides a button to automatically fix it if they are. It uses the industry standard roughness maps instead of smoothness maps, and gives greater control over the parallax mapping for heightmaps, among many other features.
Water shaders are also something many world creators want, and Mochie’s shader package also comes with a decent water shader. Other VR specific water shaders I would recommend are Red_Sim’s water shaders, Silent’s Clear water, and Norbien’s water, among others. Note that to have refraction, the shader must use a grabpass which is computationally expensive and does not work on Quest. Many water shaders also require a depth pass, which necessitates that a realtime light with shadows be in the scene. There is a DepthPass prefab included in VRWorldTooklit that is set to have the least impact on performance.
As for my personal opinions on them, I think Red_Sim’s have the best caustics (Mochie’s water caustics look too much like a voronoi texture) and Norbien’s seem to have the best performance and also works with Quest and doesn’t require a real time light for a depth pass.
https://github.com/zulubo/SpecularProbes can make decent looking baked specular highlights. Has limitations (like if the specular highlight is supposed to be occluded, doesn’t look as good as realtime specular highlights) but there are definitely certain scenes and aesthetics that stand to benefit from it.
For those who are interested, if you want to convert Unity C# scripts to UdonSharp, it typically isn’t very difficult. Typically you can change the namespace from MonoBehavior to UdonSharpBehavior, plug it into an udon component (UdonSharp will automatically fill in the rest) and it should work. You can check the UdonSharp class exposure tree by going to Window>UdonSharp>Class Exposure Tree. If you run into problems or have more questions visit the Discord server linked in UdonSharp’s Github page.
If you plan on writing Udonsharp scripts I would also recommend UdonToolkit, which allows you to create custom inspectors for your scripts (like I did on my fork of Nova_Max’s Daynight cycle prefab!). It helps make them easier to use for not only yourself but also anyone else if you plan on making it available.
Some prefabs don’t come in a unitypackage but in a zip file with a package.json file inside. To import these, open the package manager, click the plus icon, then click the package.json file and open it.
Uploading to VRChat and Quest Compatibility
As Quest users become more and more prominent on VRChat, compatibility for the Oculus Quest is more and more sought after. Thankfully, making a world Quest compatible is not very difficult, though it can be a bit tedious.
Since switching to the Quest build is slow the first time, it’s best to make edits and corrections to the PC version first. That and having a different hierarchy order between PC and Quest can mess with synced objects! So make sure that both worlds have synced objects in the same place in the hierarchy, and with the same names!
There are a few final optimizations that you should ensure you have before uploading:
Ensure that your lighting bake is accurate (you didn’t edit any static objects since the last lighting bake and your light probes don’t have errors)
Check VRWorld Toolkit’s world debugger for errors
Bake occlusion culling
Use the mass texture importer feature of VRWorld Toolkit to compress any textures that you haven’t already (click get textures from scene and then apply)]
You can compress your meshes too! To do this, click on the .fbx file and under mesh compression click medium (Click the circle with the ? as always for more info)
If you are using parallax maps, set the steps lower if you can, or disable them entirely if they are not super important to the material (they are relatively computationally expensive, and even Oculus recommends not using them for VR)
Ensure all of your pickupables are the child of one gameobject in the root of the hierarchy (a rigidbody component updates every frame, and any parent gameobjects also must update, so having only one parent gameobject makes our physics more optimized)
Have options to toggle pickupables and shadows on realtime light sources if you have any. The latter requires using two separate buttons with Udon and the script looks like this. If you’re confused on how to set either up then watch my UI and Udon videos.
Before uploading you should test your world first, not just in CyanEmu but also in VRChat. To do this go to VRChat SDK>Control Panel and switch to the build tab, and then click build and test; you can increase the number of clients to simulate multiple players. Doing this not only gives you a perfect representation of how your world will function in VRChat but also gives us access to the build report in VRWorldToolkit, which we can use to find any uncompressed assets.
There’s another add-on I’d like to tell you about in this series; comparatively it’s optional but can come in handy. It’s called VRBuildHelper, and it’s main feature is that it allows you to manage multiple branches of a world like version control, but it also comes with some helpful features (which I mostly use it for) which I will get into in a moment.
Once you’re ready to upload, check VRWorldToolkit>World Debugger to see if there’s anything you need to fix. Then position the main camera to where you want your world’s preview picture to be taken.
Install VRChat ApiTools and then VRBuildHelper. Go to Winidow>VRBuildHelper, click “Set up Build Helper in this scene”, and then click “Create new branch”.
Open VRChat SDK>Control Panel and switch to the build tab, and click build and upload.
After the build has completed but before it uploads, Unity will be in game view and you need to enter the details of the world (which can be later edited on Vrchat.com). Go back into the scene view, and on the transform of the main camera click the 3 dots > copy component and then on the new game object VRCCAM’s transform click the 3 dots on its transform component and paste component values. Repeat that process copying the post processing layer component from the main camera and then click the 3 dots on VRCCAM and click “paste component as new”.
If you have VRBuildHelper installed you will also see two options next to the preview image on the upload screen: you will probably want to tick save VRCCAM position (the other option is for the branch management feature I talked about before).
At the bottom of the upload screen it says you can publish this world to labs; when you publish a new world, you will have to wait 7 days until you can publish another. However, you can push as many updates as you want to existing worlds. When your world is published to labs it can be accessed by other users if they have “show community labs” turned on in their settings. When your world is in labs there will be warnings when loading into it that it has not yet been approved, and may perform poorly or contain offensive content; in addition, other users will not be able to set it as their home world. To get your world approved and out of labs faster, people can visit it, spend time in it, and favorite it. Labs is an obtuse system and if you have any more questions about it read the FAQ or ask in the VRChat Discord. I don’t answer questions in the comments section anymore. https://docs.vrchat.com/docs/vrchat-community-labs
If you go to Window>VRBuildHelper it will bring up its respective window, and you can see at the bottom it has two buttons next to autonomous builder: current platform (PC or Quest, whichever the editor is set to which you can see in the title of the window) and all platforms. This will allow you to upload your world with a single click, meaning you don’t have to go through the upload screen every time you want to push an update! The catch is you have to upload it the normal way first.
Now let’s focus on the Quest version of our world.
Switching from PC to Android versions usually takes a long time, but to make it faster, we can set up a local cache server. Go to Edit>Preferences>Cache Server and set the Cache Server Mode to Local. If the space on your main drive is limited then you can use a custom cache location on a larger drive. Now, the first time we switch from PC to Android and vice versa will be slow, but subsequent switches will be much, much faster.
There is one last tool we should import called EasyQuestSwitch. Once opened and set up, you can add gameobjects and assets to automate changes between the two platforms. Since Quest does not support post processing, you can add a new slot and drag your post processing volume into it, then uncheck Active on Quest. In addition, make slots for all your materials using the Standard shader. Then in the project tab search bar, type standard lite, and drag the shader file into the Quest shader slot.
In the VRChat SDK window, there is a button to switch to Android (for Quest), but this has been reported to have bugs so we will switch by going to File>Build Settings (Ctrl+Shift+B), selecting Android and then clicking Switch Platform. This will take a while on the first switch, but subsequent switches will be faster.
Ensure that you aren’t using shaders that are completely incompatible with Quest (like the aforementioned water shaders with a grabpass).
Quest worlds have a size limit of 100MB. If it goes over the world will not upload. The quickest ways to fix this are to compress/lower the resolution of textures/lightmaps/meshes/audio files or to use a larger ATSC block size for textures. All of that can be done with just a few clicks inside of Unity.
Open VRWorldToolkit and check to ensure there aren’t any problems.
Finally test the world using CyanEmu to ensure that everything works. If it’s all good, you can now upload the world to Quest!
If you have a Quest, test out the world yourself, if not, get a Quest tester to look for any issues. If everything works then congratulations! You did it! You now have the knowledge you need to make your own optimized, Quest compatible VRChat worlds!
Never Stop Learning
So you’ve finished, now what?
The first thing I would recommend is to start using version control on your important projects, which is like keeping backups that you can revert to in case something breaks. There is a tutorial here about how to setup a local repository in Unity using SourceTree. https://youtube.com/playlist?list=PL-05SQhI5rIZ0no3SfhqzAl7cxM0MBJCX
If you want additional information, on making VRChat content, I made a compendium for it on Steam Guides https://steamcommunity.com/sharedfiles/filedetails/?id=2190684978 and also on a new website called VRCLibrary which you should totally check out!
If you want to learn how to make your own 3D models, you’ve probably heard of the software Blender. It is a 3D suite where you can make pretty much any game asset you want. I would first recommend following CGMatter’s 2 Blender for Beginners videos
and then looking up tutorials or in the documentation for whatever skills you need to learn.
Unfortunately, I haven’t been able to find a perfect course for creating game assets; Blender Guru’s donut tutorial is the most popular Blender tutorial series but it is not intended for making game assets, and I personally don’t like his unscripted tutorials.
However some of his scripted tutorials are quite good, like his one on how to create archviz. It covers not just the technical skills but also the artistic skills when making 3D architecture, like where to get references and how to use them. Keep in mind that it is designed around Blender and doesn't take into account the technical limitations of real time interactive software like Unity or VRChat. TL;DR don't use absurdly high quality assets for VRChat worlds.
If you want to learn more about coding, I’d recommend this free beginner video course by Brackeys https://youtube.com/playlist?list=PLPV2KyIb3jR4CtEelGPsmPzlvP7ISPYzR. It covers C# (which Unity uses) and you can make Udon scripts with it by using UdonSharp https://github.com/MerlinVR/UdonSharp. I didn’t cover UdonSharp here because this is meant to be beginner friendly and I only wanted to use Unity to keep the tutorial simple.
Never stop learning and adding to your toolset!